Showing posts with label floating colour. Show all posts

Tuesday, 10 December 2019

How to paint holly

What's Christmas without a little holly? This week, we have created a step by step tutorial to help you have a go at painting your own corner arrangement, perfect for our square mountboards.  


For this project, you will need: 

General Supplies 
Paper Towel,
Wet Palette and water pot
White/Black Transfer paper
Tracing Paper
Black practice paper
A4 Black Mount practice board (or similar)
Pen/pencil
Dotting tool (optional) 
Brushes 
No 8 flat or angle luxe label brush for floating colour (you may find the angle brush easier to use) 
Liner brush 

DecoArt Americana Paints and Mediums…. 
I worked with this months colour palette with the exception of Lamp Black. 
Tomato Red (but any bright red will work)
Titanium (Snow) White (again any white will work)
Avocado 
Honey Brown 
Light Buttermilk 
Emperors Gold 

Skills 
First, you will need to transfer your design onto your practice board.  Once you have done that, follow these steps... 


Some DecoArt colours are more transparent than others so, if you are painting on to a dark surface, basecoat your design with white first to create a solid block of colour.  


Depending on the colour of your background and the final look you prefer, you may wish to float a darker colour around the leaves.  Play around with these ideas and discover for yourself which ones you prefer.   If you aren't confident in how to dry brush, check out Carol's video here. To dry brush the Gold, we used a small old round brush so I did not ruin one of my 'good' brushes. 

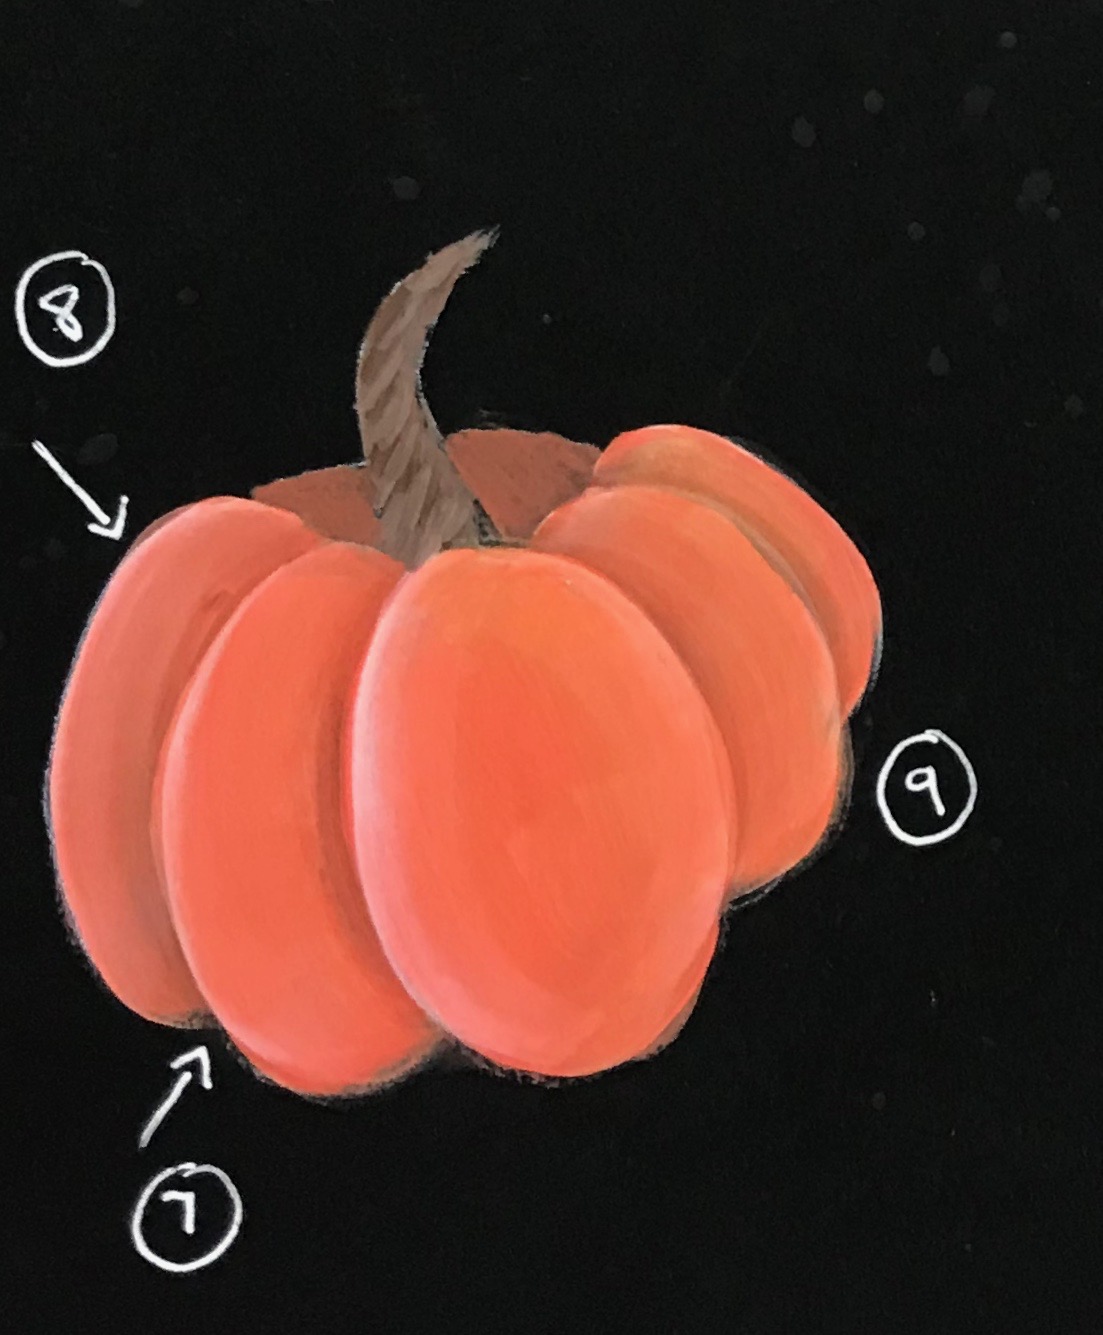
Now for the berries....


Basecoat your berries using a series of C strokes with the Flat or Angle brush.  Again, you will probably find that you need to give them two coats of red before adding the comma strokes.  If you do not feel confident to use the liner brush, create a comma stroke using the small end of the dotting tool.  


Using different techniques creates a range of different looks.  Floating colour around each berry can be tricky but creates a lovely soft shade to the berries.  You can get a similar look by dry brushing with an old round brush (which also gives you a little more control).  

We hope you have as much fun playing with these designs as we have designing this festive bunch of holly. 

Happy Folking xx  


SHARE:

Wednesday, 10 July 2019

How to paint pansies with You Can Folk It

Introducing our luxe label Angle shaders... 

Angle Shaders are used for many of the same brush strokes that can be created with the flat brush and in many cases, it makes the strokes a little easier.  One of the techniques the Angle Shader is useful for is 'floating' colour (the technique taught in our Cupcakes and Babushka kits) as the angle of the brush allows you to blend the paint on the brush nicely and the nice sharp point allows you to get into the awkward areas more easily. 


DecoArt Americana Pansy Lavender
DecoArt Americana Titanium White
DecoArt Americana Lamp Black
DecoArt Americana French Mauve
DecoArt Americana Teal Green 
DecoArt Drying Time Extender 

Brushes & Equipment used:

Pen/Pencil


1. Transfer the design (if you are completing a practice board, transfer 3 pansies to create a step by step reference as above) and use the No 8 Lux Angle Brush to base coat the larger leaves with Teal Green and use the No. 3 round brush. Mix Teal Green with a touch of Titanium White and basecoat the smaller leaves.


2. Add a touch of Lamp Black to the Teal Green and use the liner brush to apply a comma stroke vein on each leaf

3. Next, basecoat the ribbon using French Mauve.

Tip: for each of the above, paint the colours over the outline of the pansy slightly as we want these to look like they are behind the pansy in the finished piece. 


4. Use the No. 10 Lux Angle Shader to 'float' Titanium White around the edged of the larger leaves and the No 8 Angle Shader for the smaller leaves

5. Look at the pattern sheet and note that the floating on the ribbon is where the marks appear.  Float Titanium White along the marked edges (note this is the opposite edges)  Take care to join up where the 'float' meets, this will give the illusion of the twist in the ribbon

Tip: When floating colour, apply thin coats and build up with several coats rather than one heavy coat, this will give you a much better end result.

6. Basecoat the back two petals with Pansy Lavender. Next, add a little white to the lavender and basecoat the next two petals.  Finally, add a touch more white and basecoat the front bottom petal.  Apply a float of Titanium White around each petal on the pansy


7. Use the liner brush & Lamp Black to apply the centre of the pansy - add water to the brush to achieve some nice fine strokes.  Make sure you note the direction of the strokes and make sure you are putting a slight bend in them and they are not straight.  Finish with 2 comma strokes using the liner brush & Yellow Ochre.

8.  Apply dot daisies using Titanium White & French Mauve.

9. To complete the flowers, load the liner brush with Teal Green and 'tip' with Titanium White, 'tap' the end of the brush around the daisies to create filler foliage. 


If you have a go at this tutorial, we would love to see your pansies. Please tag us in social media or email your photos to toni@folkit.co 

Happy Folking! 


SHARE:

Saturday, 6 April 2019

Play with pattern


When I was learning to paint and teaching, one thing I loved was combining different elements to create something different.  Whether you have learned daisies, roses, ribbons or all three, there are numerous ways you can combine them to create something unique.  There were always some elements for me though that pair so well together, I found myself pairing roses and delicate lace time and time again in different ways.

Hand painted gift box decorated with folk art style roses and a lace pattern


This month, for our theme in April we are focusing on pattern and I just couldn't help but look through a few of my old pattern folders and came across this design.

Vintage Roses and lace design created by Carol Sykes from You Can Folk It

Mixing vintage roses, flat brush leaves and lace, it creates a delicate pattern that I will be working with throughout the month. So join me as I play with colour and play with this design to show you how you can create many different looks with just one design.  

If you would like to have a go at painting this design and want to join in and discover all the different looks you can create throughout the month, you can download the design from our Pinterest Folk It pattern board.  

I do hope you will join me on this journey :) 

Love, Carol x 


SHARE:

Monday, 10 December 2018

Christmas Cupcakes in 10 easy steps


What you need: 
Card/envelope/mountboard (or bauble mount board) 
Tracing paper & transfer paper*
Flat Brush, Medium Liner Brush and Dotting tool* 
You Can Folk It Cupcakes painting kit 
DecoArt Americana acrylics in Razzle Berry, Holly Green, Lamp Black and Titanium (Snow) White 
Drying Time extender*

*All included in our Flat Brush Starter Kit


An outline of a cupcake with a snowman sat on the top.

Step 1: transfer our Snowman cupcake pattern to your surface. This will fit perfectly on one of our square mount boards or baubles. 


Painted white silhouette of the a snowman topped cupcake.

Step 2: To help the colours on your final piece pop, base coat the entire area of your design with white using your flat brush.  


White silhouette of a snowman topped cupcake with pencil lines marking out the details


Step 3: Transfer the lines you need back onto the painted area.  


Snowman topped cupcake - with painted areas of red (the cupcake wrapper) and green (for the Snowmans hat and scarf)

 Step 4: Using your flat brush again, base coat the cupcake wrapper in red and the top of the snowman's hat using Green.  Before base coating the rim of the hat and the scarf, add a little white to make it just slightly lighter.


Hand painted snowman topped cupcake with highlighted and shaded areas to make it look 3D

Step 5: Using the Razzle Berry, float colour onto the cupcake to add texture, just as you would in our cupcakes kit.  Don't forget to add rosy cheeks too! 

Step 6: Using white, float colour around the base of his hat to highlight it. 

Handpainted snowman topped cupcake design. The snowman is dressed in a green tartan hat and scarf to compliment the red festive cupcake wrapper.

Step 7: Using your liner brush, add a pattern to his scarf and hat.  Begin with Razzle Berry and Black before adding white lines, edging and tassels. (Don't forget to add a little bobble on his hat too!)   

Step 8: Using the large end of the dotty tool, add his eyes and mouth.  Using the small end, add two dots of white to each eye.  Add his carrot nose using the liner brush (or you can apply it using the dotting tool) 

Handpainted snowman topped cupcake design Christmas card. Thesnowman wears a green tartan hat and scarf and the red cupcake wrapper is decorated with white berries and leaves

Step 9: Float white lines on the cupcake (as shown in our kit) and add berries to the area using the dotting tool. 

Step 10: Apply Crystal Glamour Dust to the design as you paint to create that all important sparkle at winter time.  

Hand painted snowman topped cupcake Christmas card design painted on to a card and mount board bauble shape that can be used as a gift tag

Don't fancy making a card? Why not try adding it to one of our baubles?


SHARE:

Monday, 22 October 2018

Paint your own pumpkin tray - perfect for Halloween


You will need:
You Can Folk It! Brushes & Tools
Medium Liner, Flat Brush, Dotting Tool
DecoArt Americana: Tangelo Orange, Burnt Umber, Warm White, 
Avocado, Bright Yellow
Other: Practice paper, tracing paper, transfer paper

Before painting your project, practice all the elements on the practice paper. (You can find the patterns on our Folk It patterns Pinterest board.)  It's always a good idea to try painting the larger Pumpkin from the practice sheet first before moving onto the smaller ones.


1. Add a touch of Burnt Umber to Tangelo Orange and paint around the stem

2. Add a touch of Burnt Umber to Warm White and paint the stem

3. Add water to Burnt Umber and with this watery mix & your liner brush apply uneven diagonal lines to the stem

4. Add a touch of Tangelo Orange to Warm White and starting at the back paint each section of the Pumpkin using a 'C' stoke. 

5. Apply a second coat of this mix if necessary.  Tangelo Orange is a transparent colour, therefore we are creating a base so that the colour stays vibrant.  If you are painting onto a light coloured surface you can omit this step.

6. Next apply a coat of Tangelo Orange to the front sections.

7. Float Burnt Umber. (This is a technique we teach in our Flat Brush Cupcakes and Babushka kit) Before beginning this step, study the pumpkin below for a moment, bearing the following in mind... The Burnt Umber is going to create a shade, so we are floating the darker colour to any section that is behind another.  

8. Float Warm White on the edges of the Pumpkin that sit in front of another.  By using this technique, we help flat objects take shape. To the eye, dark colours recede so look further away and light colours advance and so appear closer. 


9. Make a wash with your flat brush using plenty of water and Bright Yellow and apply over the whole Pumpkin, see how this has reduced the whiteness of the floated highlights, this is a great way to dull your floated colours if you have just started learning...it also gives the Pumpkin a lovely warm glow.


10. The leaves are created using the wiggle stroke as taught in the Butterflies lesson, a comma stroke using the flat brush and combining the 2 together.  If you have not yet progressed to this level, then use your favourite leaf. 


11. The blossoms are as taught in the Oriental Blossom Lesson.  Use Warm White to paint each of the Petals and apply dots using Burnt Umber & Tangelo Orange.  


Once you are happy with your skills, you can create your final design.  If you wanted to create your own wreath design, you can learn more about how to do that here. To create your wreath, begin by painting the pumpkins.  When painting the stalks, try to paint them in different directions to add variety. 

Next, add your leaves.  Using single leaves and clusters, aim to fill the majority of your circle.  If you do not feel comfortable using the ruffled technique, use whichever technique you do feel comfortable with.  We painted leaves in a few sizes, again to add interest to the design.  

Next, add single blossom flowers around the wreath - don't worry if they overlap areas you have already painted.  Finally, identify any areas that look empty and add dots (using the small end of your dotting tool) and small comma strokes using your liner brush.  

To seal your work, you could use DecoArt wax however, if you have painted a tray as we have done, it is better to opt for a couple of coats of varnish to protect your project.  
SHARE:

Monday, 14 December 2015

How to... paint poinsettia's in 10 easy steps


Even though I've been painting for 20 years, I know that in my life time I won't learn everything there is to know about Folk Art & Decorative Painting. 

The ethos of You Can Folk It! is that in each series we will teach you a different set of skills and once you've completed lessons from each series (there will be 3 in total) you will have a the basic foundation of most skills. This is because just like cooking a recipe, most designs use a little bit of this and a little bit of that.  

Here I will be showing you how to paint this Poinsettia using skills that you've learnt in both Series No. 1 and Series No. 2. 


Step 1: To start with, print the pattern and start by transferring the leaves and petals marked 1 & 2. 

Start by painting the leaves using DecoArt's Americana Acrylic in Avocado

Step 2: Paint the leaves marked 1 using Avocado (from our series 2 paint palette) and the round brush. 

Using comma strokes, paint from the inside to the tip. (Note use your liner brush for the tip of the leaves if you are struggling to get a fine point). 

Once these are dry, use the white transfer to transfer petals marked 2 over the top of your design. 

                Basecoat the first layer of petals with white to prevent your paint looking transparent

Step 3: To paint the petals, because red is a transparent colour (any colour that does not have white added tends to be transparent) we need to paint the petals white first.

By adding red onto a layer of white, you get a beautiful solid colour.
Step 4: Once the white has dried, add a touch of soft black (part of our Series 2 paint palette) to tomato red and paint the petals again.

Paint the next layer of Poinsettia petals with DecoArt's Americana acrylic in warm white and then lamp red

Step 5: Again, once this layer has dried, transfer the petals labelled 3 and repeat these steps with just tomato red. 

Step 6: To paint the centre, add soft black to the tomato red until it is slightly darker than your first layer of petals. Fill the middle using your round brush. 

Float DecoArt's Soft black americana acrylic to create depth to your petals

Step 7: We now need to 'shade' any areas that are behind something else in order to create dimension. As this petal is behind one in front we are going to 'float' soft black to create the shade (I teach you how to use this technique on the DVD's contained in our Series No. 2 Babushka and Cupcake kit) 

A folk art poinsettia ready for the final details

Here I've used the transfer paper to re-transfer the lines so I know which petals are in front of the others. You can see where I have floated the soft black to create the shade.

Highlight the petals to create depth with DecoArt's Americana Acrylic in Cadmium orange

Step 8: Now, to create more depth, we need to highlight the petals that are at the front. I have floated a lighter colour (DecoArt's Americana Cadmium Orange) on the edges of the petals. I have also floated some colour on the very tips of the petals that are behind.  

TIP: One of the most common mistakes to make when creating a highlight using floated colour is to use colours that contain a lot of white. Doing this only works if the colour you are highlighting contains white also.  When highlighting tomato red, we do not have a lighter colour in the series 1 & 2 colours that does not contain white which is why orange was used. 

(NOTE: We stock a wide range of DecoArt Americana colours and you can purchase the DecoArt Matte medium and flat brushes separately if you didn't want to invest in a full Flat Brush Starter kit.) 

Add dots to the centre of your Poinsettia to complete the flower

Step 9: Next, I used the large end of the dotting tool and yellow ochre (from our Series 1 Starter kit) to dot in some large and small dots in the centre. Once dry I placed a smaller soft black dot in the centre of the larger dots. 

Add further highlights to the Poinsettia with another layer of DecoArt Americana acrylic in Cadmium orange

Step 10: Once I'd put the dots on, I felt it needed a bit more 'pow' on the highlights - so I side loaded the round brush with Cadmium orange (as taught in the Series 1 Vintage Rose lesson) and applied it along the edge of the top petals. I then used a toothbrush & soft black to splatter the finished design before adding to the greeting card.

Once you've practiced your poinsettia, try painting it into a mount board square. If you are pleased with the result, you can add it to a greetings card, attach it to a gift bag or note book or use it as a gift tag and you have a little something that will mean just a little more than something you bought from the shop. 

Happy Folking,  

Carol xx 


SHARE:
© You Can Folk It!. All rights reserved.
designed by pipdig