Showing posts with label Series 2. Show all posts

Monday, 10 December 2018

Christmas Cupcakes in 10 easy steps


What you need: 
Card/envelope/mountboard (or bauble mount board) 
Tracing paper & transfer paper*
Flat Brush, Medium Liner Brush and Dotting tool* 
You Can Folk It Cupcakes painting kit 
DecoArt Americana acrylics in Razzle Berry, Holly Green, Lamp Black and Titanium (Snow) White 
Drying Time extender*

*All included in our Flat Brush Starter Kit


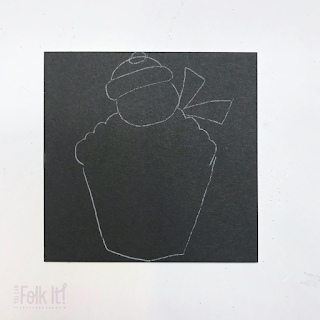
An outline of a cupcake with a snowman sat on the top.

Step 1: transfer our Snowman cupcake pattern to your surface. This will fit perfectly on one of our square mount boards or baubles. 


Painted white silhouette of the a snowman topped cupcake.

Step 2: To help the colours on your final piece pop, base coat the entire area of your design with white using your flat brush.  


White silhouette of a snowman topped cupcake with pencil lines marking out the details


Step 3: Transfer the lines you need back onto the painted area.  


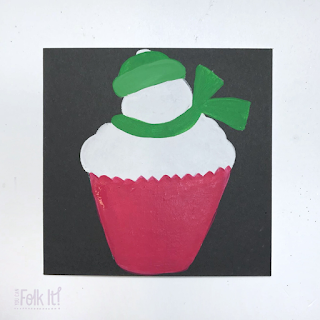
Snowman topped cupcake - with painted areas of red (the cupcake wrapper) and green (for the Snowmans hat and scarf)

 Step 4: Using your flat brush again, base coat the cupcake wrapper in red and the top of the snowman's hat using Green.  Before base coating the rim of the hat and the scarf, add a little white to make it just slightly lighter.


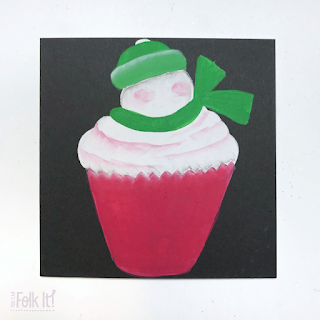
Hand painted snowman topped cupcake with highlighted and shaded areas to make it look 3D

Step 5: Using the Razzle Berry, float colour onto the cupcake to add texture, just as you would in our cupcakes kit.  Don't forget to add rosy cheeks too! 

Step 6: Using white, float colour around the base of his hat to highlight it. 

Handpainted snowman topped cupcake design. The snowman is dressed in a green tartan hat and scarf to compliment the red festive cupcake wrapper.

Step 7: Using your liner brush, add a pattern to his scarf and hat.  Begin with Razzle Berry and Black before adding white lines, edging and tassels. (Don't forget to add a little bobble on his hat too!)   

Step 8: Using the large end of the dotty tool, add his eyes and mouth.  Using the small end, add two dots of white to each eye.  Add his carrot nose using the liner brush (or you can apply it using the dotting tool) 

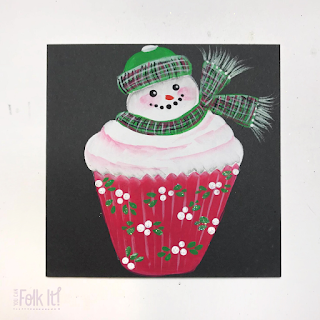
Handpainted snowman topped cupcake design Christmas card. Thesnowman wears a green tartan hat and scarf and the red cupcake wrapper is decorated with white berries and leaves

Step 9: Float white lines on the cupcake (as shown in our kit) and add berries to the area using the dotting tool. 

Step 10: Apply Crystal Glamour Dust to the design as you paint to create that all important sparkle at winter time.  

Hand painted snowman topped cupcake Christmas card design painted on to a card and mount board bauble shape that can be used as a gift tag

Don't fancy making a card? Why not try adding it to one of our baubles?


SHARE:

Thursday, 8 November 2018

Paint your own folky Polar Bear

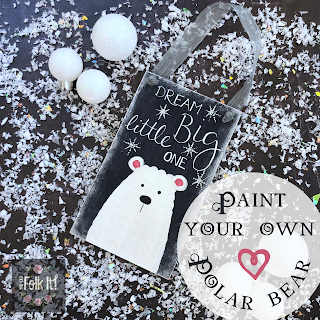
A dark hand painted plaque painted with a polar bear and snowflakes. The handwritten quote on the plaque says 'Dream Big little one' and is threaded with silver ribbon to hang on a door.


Following the success of our Folky Fox recently, we have gone from Autumn to Winter with this brand new tutorial.  

To complete this level 2 tutorial, you will need: 

DecoArt Chalky Finish paint in Honor 
Sandpaper, tracing paper* and transfer paper* 
Sponge*
Dotting tool*, Flat Brush* & Liner brush*
DecoArt Titanium (Snow) white* (or any white you have), Lamp Black and Antique Rose* 
DecoArt Dazzling Metallics in Shimmering Silver 
Sakura Gelly Roll pen in White 
DecoArt Metallic lustre in Silver Spark

*All included in our Flat Brush Starter kit 

Practice paper, paintbrushes, DecoArt Metallic Lustre and the polar bear traced pattern from You Can Folk It

 Preparing your plaque: 

 Using the sponge, base coat the plaque using the Honor chalky finish paint.  You can speed this process up with a hair dryer if you like. 
After applying a couple of coats, lightly sand the MDF plaque before transferring your design on to the surface.  

A photo showing DecoArt Americana Acrylic in Warm white and practice rows of C strokes painted using the Flat brush in the picture


Practicing your brushstrokes: 

For the Polar Bear you will need to practice the C stroke taught in the Rosebuds kit.  When you are confident painting single ones, practice painting each one side by side in rows.  


Painting your polar bear:

Using the warm white and flat brush, base coat the whole of the polar bear.  Using the Antique Rose, paint the inner part of the bears ears.  When this is dry, paint rows of c strokes over the whole of the bears body starting at the top and working down, leave to dry. Take care to try to overlap the rows a little to create your fur pattern.  

Next, using your liner brush and the black paint, add his eyes and nose. 

A photo of the completed dark blue rectangular wooden plaque painted with a polar bear and decorated with snowflakes. The phrase 'Dream Big Little One' is hand written across the top

Final touches: 

Using the silver paint and Dotting tool, add dotty snowflakes on the plaque. Leave to dry.  If you wish to add the lettering, use the Gelly Roll pen (or a fine Uni Posca paint pen) to copy over the transferred lettering.  You may need to keep wiping the tip of the pen with a tissue to make sure the tip does not get clogged with paint.  Finally, using the sponge, add the Metallic lustre around the edges of the plaque and add some ribbon to hang.  

If you did not wish to add the writing we have provided why not stamp a name on to personalise or just add more dotty snowflakes.  

Happy Folking x 

SHARE:

Thursday, 17 August 2017

Fabric painting with You Can Folk It

When I first learnt Folk Art, I admit I was so excited. Not only had I found a form of painting that I could learn, that required no artistic ability (very appealing given that I believed that I had none) and one that I could see had so much potential.  Suddenly I began dreaming of all the projects I was going to create; from the candle holders and projects I lovingly created and they lovingly accepted...though I'm not sure how long they treasured them for ;)

In all the years I have been painting, I have painted small projects and large pieces of furniture. I've painted entire walls, items of clothing and one thing I love is painting on fabric.  From leather jackets to simple tote bags, nothing is safe.  Most recently I have been painting our shirts and a few pieces for my son's company, Drop Dead Clothing.

Carol Sykes from You Can Folk It has used Folk Art techniques to paint these gorgeous clothes not just for her company but for her son's company Drop Dead Clothing

When we were planning to expand the projects our customers can create with our kits, I knew I wanted to focus on how our painting kits and the designs can be added to fabric with a little help with DecoArt Fabric medium.

So, in preparation for the show on the 19th August, we have been having great fun at Folky HQ creating a range of fabric projects. Using our Series 2 kits - beautiful Oriental blossom, pretty rosebuds, topiary and lovely lavender we have been decorating everything from cards to cushions, oven gloves to hanging decorations.  With a touch of DecoArt's Fabric medium and your acrylics, no fabric is safe from your paintbrush.

We decorated this plain unloved cushion using DecoArt Americana acrylics, fabric medium and the Series 2 Oriental blossom design from You Can Folk It #sakura

Blossom covered cushions....

For a twist on the traditional greetings cards, use fabric to paint your favourite Folk It design.

We love these fabric greetings cards (get your own fabric hearts as part of our Fabric painting bundle). 

Decorated with our Series 2 Starter kit dotty designs, whether plain or filled with Lavender create a cute little gift.

Whether they are plain decorations or lavender filled hearts, they always look better with a touch of Folk Art don't they?! 

Decorated using Folk Art Rosebuds, this plain set of oven gloves have been transformed in to a beautiful accessory for the kitchen.

Transform a plain old set of oven gloves and add your own Folk Art design.  Change the colour to match your kitchen decor.  

Once you learn the techniques in each kit, with a bit of practice and the right medium there is nothing you cannot transform with a touch of Folk Art.  We hope we have inspired you and we look forward to seeing your future fabric painting. 

Keep on Folking, 

Carol x 


SHARE:

Wednesday, 21 June 2017

Awesome DIY Image Transfer projects


There is no better feeling than creating something you love.  We've been getting creative at Folky HQ updating some old props and creating some fantastic projects ready for our shows.  The beauty of image transfer is that you have a wide range of choice over what you would like to add to your project.  Whether you want to add quotes and sentiments, family photos, bold typography or vintage style images, the choice is yours.  

We used our Series 2 Design book to add vintage style transfers to this plain freestanding piece of home decor to create a quirky centrepiece.

We absolutely love plain decorations like this popular free standing Love decoration because they have so much potential for creating something unique.  Using a variety of vintage inspired images from our Series 2 Design book, we copied the images using a laser jet printer and applied them randomly around this piece to create this fun project. 

Combine transfers and washes of colour to make the designs stand out. Turn unloved items into treasures.

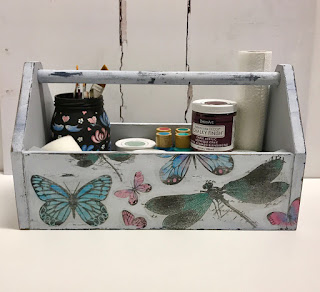
Transfers do not have to stay black and white though.  With this up cycled tool caddy, we applied the butterflies and dragonflies before adding splashes of colour.  To add colour to your project, add water to your acrylic to thin it enough to allow the image to show through and add it to the areas you want to.  


One of our favourite Chalky Finish colours is this dreamy Vintage so when someone brought a sad looking wooden mirror in to the office, we just had to give it a make over.  Using the 'Angels' quote from our Design book, we combined it with some hand painted angels (from our Series 1 Folky Christmas kit) and stencils. It's gone from unloved trash to treasure :) 

Vintage transfer from the Design book paired with You Can Folk It Oriental blossom. Kits available from www.folkit.co

This adjustable stool started life in Ikea; plain, black and practical, it was begging to be decorated.  Base coating it using white chalky finish, we added our gorgeous Vintage transfer.  To soften the look, we played around with our Oriental Blossom flowers.  Diverging from the original design, we paired them with leaves we teach you how to paint from our Rosebuds kit.  By mixing and matching brushstrokes in this way, we were able to create a unique pattern to compliment the transfer and also work with the shape of the stool.   

We were able to create such beautiful projects using our Series 2 Starter kit. When we were creating the second series of painting kits, we wanted to add something extra.  Image transfer was something we loved because of its versatility. Whether you wish to add vintage style images, bold typography or personal photos to your project, it is possible with this technique.

So, we packed our Starter kit with DecoArt Matte medium, sentiments perfectly designed for each project and a DVD full of instructions to guide you through the process.


Each project you see here used the contents of this kit along with our extra Design book which provides a great collection of images in addition to the sentiments we provide in each of our kits.  To find out more about these resources, check out our Series 2 kits here

For more inspiration and ideas for using the image transfer technique, you can also check out our Pinterest board.  Don't forget, we would love to see your creations.  Share them with us on our Social media accounts or tag us #youcanfolkit 

Happy Folking, 

The You Can Folk It team x 


SaveSaveSaveSave
SHARE:

Friday, 19 May 2017

6 creative DIY planters for your summer garden


Whether you have a home full of plants and flowers or a small outdoor space with only room for a few small planters, adding colour to your home is so worthwhile after a dark and grey winter.  We have put together 6 creative ideas to help inspire you. Whether you wish to fill your planters with flowers, succulents or herbs, create a display that will make you smile. 

DecoArt chalky finish paint is fantastic for base coating projects as the surface needs no preparation and there are a wide variety of colours - even more once you begin mixing.

For each of our pots, we chose to base coat them with DecoArt Chalky Finish paint.  For some we used the colour straight from the pot, for others, we mixed our own custom colour for our pastel theme. 


Once the pots were dry, we used the paints from our Series 1 and Series 2 Starter kits to add each of the designs from our add on ranges.  At Folk It, we begin by teaching you dotty designs from our Starter kits before we move on to teaching you brushstrokes to create the designs (like our bluebirds above) in our 'add on' lessons.  The beauty of Folk Art is that it is a skill based art, a skill anyone can learn just as anyone can learn to write.  With patience and practice, each and every one of us can paint these brushstrokes whether we believe we are creative or not.

Our Series 1 pots 

Using DecoArt Chalky Finish and You Can Folk It Series 1 Starter and Daisy details kit, we created this beautiful planter perfect for any home.

Our gorgeous Daisy pot was first base coated using a mix of DecoArt chalky finish in New Life and Everlasting, both from our Colonial colour set.  Once dry, we painted our Daisies on using the templates and techniques from our Daisy Details kit and art supplies from the Starter kit.  Add the stalks and leaves using Hauser Light Green and the liner brush.

Whether you use this pretty pot to hold a beautiful gardening gift or your favourite plant, it will be loved. Decorated using DecoArt Chalky Finish and bluebirds from You Can Folk It's Series 1 painting kits.

To create our next pot, we used the beautiful yellow shade 'Delicate' from DecoArt.  To decorate our sunny Bluebirds planter, we first added a border of dot daisies and hearts from our Series 1 Starter kit using Baby blue and Warm White (full instructions are included in both the instructional booklet and the DVD).  Next, using the comma strokes taught in our add on kits, we painted two bluebirds either side of the pot and added a simple heart between them.

Basecoated in beautiful blue and decorated using traditional Folk Art techniques taught in the Delicate lace painting kit from You Can Folk It

This pot has been getting so much love across our Social media channels! This pretty planter was first painted in 'Serene', a beautiful place blue from the chalky finish range.  Using our liner brush and the techniques we teach in our Delicate Lace kit, we added detail around the top of the pot because sometimes simple is the best.

Our Series 2 planters 

Update any home or garden with this beautiful blossom covered pot decorated using the step by step painting kits from You Can Folk It

It is no secret that our favourite colour within the chalky finish range is 'Vintage' so of course it became the base coat for our gorgeous Oriental Blossom pot. Using the templates and techniques from this add on kit, we were able to paint these pretty flowers on to both sides of the pot, perfect for Spring or Summer don't you think?

Learn how to paint these beautiful butterflies using the step by step painting kits from You Can Folk It

We created this warm, pastel orange by mixing Everlasting with a smidgen of Delicate and dash of Smitten.  One helpful tip when mixing your colours is to make a note of the ratios you use, paint half a lollypop stick with the shade and make a note of the paints you've used.  You may only use it once but just in case you wish to use it again, you will then build up a colour reference tool you can refer to again and again.  We added two fluttering butterflies here using white and the fabulous Plum colour provided in the Series 2 Starter kit.  

Learn how to paint pretty rosebuds using the step by step painting kits from You Can Folk It

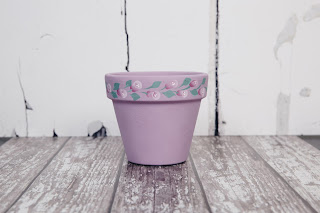
Another custom colour, we created this by mixing the dramatic 'Victorian' with 'Everlasting' both from our Heritage colour collection.    To compliment this beautiful shade, we blended our Plum and Titanium white from the Series 2 Starter kit to create the rosebuds around the top of the planter.  For the leaves we mixed a pale green using the Avocado and Titanium white, again from the Starter kit.  

To complete the pots, we finished with two coats of DecoArt Ultra Matte Varnish to protect these beautiful planters.  We chose this varnish specifically, not only because it is water based but because it maintains the matte look of the chalky finish paint we used.  

There you go. Six beautiful ideas to inspire your summer garden.  The beauty of these designs and our kits is that once you have learnt the techniques we teach you in each one, you can mix and match the designs to create a unique project that you love.  Which planter are you itching to recreate? We'd love to hear your comments and thoughts.  As always if you have any questions about these projects we are happy to help.  

Happy Folking x 


SHARE:

Monday, 6 June 2016

How to create unique storage that everyone will admire


What you will need: 

Vintage suitcase (or similar)  


This month, we were featured in the fantastic Reloved magazine. If you haven't come across this publication, it is the go to magazine for the latest up-cycling inspiration. Since it went on sale, we have had so many enquiries about out gorgeous dragonfly and rosebuds up-cycled suitcase, we have put together this step-by-step how to for you to follow. 


1. As with our Vintage Rose and Oriental Blossom cases, begin by painting the whole case (inc. the metal details and handle) in DecoArt Chalky Finish paint (this time in Vintage)


2. Next, use a brush and apply DecoArt Metallic Lustre in Iced Espresso to the details (corners, locks handles etc) The reason for this is to give the wax something to adhere to. Leave the wax to dry completely. Once it is dry, buff with a dry, lint free cloth to give you the fantastic metallic look.


3. Next, copy your chosen designs using a Laserjet printer. Laser printed images do give the best results.  It is possible to use an ink jet printer but the ink may smudge as you seal the image. When you are ready, follow Carol's instructions on our Series 2 DVD's to help you prepare your surface and transfer the images. The stamps, dragonfly, hotel images as well as the ones we transferred on to the sides are all from our Series 2 Design book and have already been reversed for you.


4.  Once you have transferred the images, paint rosebuds from our Series 2 design around the 'Hotel Royal' transfer. There is no right or wrong way to do this; you can copy the design Carol has painted or paint your own pattern. Again, our add on kits contain DVD & full colour instruction booklet, complete with templates to trace so you can learn, step-by-step how to paint these beautiful rosebuds. 


5. Next, add designs to co-ordinate with the transfers you have added around the sides. On our suitcase, we added more rosebuds on the sides. Where the 'Angels' transfer had been added, Carol added dot roses using DecoArt Americana Acrylics in Plum, Titanium white and Avocado from our Series 2 Starter kit. Next, Carol added angels from our Series 1 Christmas kit using the round brush from the Series 1 Starter kit. Next, butterflies were painted on the top of the case near the handle.

NOTE: the design you create on your suitcase will depend on your own preferences and the kits you own so get creative and have fun, for example, you could add more rosebuds and a different quote if you didn't have the kit or didn't want to invest in both Series.

6. Leave to dry. After a couple of days when the paint has cured, using DecoArt's Round brush, apply a layer of DecoArt Creme wax (we used Clear Creme Wax) to protect it. Leave to dry and buff with a dry, lint free cloth to give it a soft sheen 

All that's left for you to do now is display your case for others to admire. Whether you use it to hold towels in your bathroom or as alternative storage solutions in your living room, it will be admired by all who see it. Why not find suitcases of different sizes and stack them to create a feature in your home? 

How would you paint yours? What would you use it for? We'd love to hear your ideas. 

Happy Folking, 


The You Can Folk It team x 
SaveSaveSaveSaveSaveSave
SaveSaveSaveSaveSaveSaveSaveSaveSaveSaveSaveSaveSaveSave
SHARE:
© You Can Folk It!. All rights reserved.
designed by pipdig