Showing posts with label painting journal. Show all posts

Tuesday, 3 July 2018

10 painting projects to inspire you


Well another month has flown by and so has another monthly theme for our #funwithfolkit challenge.  When we posted our first Flora and Fauna themed project, we never expected it would be as popular as it was, getting thousands of views within the first week of being posted.  If you haven't seen it yet, why not pop over to the blog post here for a look. 

It seems that there are two camps for these challenges, those that love incorporating the themes in to their Folk It designs and those that run with it to create their own unique ideas.  However you interpret them, we love them all.  Here we have rounded up our favourites for the month of June.  


Inspired by Cath Kidston, we love Jackys version - complete with You Can Folk It's Vintage Roses and ladybirds

Jacky from Chloe and Kato recently rediscovered her painting mojo and created this beautiful spray of daisies and roses - inspired by her favourite mug! We have to say though, it is definitely cuter with a few ladybugs. 


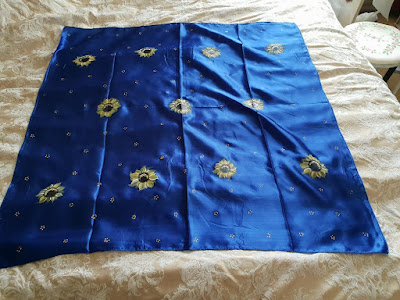
Fabric painting from Jackie - such a beautiful scarf and our Sunflower design looks great against the blue fabric

Painting on fabric takes practice, painting on silk is a labour of love but Jackie from Jacbnimble Crafts has done brilliantly creating this scarf for her friend.  

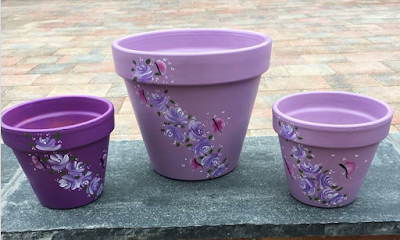
Jaxs used our Butterflies and Vintage Rose painting kits to decorate these pretty pots #giftidea #folkart

Jaxs from Vintage Crafts by Jax has created these gorgeous purple plant pots using our Butterfly and Vintage Rose kits.   By using a limited colour palette she has created a beautiful set of gifts that really stand out.  

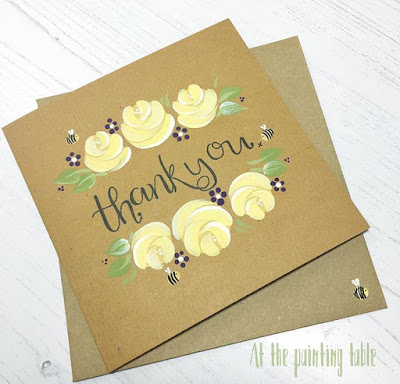
Beautiful Vintage roses and cute bees! We love it!

The lovely Folker from At the Painting Table has got creative to add the cutest bees to these delightful yellow roses - the perfect painting project for summer


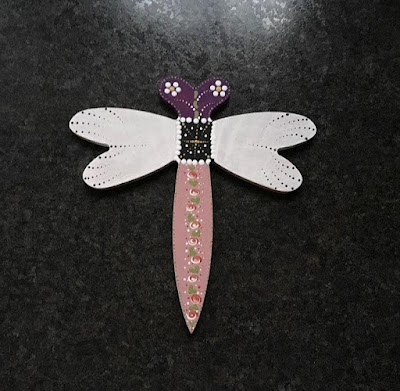
Painted dragonfly - decorated using You Can Folk It's Round Brush Starter kit

Vanessa has found this lovely dragonfly shape to decorate for the Flora and Fauna theme.  Dot daisies, dot roses and other dot patterns, it's got it all!

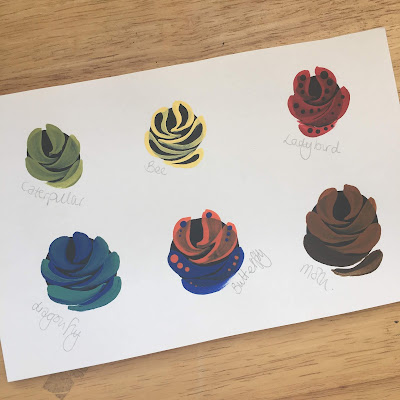
Vintage roses in a variety of fun colours inspired by wildlife - such a unique idea.

Stepping away from shapes and projects, Helen has used the Flora and Fauna theme to inspire her colour choices in her practice pages...what a great idea.  

Sandra from You Can Folk It designed this dragonfly project for our #funwithfolkit painting challenge.  She combined our Delicate lace design and dot patterns to complete the project.

Sandra felt inspired after creating our Bee tutorial to create a different project.  Featuring a unique Dragonfly design on the lid, she added a few dot daisies and vintage lace to the box to complete it. 

This wooden duck from Nazlie is just stunning. Decorated using our Vintage Rose painting kit

These ducks are so popular at the minute with crafters.  Using a French blue base coat and our Vintage Rose kit, Nazlie from Cositas Bonitas has turned this into a real centrepiece. 

Freestanding wooden decorations are great to decorate with Folk It painting kits available from www.folkit.co

Who would have thought a Folked up owl would look so pretty! Helen from Mindful Crafts used our popular Round Brush Starter kit to decorate this owl beautifully.

Vikki fell in love with her You Can Folk It Starter Kit and started getting creative - she creates such great designs with her dotting tool.

Vikki discovered our stand and our kits at the Handmade Fair and she's been hooked ever since - we love the original and unique designs she has been creating with her dotting tool and this Dragonfly design worked perfectly for June's theme! 

So as we head in to July, this month in our #funwithfolkit painting challenge, we are concentrating on wreaths.  Whether they are dotty or festive, floral or not, we can't wait to see them all! 

Happy Folking! 


SHARE:

Tuesday, 5 January 2016

Painting with a purpose


I, like many of you out there, am not the kind of person who can sit down and produce something from nothing. I do not feel like I have much of an imagination so, whilst I love doodling and I love to paint, I cannot sit down with nothing in front of me to inspire me.  I don't need to have it all planned out but I have found that I am a person who needs something; a theme, a colour palette or a picture/object to inspire me. While it may not be much, just having something to start with really helps me.

Carol was inspired to doodle this journal page after finding this old ribbon in her office. 

For a while now, I have been spending time each week doodling with my paintbrush. I have kept a painting journal for a number of years (oh how I wish I had kept one from the beginning to see how my brushstrokes had improved!) and it had been neglected for a few months as the paperwork and running of the business side of You can Folk It demanded my attention.

Needing to relax and to paint again and to help inspire other Folkers, I have begun "Painting with a purpose." By this I mean painting our designs but in new and different ways. Each Thursday on our Facebook page, I post these Folky Doodles to inspire others and to remind myself not to forget my own love of painting! Here is a round up of what I have been up to so far...

1. Experiment with colour.

In all of our kits, we have given you patterns, paint palettes and images to get you started but that is only the beginning of your journey. At You Can Folk It! we love colour and the different looks it can help create. Here, I took the wreath design and painted it using different colours from the Series 2 Starter kit.

Painting one pattern in different colours can be a great way to personalise your handmade gifts and cards.

The red one would be a gorgeous alternative to a Christmas wreath, the yellow one would be perfect for Easter cards. Why not add one to a Mothers day card using their favourite colour?

2. Arrange your designs in different shapes.

Our designs are created to fit onto our mount board squares, hanging hearts (Series 1 kits) or plaques (our Series 2 kits). However, once you have built your confidence, you can play with arrangements. Why not create a flower wreath, a corner design perfect for embellishing an envelope or a simple line?

Here, I painted circles and when dry, I added the flowers from our Bluebirds kit before painting commas strokes and Vintage Rose leaves. 

During my doodles, I enjoyed creating different designs and if you are not confident enough (yet) to make your own, I have added printable designs to our Pinterest board.

3. Combine designs


There is a joy in painting the same designs over and over again and being a skill based art, the beauty of practice like this is that you will reach a point where your hands move almost without thinking to create the perfect brushstroke (honestly!). There are times though when we want to mix things up and create something new.

During one doodle day, I sat down with the intention of combining elements from different kits. For our Daisy details kit, the leaves featured in the design are plain comma strokes. The daisy pattern is so pretty, I wondered what it would look like with the more detailed leaf featured in our Vintage Rose kit. The great thing about these leaves is that they give the pattern more structure and I was able to turn three flowers into a pretty wreath.

Our kits are fantastic on their own and are so versatile just by changing colour alone. This exercise however, has reinforced to me once again that you can create any design you wish using the building blocks each kit provides. Even after 20 years, it is nice to be reminded that playing with these building blocks can create something so unique and eye-catching.

Happy Folking,

Love, Carol xx
SHARE:

Sunday, 19 July 2015

You can Folk It! | Using Weathered Wood Crackle Finish

DecoArt Weathered wood and Folk It's Vintage Roses was used to create this beautiful Folk Art painted art journal.
Hey! We're kicking off our weekly You Can Folk It! tutorials with this weathered wood tutorial. DecoArt Weathered Wood Crackle Medium is one of the easiest crackle finishes to use! Today I'm going to show you just how easy it is to create a project that looks 100 years old…  

YOU WILL NEED

 Blank Journal 
DecoArt Weathered Wood Crackle Finish
2 DecoArt Americana Paints (Colour optional)
Brush and sponge for paint/medium application
Sponge
Posca Paint Pen

To use the DecoArt Weathered Wood Crackle Finish you need 2 colours of DecoArt Americana Paints. You can use 2 colours that are at the opposite end of the tonal scale - like I have here Yellow Ochre being light and Black being the darkest tone possible. Another option is to use two similar colours, each option will create a completely different effect.
The Weathered Wood Crackle Medium is called a 'sandwich' crackle, this is because the medium is sandwiched between 2 different colours of paints. How you apply the top coat determines how the crackle will look - if you apply the top coat with a brush it will look very different to if you apply it with a sponge.
This medium is great for creating an aged crackle effect to your painted project.  Add your Folk Art painting on top of the distressed effect
CRACKLE EFFECT 

1. Start with a base colour, here I have used 'Yellow Ochre'. You can use any colour you like for the base coat - including the DecoArt Americana Acrylic Metallic Paints (Please note you cannot use the Metallic Paints for the top coat as these do not crack!)


2. Let this dry and then apply an even coat of the DecoArt Weathered Wood Crackle Medium. You can apply it with a brush or a sponge. Allow this to dry until you can touch it without your fingers sticking to the surface, this will take around 30 mins.


3. How you apply the top coat of colour will alter the way the crackle finish looks. (We go into a bit more depth on tailoring your crackle finish here.) We're applying 'Lamp Black' as our top coat, refer to the images above to see the effects of applying it differently….


BRUSH APPLICATION 
(Photograph 2)


Using a brush gives a linear pattern, if the brush strokes go vertical or horizontal then the crackle pattern will follow the same motion. Sometimes this effect is desirable but if you are working on a chest of drawers or a wardrobe, then it becomes much more important as to how you want your finished look to appear. 

Folky Tip: Something else that will effect how the crackle looks is how 'thick' you apply the paint. Where the cracks are larger is where the paint is thicker - the finer cracks is where the paint is thinner.


SPONGE APPLICATION 

(Photograph 3)

This time I have applied the top coat of paint with a sponge. Can you see how the cracks are more 'random' there are no straight lines going vertically up and down the square?

One very important folky tip, whether you are applying the top coat with a sponge or a brush is...

Once you apply the top coat of paint it will 're-activate' the crackle medium and so you must only go over the crackle medium once with the top coat. If you apply the top coat and then go back over with the brush/sponge then you will find that you remove the crackle and the layer of paint that you applied, so the rule of thumb is once you apply the top coat LEAVE IT - DO NOT GO BACK OVER IT!


Applying DecoArt Weathered Wood in different ways can create different crackle patterns

 In the first photograph above, I didn't put the crackle medium all over the square. For some projects, especially those where you wish to add areas of painting such as clusters of Vintage roses, you might just want to apply crackle in certain areas - this often creates much more interest to your project. Just apply crackle medium where you want the cracks and apply the top coat as normal. 


In the second photograph above,  I flipped around the colours so 'Lamp Black' as a base coat and 'Yellow Ochre' as a top coat. This is the best thing about this effect, two colours can give you so many options! To finish it off nicely I've added some DecoArt Metallic Lustre 'Iced Espresso' to the edges to create an antique effect. If you haven't yet tried DecoArt Inc. Metallic Lustre then be prepared to fall in love! Click on the pictures to see which colours I've used - but beware it's like buying the Glamour Dust - everything in sight will become metallic


In the third and final photograph above, I've gone back to our original colour choices but added DecoArt's Metallic Lustre in 'Gold Rush' to the edges. Metallic Lustre resembles a cream eyeshadow, you can just apply a little with your finger or avoid getting dirty with a soft cloth or dry stiff brush. 


Vintage roses, folk art, canal art, You Can Folk It, painting, comma stroke

ADDING DECORATION


Now to add a little decoration to finish off your journal, I decided to go with some gorgeous pink roses but allow your imagination to thrive here, you can literally add anything. 

Always, always play and try out different colours and effects and remember to put them in your journal. My gosh how many different options do we have when we're painting! It's almost mind boggling - but the Folk It! Team can assure you from our experience, playing and experimenting is not only very, very relaxing and theraputic - but you won't appreciate at the time just how much it teaches you, but on hindsight (oh how we are all so much wiser on hindsight) you realise it's the playing and the mistakes where you learn so much! So don't try and get everything right first time, just play, make massive big mistakes and most importantly just enjoy - it's very important. 


Folky Tip: Don't forget the details! I've added a tiny bit of Metallic Lustre to the metal buttons. Use DecoArt Paint Adhesion Medium first, then apply the 'Lamp Black' paint followed by the Lustre.


Decorated using Folk It's Vintage rose painting kit which teaches traditional folk art techniques
 Experiment with new products and make time to have fun. Whether you like what you create or not, no project or experiment is ever wasted, you are just preparing for your next project. Here at Folk It! we love to see your creations so if you give this tutorial a go be sure to share it and tag us using the hashtag #youcanfolkit
Have a lovely week, 
Carol x
SHARE:
© You Can Folk It!. All rights reserved.
designed by pipdig