Showing posts with label Multi purpose sealer. Show all posts

Friday, 23 August 2019

Reduce, Reuse and upcycle

Sometimes you want something to solve a problem and it can be so easy to nip to the shop and buy something that will suit.  Sometimes you get exactly what you want, other times you have to compromise.  Today however, with the landfills of the world bursting at the seams, we have a responsibility to think outside of the box, to reuse what we already have, to make do and to upcycle.   

For a while now, I have been buying nuts and other snacks for when I'm in the office. I love these for keeping hunger at bay but felt increasingly uncomfortable with the single use plastic they came in.  I wanted to buy a small pot to house my snacks so I could bulk buy or refill my stash at our local zero waste shop so, instead of buying one, I got creative. 


Recently trying these John West snacks, I had washed them and was going to recycle them but I suddenly thought that these were a perfect solution.  True, I could have just used them as they were but where's the fun in that?! 

John West Salmon tin up cycled using You Can Folk It painting kits

Here's how I upcycled them... 

Materials used: 

DecoArt Matte Varnish
DecoArt Americana - Antique Rose, Desert Turquoise, Titanium white, Avocado, Coral Shell 

I first mixed equal parts Multi Purpose Sealer with the Americana paint.  I could have chosen to basecoat the pots with Chalky Finish paint which does not require any preparation but after using Americana Acrylic to paint items in our office kitchen, I was reminded just how creamy and wonderful this paint is on large surfaces.  

I painted the sides and lid (excluding the plastic rim as painting this would make the pot less durable. I chose the colours to match the rim and they worked perfectly! 

John West Salmon tin up cycled using You Can Folk It painting kits

Once dry, I added the design - I opted for Oriental Blossom and Rosebuds but any of our designs would look great on them :) 

Once these were dry, although the Multi Purpose Sealer makes the paint weatherproof and waterproof, I added a couple of coats of Matte varnish as these will spend a lot of time travelling in my handbag.  

I have now left the pots to cure for a week or so before I put them to good use.  It feels amazing to have been able to create something from nothing, to save useable items from landfill and get creative.  

What have you saved from landfill recently? 

Love Carol x 


SHARE:

Monday, 19 March 2018

How to paint on to soap


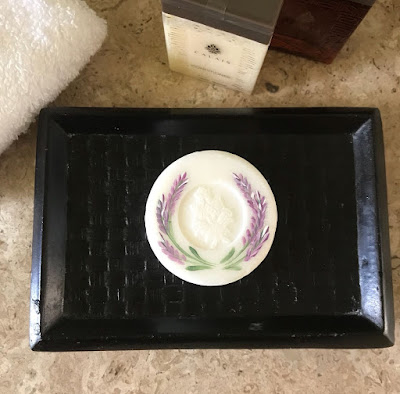
Painting on to soap, decorative painting, folk art, painting project. butterfly, lavender

I first learned to paint onto soap years ago when I first discovered Folk Art. I had seen decorated soap before but always thought it was something other people did, not something as easily achievable as it is.  

Sometimes, when you are learning to paint, you want to try something different, sometimes you wish to give a unique gift...the great thing is this project ticks both boxes.  I was recently on holiday in Mexico and their complimentary soaps were so lovely, I just couldn't resist painting them! 

For this project you will need: 

A bar of soap of your choice 
Paint Adhesion Medium or Multi Purpose Sealer 
The design of your choice (I chose Butterflies and the Lavender design taught in our Round Brush Course
For these designs I used the No3 Round Brush, Liner brush and Flat brush from both of our Starter Kits 
DecoArt Americana Acrylic (I used Blue Violet, Warm White, Plum, Lamp Black and Hauser light Green)

Painting on to soap, decorative painting, folk art, painting project. butterfly

Step 1: Begin by applying a coat of Sealer (or Paint Adhesion Medium) to the area you wish to add your design to.

Step 2: Once the sealer is dry (you can speed the process with a hair dryer if you wish), paint your chosen design. With both of the soaps, I tried to choose designs that worked with the shape/detail already on the soaps. Leave the design to dry.

Step 3: Finish by painting 3 more thin layers over your design, drying with a hairdryer each time to help the drying process along and dry each layer.

Step 4: Leave to dry for a couple of days for the paint and sealer to cure (dry and harden completely).  The layers of sealer creates something similar to a transfer on the soap.  Once it has been allowed to cure, this means you can use the soap as you would a normal bar of soap and the design will remain firmly in place.

Painting on to soap, decorative painting, folk art, painting project. lavender


I hope you have fun with this project.

Happy Folking,

Carol x
SHARE:

Wednesday, 8 March 2017

How to create storage that gets noticed


Making something out of nothing can feel so satisfying.  We are in the process of relocating our office at Folky HQ and we are rediscovering old boxes, bags and jars that we squirrelled away to paint another day.  As we need more storage in the office we thought we would get to transforming them and with Mother's Day later this month in the UK, we thought that there was no time like the present to share a fantastic project that can be used on any old glass jar or bottle.  The fantastic thing about projects like these is that if you make a mistake or you aren't 100% happy with your finished jar, all you have lost is an old jar.  


What you will need: 

An old jar or bottle
1:1 solution of Vinegar and water
A lint free cloth  
DecoArt Multi Purpose Sealer


Before you start to basecoat the jar, you need to ensure the surface is absolutely clean. Although it is tempting to miss this step out, it really does guarantee you create the best finish. Use a 1:1 solution of vinegar and water to wipe down your glass. We have a lot of natural oils on our fingers that can ruin our finished piece so be careful not to handle the glass after you have cleaned it. 

NOTE: The ultimate grease remover is pure alcohol called Isopropyl. It is worth investing in some if you wish to paint a lot of glass and can be bought from Pharmacies. 

We could have chosen DecoArt Chalky Finish to basecoat our jar which would not require any Paint Adhesion medium to adhere to the glass.  For this project however, we used paints straight from our Series 1 Starter kit, including the Lamp Black to create a bold background for a striking project. To prevent the paint being scratched, add DecoArt Paint Adhesion Medium (*this has since been discontinued.  If you haven't got any,  please replace with DecoArt Multi Purpose Sealer which does the same job in the same way) to your Lamp Black (1:1 - you will not lose quality in colour or consistency) and using the sponge from our Starter kit, paint directly on to the plain glass. 

Once the paint has dried, using your traced pattern and transfer paper, transfer your design guide onto your surface - (don't forget any lids you may have if you wish to keep it). 

Begin to paint your design on to the jar.  You may wish to speed up the drying process with a hair dryer to prevent unfortunate smudges.  We painted our Bluebirds design using the paints provided in the Series 1 Starter kit. The instruction booklet and DVD from the Bluebirds add on kit takes you through, step by step, which colours to mix and how to tip your paintbrush to paint the two tone bluebirds.  

Once you have completed your design, sit back and admire your project and wait for the paint to cure.  Once your paint has cured, fill with pens and rulers, knives and forks at the dining table, flowers or indeed make up brushes as we have done here.  


We are big believers in documenting your painting journey to allow you to look back and enjoy seeing how far you've come since you first fell in love with Folk It.  So... if you have created this project for a loved one or if you're not 100% happy with it and do not wish to keep it, why not take a photo of it and add it to your painting journal to remind yourself of your creations.  

Things to remember.....


All paint needs to cure. A cured paint will be solid throughout, not just dry to the touch. Acrylics often feel dry a few minutes after being painted but in order to cure, it usually needs a couple of weeks. Factors such as humidity, number of coats and thickness of paint will also influence this time. A slick surface will mean paint is easily scratched off after a couple of days but becomes more robust after a couple of weeks.

Always remember, your painted objects are like a car. Scratch a car with a key and paint will come away. Similarly, if your object is scratched with some force, because it does not have that 'key', some paint will be removed, regardless of the paint used.  


SHARE:

Thursday, 8 October 2015

How to create beautiful storage by painting on glass


For many people discovering a new hobby can be exciting and addictive. Once we delve into learning a new skill, our confidence grows and soon, all we want to do is create. It is often the same with our Folk It kits. When I discovered Folk Art in Australia, I would drop my children off at school and take up residence in my teachers studio to take part in back to back lessons, only leaving when I needed to pick them back up again. There comes a time when paper is not enough and we want to use our brushstrokes on anything that doesn't move. We know that we are not alone in this feeling and a while back I created this tutorial for our newsletter subscribers. Following the Handmade Fair and our weekender on Create and Craft recently, we have started receiving questions about how to paint on glass. We visited our newsletter archives, gave it a tweak or three and posted it here for you to enjoy. I hope you find it useful. 

Happy Folking, 
Carol x 

DecoArt understand the lure of painting on glass - to create beautiful glass tree ornaments, upcycle jam jars or create beautiful storage. They have done a fantastic job creating many different paints that allow you to paint straight onto different surfaces. If you wish to paint on glass, you can choose some lovely DecoArt Gloss Enamels. However, DecoArt Multi Surface Satin is a great all rounder for painting onto most surfaces. 


However, the best paint for Folk Artists like us, is Americana Acrylics. They are a perfect consistency and dry to a beautiful matt finish. The problem with using these paints on their own and painting directly onto glass is that they can be very easily scratched off. However, the solution can be found in DecoArt's Paint Adhesion Medium or Multi Purpose Sealer.  
You can either paint a thin layer of the medium directly onto surface you wish to paint as we have done here, or you can add it into your acrylics (1:1 - you will not lose quality in colour or consistency) and paint directly on to the plain glass. 


So lets get started...  
Use used jars and canisters, Folk It and DecoArt's Paint adhesion medium to epicycle them.
Any old jar...
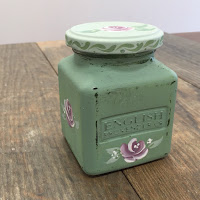
Step 1: Choose your glass item you wish to paint. I chose an empty pickle jar - it doesn't have to cost a fortune to look pretty. This was a jar I had at home but I chose it for its lovely shape and detail - any raised detail will look lovely when you lightly sand some of the paint off.
Before you start to paint you need to ensure the surface is absolutely clean. While it is tempting to miss this step out, (especially if you're excited to get started) it really does ensure the best finish. Use a 1:1 solution of vinegar and water to wipe down your glass. We have a lot of natural oils on our fingers that can ruin our finished piece so be careful not to handle the glass after you have cleaned it. 
The ultimate grease remover is pure alcohol called Isopropyl. It is worth investing in some if you wish to paint a lot of glass and can be bought from Pharmacies. 

Step 2: Paint a layer of Paint Adhesion Medium onto your glass and allow it to dry completely.  
(Please note: The Paint Adhesion medium has since been discontinued.  However, DecoArt Multi Purpose sealer can be used in exactly the same way for the same purpose) 
Step 3: Paint one layer of your paint on top of the dried medium. For this project, I created this soft green by mixing Baby Blue and Hauser Light Green (both from the Series 1 Starter kit). Again, allow your paint to dry completely before the next step.

Paint a layer of DecoArt's Paint Adhesion medium before painting it with your chosen colour.

I am a big advocate for using leftover paint. DecoArt's Americana acrylics really do go a long way and so here, I also covered a Kenco Millicano coffee tub (shown in the background). 

Step 4: (optional) With fine sandpaper, lightly rub over the jar to pick out any detail - like the words on these jars. 
Step 5: Using your traced pattern and transfer paper, transfer your design guide onto your surface - don't forget all sides and any lids you may have!
Decorate with a Folk It design - here we used our Vintage Rose kit available from www.folkit.co
Paint on your design 
Step 6: Paint your design onto the dry base colour. These roses were painted using a mix of Baby Blue and Tomato Red from the Series 1 Starter Kit. 
Step 7: Sit back, admire and wait for your paint to cure. 

Painted jar created using Folk It's Vintage rose kit
Leave to cure! 
Things to remember.....
All paint needs to cure. A cured paint will be solid throughout, not just dry to the touch. Acrylics often feel dry a few minutes after being painted but in order to cure, it usually needs a couple of weeks. Factors such as humidity, number of coats and thickness of paint will also influence this time. A slick surface will mean paint is easily scratched off after a couple of days but becomes more robust after a couple of weeks.
Always remember, your painted objects are like a car. Scratch a car with a key and paint will come away. Similarly, if your object is scratched with some force, because it does not have that 'key', some paint will be removed, regardless of the paint used.  


SHARE:
© You Can Folk It!. All rights reserved.
designed by pipdig