Showing posts with label daisies. Show all posts

Tuesday, 24 March 2020

Projects to practice with: Flower frames

Things are a little uncertain at the moment and as many of us find ourselves inside, working from home or self-isolating, the need to create, to distract ourselves is strong.  Practising the comma stroke is so achievable but more importantly, mindful. Sometimes though, lines of comma strokes fail to inspire.

Whether you are wanting to practice or just create a fun project, these frames are lovely.


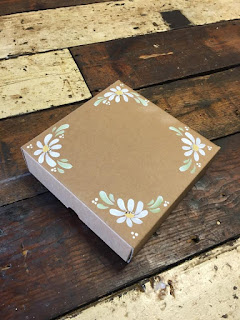
Our Level 2 Daisy details is the next step after our Round Brush Starter kit.  These pretty flowers are made up of comma strokes and can be painted in a variety of formations.  If you have learnt to paint these flowers and would like to learn to paint them from different angles, check out our blog here. 

To have a go at painting this Daisy frame, print off our pattern sheet from our Pattern Board on Pinterest.


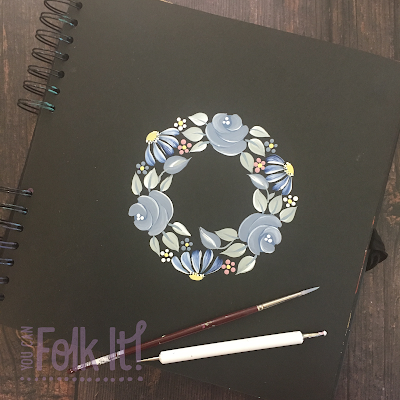
Our Level 3 Vintage Rose kit takes Folk Art painting to the next level. This kit does not introduce you lots more techniques (though it does introduce you to side-loading) but it does take more practice as you learn how to fit the petals together to form a beautiful rose.

To paint this floral frame, download the frame here. 

We do hope you find enjoyment in these projects during lockdown.  Feel free to share your projects with us when they are completed.

Happy Folking,

You Can Folk It x
SHARE:

Wednesday, 11 July 2018

How to paint a wreath - part 1


Wreaths are everywhere at the moment aren't they?! Whether they are being handpainted during an Instagram video, adorning a greetings cards or being featured on some gorgeous stationary, their popularity shows no signs of waning.

We have certainly seen the attraction of wreaths since launching our Folky Christmas kit a few years ago.  There is something so relaxing about layering up the different shades of paint and creating the wreath design to create a beautiful festive greetings card. However, what was once a symbol of the Christmas period has now become much more versatile. Whether they are made of flowers, ribbon, photos or pom poms, there is a wreath for every style and every occasion and this is also becoming the case for those wreaths we paint.

For our #funwithfolkit painting challenge this month, we have been focusing on wreaths and it is clear that this has captured the imagination of so many of you.  If you don't fancy creating your own classic foliage wreath from our Dotty Collection painting kit, we thought we would put together a few steps to help you create your own painted wreaths using the kits you already have.

Create a template to guide you when you are designing your wreath

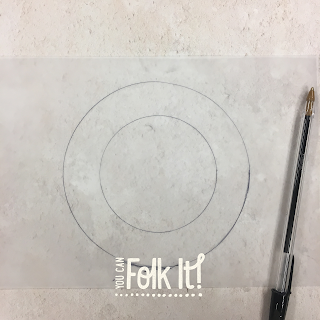
Step 1: Create a guide for you to work to by drawing round a circle or using a compass.  If you feel like you would like more structure to work with, draw a smaller circle within the larger circle.

Use the Rule of 3 and add flowers to your wreath, space them evenly around your ring.

Step 2: When creating your wreath, it helps to balance out some of the larger elements (e.g. vintage roses or daisies) with smaller elements (dotty flowers and leaves) The great thing here is that there are no limits - you can include what you want and leave out flowers or brushstrokes that you are less confident with.  A good tip to remember is to stick with odd numbers.  On a smaller wreath, work with three larger elements like we did here. If you are working on a larger wreath, use 5 flowers and so on to suit the size of your finished piece, this will make the finished piece more aesthetically pleasing.

First, mark out where your largest flowers will be.  Here we began with roses arranging them around the circle.

Use the rule of 3 - add your large flowers to the ring, if there is space, rotate your page and add three more or three different flowers

Step 3: Next, because we had enough space, we rotated our design and added three daisies before adding leaves with our round brush (again, adopting the rule of 3 to add leaves to each side of the roses).  Remember: You can work slightly inside and outside of your guide (as we have in the placement of the leaves) but always try to stay close to your original guide to prevent a wonky or uneven wreath!


When creating a wreath, you may be the type of person who likes to plan where you will add each element. To do this, you can draw out a pattern in a sketch book to trace and transfer it to your painting journal.  The important thing is that you find a process that suits you.

After adding your larger elements, fill any gaps with smaller items such as Rosebuds, dot flowers or comma strokes


Step 4: Once you have added the larger flowers and details, take a look at your wreath to see where there are gaps and fill with smaller details like dot flowers, rosebuds, a sprig of lavender or berries....anything that takes your fancy.

Folk Art painted wreath from You Can Folk It

Step 5: Once your wreath is complete, sit back and admire!


If you have created it as you paint and would like to keep the pattern, leave your design to dry before covering with transfer paper and drawing out a rough guide of where everything is.  As you can see, we have traced within the edges of the painting. This means that when you come to paint it, you will cover the lines you have transferred.  This is a great way to build up a collection of patterns and it means that you can try it again using different colours.

Pattern from You Can Folk It using different painting kits to create a beautiful painted floral wreath

We'd love to see your finished wreaths - tag us in your social media posts and use #funwithfolkit

Happy Folking xx

SHARE:

Friday, 1 April 2016

Get to know our Daisy Details kit this Spring

(Level 2)

Our Daisy Details design is perfect for Spring and our daisy projects have been getting a lot of love recently. If you were trying to decide which add on's to choose, here is a bit more information about this gorgeous kit. 

Once you’ve completed your first step in your painting journey and completed the dotty designs in the Series 1 Starter kit, you’re now ready to move on to the next step in learning Folk Art Painting with a level 2 Folk It! kit.  There are 2 kits at level 2  – this kit and Bluebirdshttp://www.folkit.co/collections/series-no-1-starter-kit/products/bluebirds. The beauty of our range is that you are free to choose your favourite or to complete them both. As with all our kits, Carol will teach you, step-by-step, how to paint comma strokes using the round brush and liner brush. She will also show you how to  ‘tip’ the brush – a great technique used to add additional colour and create depth to your painting in one easy stroke.

DON'T FORGET: You’ll need supplies from the ‘Starter Kit’ to complete this kit. 

KIT CONTAINS

Daisy Details Design
MDF Heart
Hanging Twine
Greetings Card
Mount Bound
Envelope
Instruction Guide
Step by Step DVD


Begin by practicing the techniques and start decorating the heart, card & envelope that comes with this kit. This is just the beginning though. As your confidence grows, you can start adding daisies to anything. Why not try adding them to:


Plain Kraft gift bags (co-ordinate the tag using the dot daisies from the Series 1 Starter Kit)


Add daisies to gift boxes

Gift boxes. You can add the daisies using our pattern designed for the hanging heart, or add daisies to each corner. Find out here how to create different daisy shapes.

DON'T FORGET: You’ll need supplies from the ‘Starter Kit’ to complete this kit. 
SHARE:

Sunday, 2 August 2015

You Can Folk It! | Daisy Drawers

Upcycling with Delicate Daisy designs from You Can Folk it www.folkit.co
Hey, welcome back for another batch of Sunday Inspiration over here at Folk It! HQ. This week we're looking at storage and a simple folky way in which you can completely transform it. Storage units are dirt cheap and available all over the high street, we grabbed this set of three drawers from Matalan and decided to give it a daisy makeover. 
Note: The headers were already printed on the drawers. 

YOU WILL NEED
Storage of your choice
Folk It! Starter Kit - Level 1
Water

1. So let's get started, we're going to paint the whole unit (minus the drawers) with a wash, so remove all of the drawers prior to painting. To create the blue wash - mix 2 parts of Americana Decor Chalky Finish Paint in 'Escape' with 1 part Water and brush the mixture all over the unfinished wood, remove any excess with a soft dry cloth. 

Folky Tip: The wood needs to be unvarnished/unpainted to allow the wash to soak into the surface. The water will raise the grain of the wood slightly making it feel rough, so always lightly sand it using a fine sandpaper, this often removes a little of the wash we have just applied which can give it a nice finish. If you'd rather have a stronger colour then just apply a second layer of the wash but this time don't sand afterwards. 
Upcycled drawers, decorated with Folk Art Daisies - learn how with You Can Folk It
2. Now open up your Folk It! Starter Kit, we're going to use the Folk It! Dotting tool along the top edges of the individual drawers to create simple dot daisies. The piece of storage that you are painting will alter the way in which you wish to decorate it, we popped our dot daisies either side of the type already present on our drawers. 
 Folk Art comma strokes, learn traditional painting techniques with You Can Folk It www.folkit.co
3. Next up are the comma stroke daisies, we're going to use the round brush and liner brush from the starter kit and by following the steps from our Daisy Details kit (we've included an instruction page form our kit to help you above) you can learn to paint your very own. The kit teaches you how to use your brush to create a highlight and a shadow in one single stroke, perfect for creates those leaves and petals. 

Folky Tip: When painting a comma stroke you are learning a 'technique' so it's important not to try and 'draw' the shape. The technique is to press the bristles down and lift the bristles. It is this action that you make and the bristles of the brush that are creating the shape. This is the first step in learning more advanced brush strokes and techniques.
4. Once you've mastered our comma stroke daisies, there are tonnes of daisies you can paint. Play around by drawing different sized circles and ovals and place the centre in different places - to the top - side - middle - bottom and see what happens when you paint the petals. This is where you can let your creativity take over and really customise your piece of storage. 
Folky Tip: Why not paint inside the drawers? Or on the sides of the drawers so the design peeks out every time you open a drawer? That's the beauty of decorating a project yourself, you can place the design wherever you desire. 

So that completes our Daisy Drawers tutorial, it's super easy and diverse, why not be a little adventurous and apply it to a wardrobe or a bedside table? Here at Folk It! we love to see your creations so if you give this tutorial a go be sure to share it and tag us using the hashtag #youcanfolkit

Have a folky week,
Carol x
SHARE:
© You Can Folk It!. All rights reserved.
designed by pipdig