Showing posts with label Vintage rose. Show all posts

Wednesday, 10 June 2020

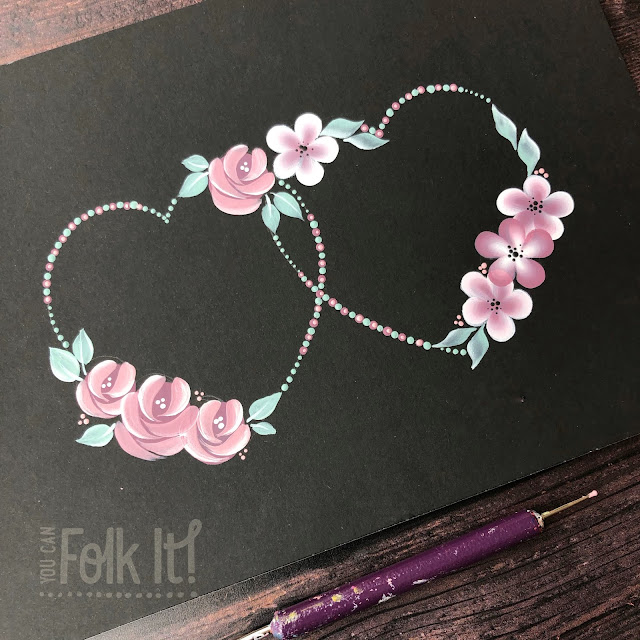
Learn to paint with You Can Folk It: Twin hearts tutorial

With so much going on in the world at the moment, we don't know where we would be without our favourite escape.  Picking up our paintbrushes, even just sitting in our creative space is a welcome solace.  Last week, we talked about the need to spread a little love and joy to others and this week, we have created a little project for you. 

You can Folk It painting instruction booklets


For this project you will need: 
Transfer paper 
Dotting tool 
DecoArt Americana paints - we chose Frosted Plum, French Mauve, Warm White, Blue mist & Lamp Black. 


Begin by transferring the pattern to your project.  We painted ours onto A4 black card.  

You Can Folk It tutorial, hearts template

To create this original project we drew around an MDF heart we had so if you didn't want to transfer it, feel free to draw around an MDF heart or one of our mountboard hearts. 

Begin by painting the roses and the blossom flowers. When painting the blossom flowers, we twisted our brush so unlike the outer two flowers, the centre flower had darker edges and a lighter centre.  

 NOTE: If you do not have either of these kits, why not try substituting them for daisies, hindeloopen flowers or a cluster of rosebuds?  

Paint the leaves and then add a little white to your green to add the stems.  Work with the heart shape when you are doing this.  If you want to add more than we have, make sure they are positioned within our close to the heart outline. You will notice we added s stroke leaves to the Oriental Blossom but you don't have to if you haven't learnt them.  The great thing about these patterns is that you can mix and match the techniques you have learnt and create something that's your own.  


You Can Folk It Vintage Roses and dots in pink and green

Add a line of dots on either side of each flower/flower cluster using the large end of the dotting tool.  


Next, using the large end of the dotting tool, create alternate dots of green and the darker shade you've chosen (in our case Frosted Plum).  

When these dots are dry, using the smaller end of the dotting tool, add the lighter shade (we used French Mauve) to each Frosted Plum.  If you have our Sweethearts kit, this is explained in the pattern from our Candy Cane heart.  

OPTIONAL: Add a few triangles of dots around your design to fill any spaces as you wish. 

Vintage Rose and Oriental Blossom twin hearts. Folk art painting from You Can Folk It


SHARE:

Tuesday, 24 March 2020

Projects to practice with: Flower frames

Things are a little uncertain at the moment and as many of us find ourselves inside, working from home or self-isolating, the need to create, to distract ourselves is strong.  Practising the comma stroke is so achievable but more importantly, mindful. Sometimes though, lines of comma strokes fail to inspire.

Whether you are wanting to practice or just create a fun project, these frames are lovely.


Our Level 2 Daisy details is the next step after our Round Brush Starter kit.  These pretty flowers are made up of comma strokes and can be painted in a variety of formations.  If you have learnt to paint these flowers and would like to learn to paint them from different angles, check out our blog here. 

To have a go at painting this Daisy frame, print off our pattern sheet from our Pattern Board on Pinterest.


Our Level 3 Vintage Rose kit takes Folk Art painting to the next level. This kit does not introduce you lots more techniques (though it does introduce you to side-loading) but it does take more practice as you learn how to fit the petals together to form a beautiful rose.

To paint this floral frame, download the frame here. 

We do hope you find enjoyment in these projects during lockdown.  Feel free to share your projects with us when they are completed.

Happy Folking,

You Can Folk It x
SHARE:

Saturday, 6 April 2019

Play with pattern


When I was learning to paint and teaching, one thing I loved was combining different elements to create something different.  Whether you have learned daisies, roses, ribbons or all three, there are numerous ways you can combine them to create something unique.  There were always some elements for me though that pair so well together, I found myself pairing roses and delicate lace time and time again in different ways.

Hand painted gift box decorated with folk art style roses and a lace pattern


This month, for our theme in April we are focusing on pattern and I just couldn't help but look through a few of my old pattern folders and came across this design.

Vintage Roses and lace design created by Carol Sykes from You Can Folk It

Mixing vintage roses, flat brush leaves and lace, it creates a delicate pattern that I will be working with throughout the month. So join me as I play with colour and play with this design to show you how you can create many different looks with just one design.  

If you would like to have a go at painting this design and want to join in and discover all the different looks you can create throughout the month, you can download the design from our Pinterest Folk It pattern board.  

I do hope you will join me on this journey :) 

Love, Carol x 


SHARE:

Wednesday, 29 August 2018

How to paint wreaths - part 3


We may have welcomed another month of the painting challenge this August but our head is still buzzing with ideas from last months wreath theme. The answer? To combine them both of course! This August, we took out our bright paints and set to work creating this beautiful heart wreath. Painted wreaths can come in all shapes and sizes as you demonstrated last month and we love this heart shaped one.


Here's the colours we opted for - styling our roses with a lighted background and more vibrant petals to really make them pop but have a play with colour and see which colours you prefer and find a look that suits your style.  

When we began to paint this idea, we did wonder what we had let ourselves in for. After all, when you have a new idea buzzing away in your head that you are excited about, it can be a little scary to try and translate that onto the page for fear that it won’t measure up to your imagination. We were so pleased when the risk paid off and so we have put together a little tutorial to help you create your own heart wreath. We have drawn the template using circles where the roses should be painted, however there is nothing stopping you from replacing those circles with daisies, oriental blossom flowers, or even butterflies if you’re really thinking outside the box. Try something new today.


Step 1: Using your template and transfer paper (this can be found in the starter kits or in our online shop) to transfer the po using your template and transfer paper (this can be found in the starter kits or in our online shop) to transfer the pattern to whatever surface you’re working on. Depending on surface you may need to resize the pattern to fit.


Step two: Begin by painting the circles that will make up your Vintage Roses. Using the role of three/five from the first instalment of this wreath series, we filled in 5 circles using the pink and three circles of each other colour. If you are painting on black paper as we did,  you may find you need two coats of paint for each circle.  When these are dry, add the centres and the petals.  As you can see we have alternated the direction of the flowers around the heart and this has been marked on the pattern for you.


Step three: Once your Vintage Roses are dry, begin filling in your leaves. Here we used the round brush leaves as taught in our vintage rose kit.


Step 4: Once your leaves are dry, add the fillers to your heart. Here we used plain dots as well as dot roses in a variety of colours but you could add Dottie daisies or any other small design you wish.  As we mentioned earlier in the series,  keep taking a step back to look at your design as a whole and see if there is anywhere that needs filling.

Step five: finally using the liner brush from either  of our starter kits, add stalks to the leaves using comma strokes.

This would look great painted on to a A4 board and framed or onto a canvas.  If you have a go at painting this gorgeous wreath, do tag us on social media or use #funwithfolkit 

Happy Folking x 

SHARE:

Wednesday, 11 July 2018

How to paint a wreath - part 1


Wreaths are everywhere at the moment aren't they?! Whether they are being handpainted during an Instagram video, adorning a greetings cards or being featured on some gorgeous stationary, their popularity shows no signs of waning.

We have certainly seen the attraction of wreaths since launching our Folky Christmas kit a few years ago.  There is something so relaxing about layering up the different shades of paint and creating the wreath design to create a beautiful festive greetings card. However, what was once a symbol of the Christmas period has now become much more versatile. Whether they are made of flowers, ribbon, photos or pom poms, there is a wreath for every style and every occasion and this is also becoming the case for those wreaths we paint.

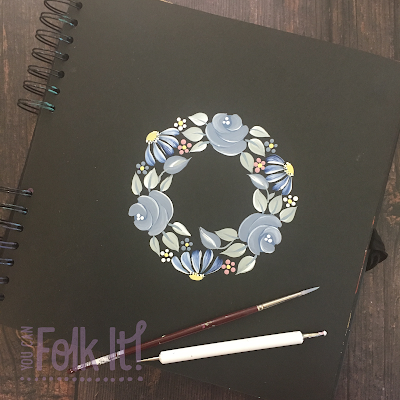
For our #funwithfolkit painting challenge this month, we have been focusing on wreaths and it is clear that this has captured the imagination of so many of you.  If you don't fancy creating your own classic foliage wreath from our Dotty Collection painting kit, we thought we would put together a few steps to help you create your own painted wreaths using the kits you already have.

Create a template to guide you when you are designing your wreath

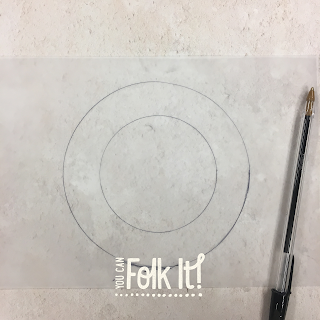
Step 1: Create a guide for you to work to by drawing round a circle or using a compass.  If you feel like you would like more structure to work with, draw a smaller circle within the larger circle.

Use the Rule of 3 and add flowers to your wreath, space them evenly around your ring.

Step 2: When creating your wreath, it helps to balance out some of the larger elements (e.g. vintage roses or daisies) with smaller elements (dotty flowers and leaves) The great thing here is that there are no limits - you can include what you want and leave out flowers or brushstrokes that you are less confident with.  A good tip to remember is to stick with odd numbers.  On a smaller wreath, work with three larger elements like we did here. If you are working on a larger wreath, use 5 flowers and so on to suit the size of your finished piece, this will make the finished piece more aesthetically pleasing.

First, mark out where your largest flowers will be.  Here we began with roses arranging them around the circle.

Use the rule of 3 - add your large flowers to the ring, if there is space, rotate your page and add three more or three different flowers

Step 3: Next, because we had enough space, we rotated our design and added three daisies before adding leaves with our round brush (again, adopting the rule of 3 to add leaves to each side of the roses).  Remember: You can work slightly inside and outside of your guide (as we have in the placement of the leaves) but always try to stay close to your original guide to prevent a wonky or uneven wreath!


When creating a wreath, you may be the type of person who likes to plan where you will add each element. To do this, you can draw out a pattern in a sketch book to trace and transfer it to your painting journal.  The important thing is that you find a process that suits you.

After adding your larger elements, fill any gaps with smaller items such as Rosebuds, dot flowers or comma strokes


Step 4: Once you have added the larger flowers and details, take a look at your wreath to see where there are gaps and fill with smaller details like dot flowers, rosebuds, a sprig of lavender or berries....anything that takes your fancy.

Folk Art painted wreath from You Can Folk It

Step 5: Once your wreath is complete, sit back and admire!


If you have created it as you paint and would like to keep the pattern, leave your design to dry before covering with transfer paper and drawing out a rough guide of where everything is.  As you can see, we have traced within the edges of the painting. This means that when you come to paint it, you will cover the lines you have transferred.  This is a great way to build up a collection of patterns and it means that you can try it again using different colours.

Pattern from You Can Folk It using different painting kits to create a beautiful painted floral wreath

We'd love to see your finished wreaths - tag us in your social media posts and use #funwithfolkit

Happy Folking xx

SHARE:

Wednesday, 7 February 2018

Colour us happy this winter

As we paint our way through February, we have seen temperatures drop along with the occasional snow flurry and ice.  Even though the sun is bright, our days have been somewhat grey here in Yorkshire and so we have been escaping in to a world of colour and creating a little happiness and sunshine at Folky HQ.  

When painting, we often tell our followers to make a note of the colours they use so that, if they find something they love they can use it again....in the same way, if they find a colour they do not like or feel a little uncomfortable with a colour scheme they have chosen, they can avoid it.  As you move through your journey, you can look back at projects and colours you loved and become inspired all over again.  This week, we decided to look through our archives and be inspired by projects old and new and here is what we found. From deep rich palettes to bright ones with a tropical feel, we almost forgot it was still winter :) 

We hope you enjoy them... 

Happy Folking x 

PS If you would like to discover more about the theory of colour and how to develop your colour mixing skills, check out our Colour theory posts here

Vintage roses can be painted in any colour, including this gorgeous tropical inspired colour palette


Cherry blossom inspired colour palette - perfect for a spot of upcycling


Dusky pinks and deep burgundy's work so well together in this colour palette


A classic colour palette inspired by the Canal boat art of England


Vintage inspired colour palette characterised by rich reds, deep blues and soft greens


Rich yellows and browns look beautiful together in this folk art inspired colour palette


Folk art poppies painted in earthy tones with a pop of orange.  A beautiful colour palette with a bit of a retro feel.


SHARE:

Tuesday, 18 July 2017

5 ways to decorate with our Delicate lace kit

Create your own hand painted gift boxes with You Can Folk it


Knowing you have found the perfect gift for a loved one is a lovely feeling but how do you present it? Gift wrapping and presentation often fills people with dread but it doesn't have to. This month, we have been having fun decorating a few gift boxes to create beautiful packaging that will be as memorable as the gift itself.

We decorated this plain box using the Round brush Starter kit and Delicate lace kit from You Can Folk It

Basecoating our Kraft box using DecoArt Chalky Finish paint, we began by painting two diagonal lace strips across our gift box and of course, sprinkled it with a dusting of Crystal Glamour dust

We decorated our gift box using the Series 1 Starter kit, delicate lace and vintage roses. The kits from You Can Folk It teach these designs step by step.

The great thing about our Delicate lace kit is that it compliments our other designs well.  For this box, we painted our delicate lace and once it was dry, we added our Vintage roses over the top.  

This plain kraft box was given a makeover using our Folky Christmas angels and Delicate lace kit. Learn how to paint these designs with You Can Folk It and create your own.

One of the boxes we recently created for our Hochanda show recently. This time, we ditched the base coating and paired the kraft box with a plain white design.  We teach you how to paint these pretty little angels in our Christmas kit along with 4 other designs but these angels go so well with our lace, we had to pair them up :) Use this at Christmas for a lovely wow factor. 

Pairing vintage roses and delicate lace from You Can Folk It's folk art painting kits to decorate this gift box.

Getting more adventurous, for this gift box, we drew out a square and designed our own lace trim to compliment it - find out how to design your own lace pattern here


Instead of using a square, here, we used a circle template to create our design and used the steps outlined here to create the pattern.  Inside, we used the template we provide in the Vintage roses kit to paint the centrepiece and create this vintage inspired box. 


There are so many possibilities when it comes to decorating your own gift boxes and the great thing is that base coating your project means that you can even upcycle old packaging and transform it in to  a box worthy of gifting to a loved one.  However you choose to decorate your gift packaging, relax, let go and have fun, after all handmade is always better. 

Happy Folking, 

The You Can Folk It team x 


SHARE:

Saturday, 28 January 2017

Don't recycle....Upcycle


With the holiday season behind us, one thing that we have in our house (in addition to the lovely gifts we received) is lots of packaging; boxes, tins and jars that we cannot bear to throw away because they are too pretty, too sturdy and too useful to send to landfill.

In time's when we are always looking for ways to save a bit of cash, one of the best ways to save is to create your own storage.  This does not mean, however, that your DIY storage has to be plain, undecorated or boring.

This week, we have been making use of our old sweet tubs and taking inspiration from vintage hat boxes to up-cycle our first project, just for you. We loved the look of some vintage hat boxes we found that were covered in beautiful roses. Although we have just used our rose design, you could add some stencilling to add to the hat-box feel, though the stencil you use will depend on the size of your project.  


For this project, you will need: 

A tub of your choice 
Flat base coating brush

Choose your project.  A Haribo sweet tub or chocolate tub is perfect for creating up cycled storage

The first decision you need to make is to decide what you will be upcycling.  This is a great project for experimenting with painting on different surfaces, for example painting on curved surfaces is very different to painting on to flat surfaces.  If your project doesn't go to plan, it can still be recycled and it hasn't cost you any money. We chose a leftover sweet tub from our Christmas gifts that was just going to be re-cycled.  

The beauty of DecoArt Chalky finish paint is that you can paint straight on to the surface without fear of the paint flaking off at a later date.  However, one thing you will need to do before you begin painting is to wipe down the tub completely with a mixture of vinegar and water to remove any greasy fingerprints.  Any greasy fingerprints left on the surface will prevent the paint from adhering to the surface.  


Once you've decided which shade of Chalky Finish paint you would like to use, begin painting the tub using a flat brush.  Be sure to cover every inch of the tub with the paint.  


1. Once the Chalky Finish base coat has dried, using your finger or, cloth or old brush apply Rose Gold Metallic Lustre around the lid.  Tip: if your lustre has hardened, put a little water in the jar, screw the lid back on and leave for a couple of hours or overnight to soften.  

2. Using the patterns, randomly place roses around the edge, alternating between 1 rose, 2 roses and 3 rose clusters.  Tip: to make it look more professional, trace a few of the roses off the edge as Carol has done here.  Next trace the larger cluster in the centre of your project, or in this case, the lid. Note: the patterns should print at the correct size. 

Next fill in the roses using your round brush from the Series 1 Starter kit as instructed on the Vintage Rose tutorial DVD. For this project, Carol used DecoArt Americana Naphthol Red. However, you can create a similar shade by mixing our Series 1 Tomato red with a bit of Lamp black, also from the Series 1 kit.  (To learn more about mixing colours, click here). 

3. Using Avocado green from the Series 2 kit, add the leaves following the tutorial from the Vintage Rose DVD.  Tip: If you do not have the Series 2 Starter kit, you could use the Hauser Light Green from our Series 1 Kit.  


Now you have the pattern to work with, add your comma strokes to paint your vintage roses, tipping your brush with Warm White - you can watch the full tutorial  on the DVD supplied in our Vintage Rose add on kit

Using your liner brush, add stalks to your leaves using Avocado around the tub.

Once you design is dried, using the warm white, add comma strokes using your liner brush. Finish by adding some 'filler foliage' this has been created by loading the end of the round brush with avocado and tipping the brush with white.

Leave to dry and apply a coat of Clear Creme wax using a round brush to protect your beautiful new  storage. You can either use it once it has dried or buff the wax with a soft, lint free cloth to create a soft sheen to your container. 


Happy Folking, 

Carol xx 

SHARE:
© You Can Folk It!. All rights reserved.
designed by pipdig