Showing posts with label Round brush. Show all posts

Thursday, 17 January 2019

Inspired by music and having #funwithfolkit

Canal Art Roses and Daisies painted on to a vintage vinyl record.

This month, our challenge has been to find inspiration in music.  While we may turn up our favourite tunes in the studio while we paint, that is usually where our inspiration ends! We are pleased to say however, that our inspiration and yours has taken us by surprise. Pairing our painting kits with music has created a range of great ideas and we thought we'd round up a few for you.


You Can Folk it's folk art daisies painted to create musical notes

Musical notes - when you're practicing brushstrokes, it can be fun to create something new with them and play with ideas without committing too much time in case your idea doesn't work out.  These daisy notes by In Blume are a lovely twist on our Daisy Details kit.

                         Black and white handpainted birthday card. The card has a large A painted with musical notes and symbols

At the Painting Table has created this lovely card by painting a little music using her liner brush.  Painting with your liner brush is a little different to painting comma strokes but once you've mastered it, this brush is perfect for painting more delicate designs. 

3 different cards featuring strips of music sheets and painted using folk art brushstrokes.

Carol recently went to visit friends in South Africa and got creative with her friend Ronel.  Armed with some free music sheet printables, she used them to create a border before adding some liner brush patterns and hearts.  We think the black heart would make a great Valentines card for the music lover in your life. What do you think? 

An outline of a guitar painted by You Can Folk It! using folk art comma strokes and dots

Take a silhouette and decorate it with a few liner brush strokes to create your own unique design.  Sandra used a mixture of comma strokes, lines and dotting to create this pretty pattern.  For the strings she used a Micron pen.  If you don't feel comfortable using a liner brush for the longer lines and swirls, why not use pens or colouring pencils and just use the brush for the comma strokes?  

Handpainted cards, one black, one white.  Both feature a square of vintage music sheets that have been painted on to using You Can Folk It painting kits.

Get your hands on some old music sheets to create some Vintage vibes? Here we toned down the background (you don't want the music distracting from your painted design) using a little Antiquing.  If you want to know more about how to do this, check out our You Tube tutorial

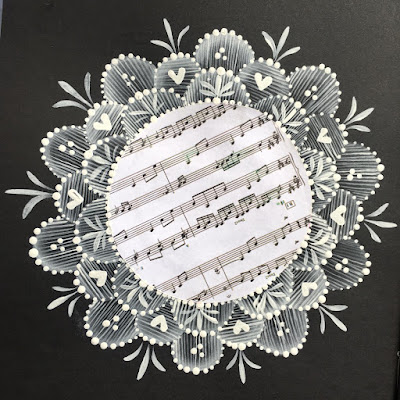
A circle of music paper framed by hand painted lace like designs from You Can Folk it

Use a little music to create a centrepiece and add a little lace around it.  Learn to paint our delicate lace design using our kit and then follow our great tutorial to build on those skills and learn to create your own patterns. 

An old radio that has been hand painted with Roses using You Can Folk It's Vintage roses kit.  Photographed with painting in progress and the finished radio in the owners home

Jo from The Original Craft Co doesn't get much time to herself but inspired by this months theme, she knew the perfect project.  Sitting unloved in a corner of her home, she dusted off her tired looking radio and gave it a new lease of life with our Vintage Roses kit.  


Handpainted white Edelweiss flower on black paper.  White petals with a white and yellow centre.

Inspired by a song, At the Painting Table searched for this pretty flower and used her Folk Art round brush skills to create a version of her own.  Once you've learned the techniques from our kits, it just goes to show you can create and paint so much more.  

When we first came up with our monthly themes for our painting challenge, we thought it would give us a focus, a way to inspire us and we are so pleased that it has done that and so much more.  Once again, we are blown away with all that you can do with a few brushstrokes.  

Happy Folking! 


SHARE:

Wednesday, 21 November 2018

The beauty of Bauernmalerai

November is about all things vintage at Folky HQ as part of our #funwithfolkit painting challenge.  This week, we thought we would indulge in a little Bauernmalerai painting - a version of folk art originating from Germany, Austria and Switzerland.  Using the round brush, it uses our beloved comma strokes as well as the c and s strokes.  If you have some of our Flat Brush kits you may have learnt these brushstrokes, the only difference is that in this project you paint them using the round brush.  If you are up for the challenge, it certainly is a lovely design to paint. 

For this project, you will need:

Liner brush 
No 3 Round Brush 
True Ochre, 
Tomato or Country Red, 
Warm White, 
Antique Green,
French Grey Blue, 
Burnt Umber
To Antique and complete the tray you will need:
DecoArt Metallic lustre in Copper Kettle 
Soft, lint free cloth
Your chosen varnish

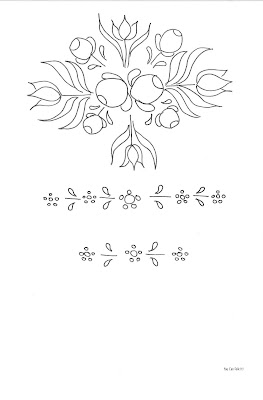
Traditional decorative painting - Bauernmalerai pattern outline


Once you have transferred your design, begin by base coating your roses in Red and Ochre.  

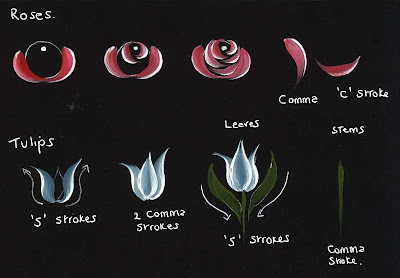
Step by step images of how to paint Bauernmalerai inspired roses and tulips using Folk Art brushstrokes.

To paint the roses load your brush with Red/Ochre and side load with warm white. 
First, paint 2 comma strokes to the bottom of your rose then fill your circle using C strokes to create the rose as shown above. 

An image of a plain tea tray and the painted design that will be added to it. The design consists of red and yellow roses and blue tulips with a decorative border


To paint the Tulip, load your brush with French Blue Grey and side load with Warm White. 
Using s strokes, paint the outer petals before using comma strokes to paint the centre.  

Using your liner brush (loaded with Antique Green) apply the stems. 

Painted white tray decorated with a traditional Bauernmalerai design featuring red and yellow roses and blue tulips

To paint your leaves, load your brush with Green and side load with the True Ochre.  Paint your S strokes to the tulips.  

Next, using the same colours, paint the comma strokes around the centre and edge of the design. 

A photo of the completed Bauernmalerai pattern featuring red and yellow roses and blue tulips on a plain white tray next to the pattern/design sheet


Next, paint the edge pattern around your tray. (If you are choosing to do this on a different project, you could use this design as a border or leave it out).

A photo of the sides of the tea tray decorated with hand painted daisies and leaves in the Bauernmalerai style

We have painted our flowers with the blue/red side loaded with white. Finish by painting the comma strokes with green side loaded with white. 

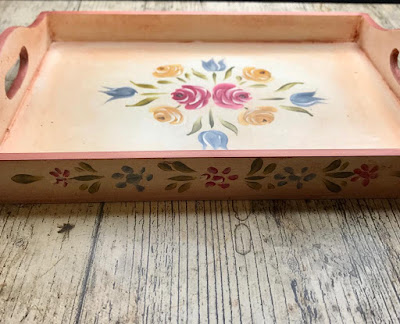
Once we were certain the tray was completely dry, we decided to complete the Vintage inspired project by Antiquing the tray.  To do this we mixed 3 parts Drying Time extender and 1 part Burnt Sienna before applying this to the tray.  You can check out our video tutorial here

Next, apply a little metallic lustre to the edges and handles of your tray.  Leave to dry before varnishing. 

A photo of a wooden tray that has been painted white and hand painted with a Bauernmalerai inspired design of yellow and red roses and blue tulips. A wash of brown has been applied over the top of the tray to tone down the colours and give the tray an antique look


SHARE:

Monday, 29 October 2018

Paint your own Autumnal wreath in 5 simple steps

Handpainted wreath painted in Autumn colours of greens, browns and golds with red berries

The days are getting shorter and the air is adopting a chill, Autumn is certainly taking a hold both inside and outside of Folky HQ.  

Handpainted folk art design in Autumn colours of reds, browns and oranges surrounded by pots of DecoArt Americana paint

Over the last couple of weeks we have been cracking open those warm orange and golds, deep, rich browns and earthy greens to create a few Autumnal projects to fit with this months #funwithfolkit theme.  After sharing this on social media, so many of you asked for the pattern so here is a quick tutorial.  

You will need: 

Practice paper, transfer and tracing paper*
pencil
A brown, green, gold and red paint 
(Sandra used Asphaltum and Autumn Red but you could use Traditional Burnt Sienna and Country Red)
We also used Emperors Gold and Avocado
No 3 Round Brush & Dotting tool*

*Available in our Round Brush Starter Kit 

Pattern outline of a wreath made up of comma strokes

Step 1: Take your pattern and transfer it onto your practice paper or project 

Practice boards from You Can Folk It featuring an outline of a wreath and a painted version using red, green, brown and gold

Step 2: To paint your comma strokes, fill your round brush with Avocado or Raw Umber and tip your brush with the Emperors Gold (a technique taught in our Daisy Details kit

Step 3: Paint alternating bunches of green and brown comma strokes to add variety to your wreath. 

Folk It autumnal wreath painted in browns, golds and greens and decorated with red berries

Step 4: Using the red, add berries around the wreath and leave to dry. 

Step 5: Add a little gold to your brush and on a paper towel, gently rub off the excess. Dry brush a little gold over each of the berries and dot a little brown in each one. 

Your wreath is now complete! If you fancy a more festive look, why not try using two shades of green and red and gold or use a paler green and grey tipped with silver - this would look great finished with white and silver mistletoe berries! 

Happy Folking everyone x   


SHARE:

Wednesday, 29 August 2018

How to paint wreaths - part 3


We may have welcomed another month of the painting challenge this August but our head is still buzzing with ideas from last months wreath theme. The answer? To combine them both of course! This August, we took out our bright paints and set to work creating this beautiful heart wreath. Painted wreaths can come in all shapes and sizes as you demonstrated last month and we love this heart shaped one.


Here's the colours we opted for - styling our roses with a lighted background and more vibrant petals to really make them pop but have a play with colour and see which colours you prefer and find a look that suits your style.  

When we began to paint this idea, we did wonder what we had let ourselves in for. After all, when you have a new idea buzzing away in your head that you are excited about, it can be a little scary to try and translate that onto the page for fear that it won’t measure up to your imagination. We were so pleased when the risk paid off and so we have put together a little tutorial to help you create your own heart wreath. We have drawn the template using circles where the roses should be painted, however there is nothing stopping you from replacing those circles with daisies, oriental blossom flowers, or even butterflies if you’re really thinking outside the box. Try something new today.


Step 1: Using your template and transfer paper (this can be found in the starter kits or in our online shop) to transfer the po using your template and transfer paper (this can be found in the starter kits or in our online shop) to transfer the pattern to whatever surface you’re working on. Depending on surface you may need to resize the pattern to fit.


Step two: Begin by painting the circles that will make up your Vintage Roses. Using the role of three/five from the first instalment of this wreath series, we filled in 5 circles using the pink and three circles of each other colour. If you are painting on black paper as we did,  you may find you need two coats of paint for each circle.  When these are dry, add the centres and the petals.  As you can see we have alternated the direction of the flowers around the heart and this has been marked on the pattern for you.


Step three: Once your Vintage Roses are dry, begin filling in your leaves. Here we used the round brush leaves as taught in our vintage rose kit.


Step 4: Once your leaves are dry, add the fillers to your heart. Here we used plain dots as well as dot roses in a variety of colours but you could add Dottie daisies or any other small design you wish.  As we mentioned earlier in the series,  keep taking a step back to look at your design as a whole and see if there is anywhere that needs filling.

Step five: finally using the liner brush from either  of our starter kits, add stalks to the leaves using comma strokes.

This would look great painted on to a A4 board and framed or onto a canvas.  If you have a go at painting this gorgeous wreath, do tag us on social media or use #funwithfolkit 

Happy Folking x 

SHARE:

Monday, 26 March 2018

How to paint Snowdrops


For this project you will need: 

DecoArt Americana Acrylic in Green Tree and Snow White (also known as Titanium White)
Medium Brush liner, No 3 Round Brush and Dotting tool (available separately or as part of our Round Brush Starter kit
Comma stroke lesson (available within our Round brush add on kits) 
Chalk pen (optional) 

Using the medium liner brush and DecoArt Americana Acrylic in Green Tree, add a little water to your paint to make your strokes go further and start by practicing the stems.  Imagine you are painting walking sticks and paint the hook to the left and right, trying to keep the stems as straight as possible.  Don't worry if your paint runs out a little at the end, you can always mask this when you add the comma stroke leaves


Next practice adding the petals using the No. 3 Round Brush and comma stroke leaves using the liner brush as shown above.  Play around with using just white and try using Green Tree tipped with white.


Paint your Terracotta pot using the Relic Chalky Finish.  (If you wish to use this pot outdoors once it is completed, make sure you cover every inch of the pot including the hole at the bottom to prevent the pot absorbing water).  The Snowdrops are placed approximately 3cm apart, alternating 1 long and 1 short.  The Daisies are 2cm apart 1 high and 1 low.  You can use a chalk pencil to mark the design, but you may find it easier to paint the design straight onto the pot without the constraints of having to follow a line.


Paint the stems.  Working on surfaces that are not flat is always going to be more challenging, so try practicing on inexpensive items like recycled packaging first, the more practice you do, the easier it becomes.


Complete the rest of the Snowdrops


Next, add the daisies along the top lip of the pot.  


Finish with a coat of wax or varnish to preserve the design.

As we mentioned earlier, it is possible to use hand painted terracotta pots outside, but if they are going to come in to contact with water it is very important that you prepare the pot correctly.  There are two ways to do this

1. Make sure every inch of the pot is completely sealed with the Relic chalky finish paint (including the hole in the bottom) so that the terracotta cannot absorb any water.  Once you have completed the pot, finish it with a couple of coats of weatherproof varnish.

2. Add equal amounts of DecoArt Multi Purpose Sealer to your Chalky Finish and Acrylic paint.  By doing this, it means that no varnishing is necessary but as before, ensure that every inch of the surface is coated with the paint and sealer.

Once you have completed your project, remember to wash your brushes ready for next time - look after your brushes and they will look after you.


SHARE:

Monday, 13 June 2016

How to create a Father's Day card that they will love


With Father's Day coming around, many of us are thinking about what to buy, create or bake that will express our thanks for being there for us. It's true there are many shops and websites out there offering great ideas but there's nothing better than creating your own cards, gifts or even gift wrap. 
Here are a few ideas to help you create a gorgeous Fathers Day card with You Can Folk It...

What you'll need: 
Any of the Series 1 add on kits - these teach you the all important comma stroke. 
Our Chef, moustache and guitar patterns


1. Dot Rose card 
With any of our designs, you can create so many different looks just by changing the paint colours you use. Here, we used the dot rose heart from our Series 1 Starter kit. Instead of using the colours from the original design, we created the heart using Lamp black and Warm white from the kit to give the design a more masculine look. 

One of the fantastic things about Folk Art is that it is not the design that is important but the brushstroke. Once you have mastered the comma stroke from our Series 1 add on kits, you can use it to create anything you wish; from roses to angels, daisies to beautiful borders. 

However, this versatile brushstroke can create so much more! Here at Folky HQ, our resident designer Sandra has been working her magic to create a few other designs. 


2. The Chef card 
Still limiting the colour palette to Lamp Black and Warm White, base coat your chef in White using the round brush. To achieve a smooth finish, use comma strokes to fill the area in.  Let it dry and if needed very lightly sand smooth.  Continue this process until you have applied three coats.  Using the liner brush and the Lamp Black, paint comma strokes  to create his moustache.  Using your dotting tool, add dots for his buttons.

3.  Moustaches 

Using the Lamp Black and your round brush, paint the areas with comma strokes. If your brushstrokes do not give you the shape you want, especially if you find it difficult to create the curled moustache, simply fill in the shape using your brush. 


4. Guitar - For all those musical or music obsessed Dad's out there :) 

Base coat the guitar in Lamp Black with the round brush, let dry and lightly sand. With the liner brush, paint the stems in Lamp Black.  Add black dots with the large end of the dotting tool. A good tip here is to make sure the dots are dry so your work doesn't get smudged as you continue to paint the rest of the design. If you wish to move on with the design, simply use a hairdryer to speed up the process.  Next, with the small end of the dotting tool, add comma strokes for the leaves in Warm White. 

For the detail on the guitar apply the top heart in Warm White with the small end of the dotting tool. Next, apply the white circle with the large end of the dotting tool. For the middle heart, use the large end of the dotting tool and the last one at the bottom with the small end of the dotting tool.  When these are dry, add more hearts over the top of the white using Lamp black and the small end of the dotting tool.  To finish, using the liner brush, paint stems close to the edge of the guitar in Warm White and with the small end of the dotting tool apply tiny leaves in the same colour.  Once dry scatter white and black dots around the stems.

DON"T FORGET THE DETAILS! 

When you have created your card, it is easy to get so caught up in the satisfaction of your make that the envelopes get overlooked. To complete your handprinted creation, why not add designs to the back of the envelope as we have done here or add a small design to the corner of the front of your envelope? 

What will you be creating for Father's Day? We hope we have inspired you and as always, if you do create one of these cards, or something different using our kits, we would love to see it. 

Happy Folking, 

You Can Folk It! 

SaveSave
SHARE:

Friday, 1 April 2016

Get to know our Daisy Details kit this Spring

(Level 2)

Our Daisy Details design is perfect for Spring and our daisy projects have been getting a lot of love recently. If you were trying to decide which add on's to choose, here is a bit more information about this gorgeous kit. 

Once you’ve completed your first step in your painting journey and completed the dotty designs in the Series 1 Starter kit, you’re now ready to move on to the next step in learning Folk Art Painting with a level 2 Folk It! kit.  There are 2 kits at level 2  – this kit and Bluebirdshttp://www.folkit.co/collections/series-no-1-starter-kit/products/bluebirds. The beauty of our range is that you are free to choose your favourite or to complete them both. As with all our kits, Carol will teach you, step-by-step, how to paint comma strokes using the round brush and liner brush. She will also show you how to  ‘tip’ the brush – a great technique used to add additional colour and create depth to your painting in one easy stroke.

DON'T FORGET: You’ll need supplies from the ‘Starter Kit’ to complete this kit. 

KIT CONTAINS

Daisy Details Design
MDF Heart
Hanging Twine
Greetings Card
Mount Bound
Envelope
Instruction Guide
Step by Step DVD


Begin by practicing the techniques and start decorating the heart, card & envelope that comes with this kit. This is just the beginning though. As your confidence grows, you can start adding daisies to anything. Why not try adding them to:


Plain Kraft gift bags (co-ordinate the tag using the dot daisies from the Series 1 Starter Kit)


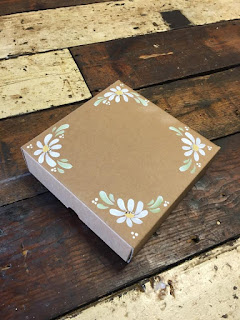
Add daisies to gift boxes

Gift boxes. You can add the daisies using our pattern designed for the hanging heart, or add daisies to each corner. Find out here how to create different daisy shapes.

DON'T FORGET: You’ll need supplies from the ‘Starter Kit’ to complete this kit. 
SHARE:

Sunday, 2 August 2015

You Can Folk It! | Daisy Drawers

Upcycling with Delicate Daisy designs from You Can Folk it www.folkit.co
Hey, welcome back for another batch of Sunday Inspiration over here at Folk It! HQ. This week we're looking at storage and a simple folky way in which you can completely transform it. Storage units are dirt cheap and available all over the high street, we grabbed this set of three drawers from Matalan and decided to give it a daisy makeover. 
Note: The headers were already printed on the drawers. 

YOU WILL NEED
Storage of your choice
Folk It! Starter Kit - Level 1
Water

1. So let's get started, we're going to paint the whole unit (minus the drawers) with a wash, so remove all of the drawers prior to painting. To create the blue wash - mix 2 parts of Americana Decor Chalky Finish Paint in 'Escape' with 1 part Water and brush the mixture all over the unfinished wood, remove any excess with a soft dry cloth. 

Folky Tip: The wood needs to be unvarnished/unpainted to allow the wash to soak into the surface. The water will raise the grain of the wood slightly making it feel rough, so always lightly sand it using a fine sandpaper, this often removes a little of the wash we have just applied which can give it a nice finish. If you'd rather have a stronger colour then just apply a second layer of the wash but this time don't sand afterwards. 
Upcycled drawers, decorated with Folk Art Daisies - learn how with You Can Folk It
2. Now open up your Folk It! Starter Kit, we're going to use the Folk It! Dotting tool along the top edges of the individual drawers to create simple dot daisies. The piece of storage that you are painting will alter the way in which you wish to decorate it, we popped our dot daisies either side of the type already present on our drawers. 
 Folk Art comma strokes, learn traditional painting techniques with You Can Folk It www.folkit.co
3. Next up are the comma stroke daisies, we're going to use the round brush and liner brush from the starter kit and by following the steps from our Daisy Details kit (we've included an instruction page form our kit to help you above) you can learn to paint your very own. The kit teaches you how to use your brush to create a highlight and a shadow in one single stroke, perfect for creates those leaves and petals. 

Folky Tip: When painting a comma stroke you are learning a 'technique' so it's important not to try and 'draw' the shape. The technique is to press the bristles down and lift the bristles. It is this action that you make and the bristles of the brush that are creating the shape. This is the first step in learning more advanced brush strokes and techniques.
4. Once you've mastered our comma stroke daisies, there are tonnes of daisies you can paint. Play around by drawing different sized circles and ovals and place the centre in different places - to the top - side - middle - bottom and see what happens when you paint the petals. This is where you can let your creativity take over and really customise your piece of storage. 
Folky Tip: Why not paint inside the drawers? Or on the sides of the drawers so the design peeks out every time you open a drawer? That's the beauty of decorating a project yourself, you can place the design wherever you desire. 

So that completes our Daisy Drawers tutorial, it's super easy and diverse, why not be a little adventurous and apply it to a wardrobe or a bedside table? Here at Folk It! we love to see your creations so if you give this tutorial a go be sure to share it and tag us using the hashtag #youcanfolkit

Have a folky week,
Carol x
SHARE:
© You Can Folk It!. All rights reserved.
designed by pipdig