Showing posts with label Level 3. Show all posts

Tuesday, 19 November 2019

How to paint a reindeer in ten steps

Folk Art brushstrokes painted to create a delicate pattern in the shape of a flying reindeer. Designed and painted by You Can Folk It

We always love to try something a bit different at Folky HQ and over the past couple of years we have been challenging ourselves to have fun with our skills.  Every month, we set a different theme and play with different ideas.  A few months ago, inspired by the popularity of our mandala month, we began playing with patterns and silhouettes - creating doodles within different shapes.

This month, we revisited this idea after a customer challenged us to create a reindeer doodle.  We have had so many requests and emails about this one, we've put a tutorial together just for you.  Please note: although we have created this Level 3 guide, please do not feel that you have to stick to it.  Take what you want from it and leave the rest; if there is a part of the design you don't feel comfortable painting or if it involves a technique you haven't learnt yet, replace it with something else. The great thing about these doodle practice pages is that they are fun, they are flexible and they are entirely yours to paint how you will.

What we used: 

Dark paper (we love a bit of black paper to paint on!) 
DecoArt Americana in Tomato Red and Snow (Titanium) White
(or something similar)
Luxe label brushes 
No 4 Round Brush
No 2 Round Brush
Liner Brush
No 8 Rake Brush
Dotting tool
Pen
Tracing and transfer paper 

When completing these doodle animals, we always begin adding a few larger patterns to the piece.  These are what draws the eye to various parts of the shape and adds interest.  We add our dots towards the end as they act as fillers.

Step 1: Transfer your design to your paper.

Step 2: Begin by painting the larger designs using the Titanium white. Using your liner brush, paint the snowflake, surrounding lines and flowers (those marked in blue).

Step 3: Using your No 4 brush, paint the comma stroke petals in white (shown in pink).

If you haven't got the brushes we are using here, feel free to use the brushes you have and adapt the design - a thicker No 3/4 brush will need fewer petals, whereas using a liner or No 2 brush, you will need to add more petals.  

Step 4: Using the Rake brush, fill each leg with white lines.  Once this is dry, do the same again but in a different direction to create a crosshatched effect. (the yellow areas).
Again, if you don't feel confident using the Rake Brush or haven't got one, why not try using your liner brush to create this lace-like crosshatched design? 

Step 5: Next, using your liner brush, paint the lines marked in orange.
Don't worry if these aren't perfect as you will be adding detail to them - dots and lines.  This design isn't about being perfect but about having fun.  The great thing is, there may be areas in these paintings that you aren't happy with as you are creating them but they fade into the background when you look at the project as a whole.  

Step 6: Using your No 2 round brush, or a liner brush, paint two comma strokes for the hooves. Paint the comma strokes around the head and antlers (those colour coded in purple).
Here, we have painted some in Tomato Red and some in white.  You can follow our original design or make it your own. 

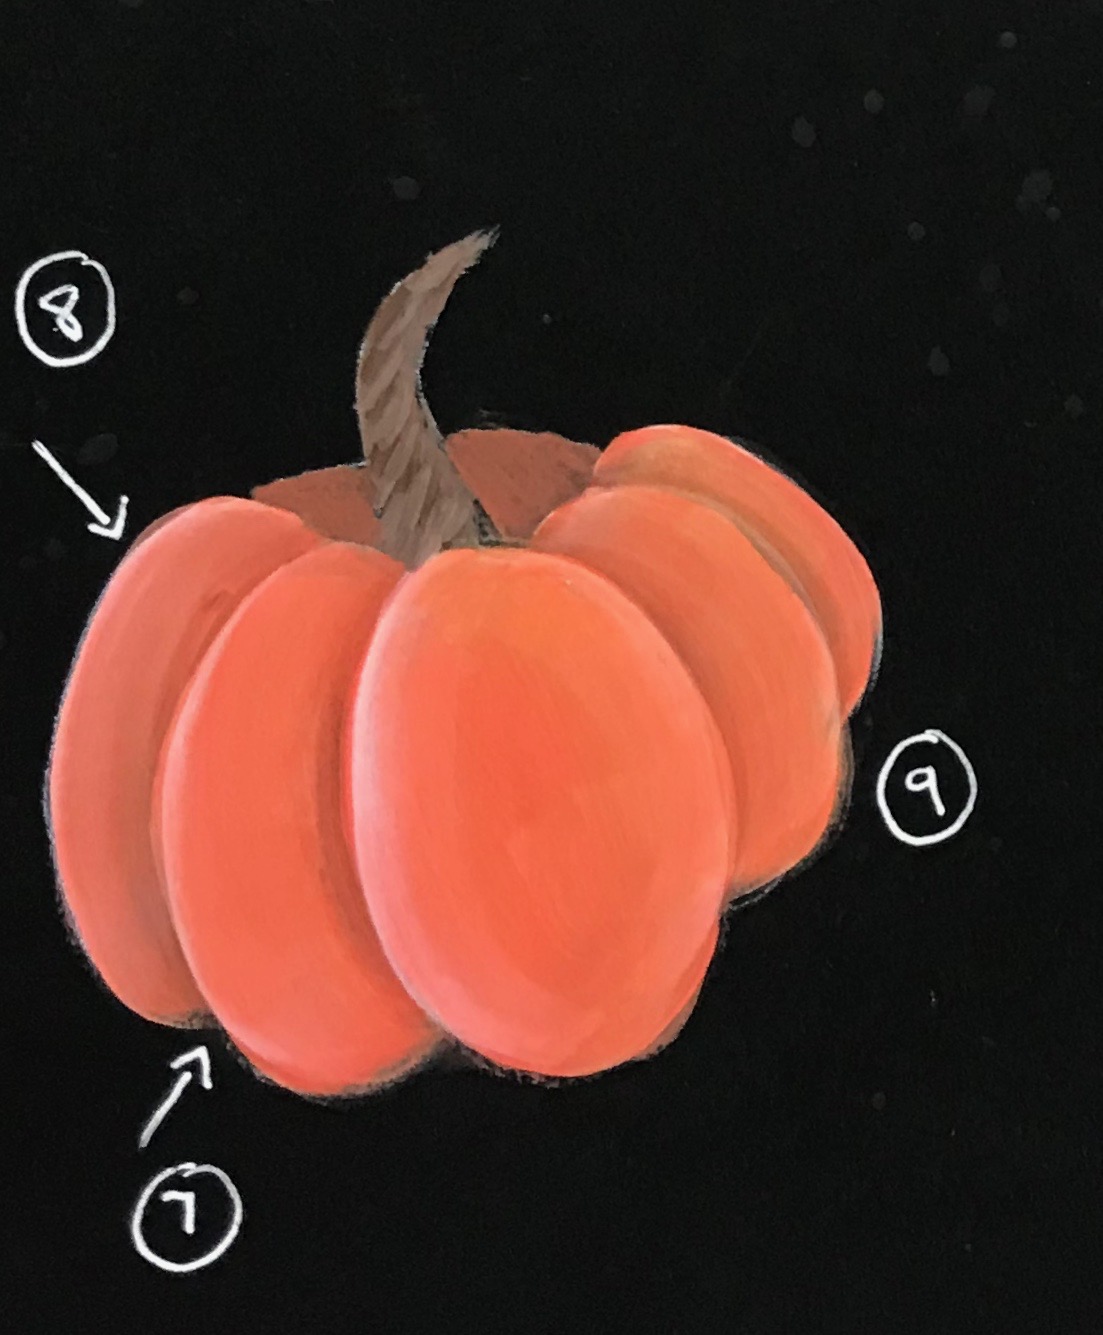
Step 7: Next, add the larger dots to your reindeer (marked green) You can use large dotting tools for this like the ones here or like us, you can use the end of a pen or pencil!

Step 8: Grab your dotting tool and create hearts across his tail using the small end (marked in red).

Step 9: Add dots across the lines and around the large dots (marked in grey)
Take a step back from your design and add dots of paint around your design where you have gaps.  You will see we have done this around the antlers, and around the snowflake.
These dots help to bring your pattern together.  While you want to have some black space on your reindeer, having too much will stop your eyes seeing the 'bigger picture' as it focuses on each pattern. Adding dots helps fill the shape creating an outline without the need for painting one.

Step 10: Add any contrasting brushstrokes/dots you wish.  You will see around the head, we layered smaller brushstrokes on top of the larger ones to add detail and bring the two colours together.

Painted reindeer created using Folk Art brushstrokes in a red and white festive palette.


If you do have a go at painting this fun project, we would love to see it.

Happy Folking x

SHARE:

Wednesday, 10 July 2019

How to paint pansies with You Can Folk It

Introducing our luxe label Angle shaders... 

Angle Shaders are used for many of the same brush strokes that can be created with the flat brush and in many cases, it makes the strokes a little easier.  One of the techniques the Angle Shader is useful for is 'floating' colour (the technique taught in our Cupcakes and Babushka kits) as the angle of the brush allows you to blend the paint on the brush nicely and the nice sharp point allows you to get into the awkward areas more easily. 


DecoArt Americana Pansy Lavender
DecoArt Americana Titanium White
DecoArt Americana Lamp Black
DecoArt Americana French Mauve
DecoArt Americana Teal Green 
DecoArt Drying Time Extender 

Brushes & Equipment used:

Pen/Pencil


1. Transfer the design (if you are completing a practice board, transfer 3 pansies to create a step by step reference as above) and use the No 8 Lux Angle Brush to base coat the larger leaves with Teal Green and use the No. 3 round brush. Mix Teal Green with a touch of Titanium White and basecoat the smaller leaves.


2. Add a touch of Lamp Black to the Teal Green and use the liner brush to apply a comma stroke vein on each leaf

3. Next, basecoat the ribbon using French Mauve.

Tip: for each of the above, paint the colours over the outline of the pansy slightly as we want these to look like they are behind the pansy in the finished piece. 


4. Use the No. 10 Lux Angle Shader to 'float' Titanium White around the edged of the larger leaves and the No 8 Angle Shader for the smaller leaves

5. Look at the pattern sheet and note that the floating on the ribbon is where the marks appear.  Float Titanium White along the marked edges (note this is the opposite edges)  Take care to join up where the 'float' meets, this will give the illusion of the twist in the ribbon

Tip: When floating colour, apply thin coats and build up with several coats rather than one heavy coat, this will give you a much better end result.

6. Basecoat the back two petals with Pansy Lavender. Next, add a little white to the lavender and basecoat the next two petals.  Finally, add a touch more white and basecoat the front bottom petal.  Apply a float of Titanium White around each petal on the pansy


7. Use the liner brush & Lamp Black to apply the centre of the pansy - add water to the brush to achieve some nice fine strokes.  Make sure you note the direction of the strokes and make sure you are putting a slight bend in them and they are not straight.  Finish with 2 comma strokes using the liner brush & Yellow Ochre.

8.  Apply dot daisies using Titanium White & French Mauve.

9. To complete the flowers, load the liner brush with Teal Green and 'tip' with Titanium White, 'tap' the end of the brush around the daisies to create filler foliage. 


If you have a go at this tutorial, we would love to see your pansies. Please tag us in social media or email your photos to toni@folkit.co 

Happy Folking! 


SHARE:

Thursday, 11 April 2019

How to paint feathers

This month, after three years of promising my daughter that I would up-cycle her chest of drawers (a bargain £40 from the charity shop - 100% wood, no veneer here and beautiful dove tail joints, without wanting to sound like my Grandma, they don't make them like they used to!) I finally got round to painting them.  Her new bedroom, purple wallpaper adorned with feathers and grey carpet were the inspiration...so out came the DecoArt Yesteryear Chalky Finish, Americana's in purples and greens, my trusty Vintage Rose kit and silver for a few feathers.  I'll be honest, I never painted a feather in my life but in for a penny, in for a pound I went for it. Worst case scenario? I'd sand and repaint it.   


I shared a few photos on social media and wow! Who'd have thought you'd all fall in love with feathers like you did.  You requested a tutorial and so I sat down last night and thought, how on earth did I do it.... Here are the steps I went through though I will say, if you have not begun your journey with the liner brush yet, this is a great project to try, it is easier than it looks and it is very forgiving.  

I have drawn out a few feather outlines for you to download here.  When you are practicing, I would suggest working with a smaller version first just to get the feel of painting them.  

You will need: 

DecoArt Americana in your choice of colour (I used Dove Grey for the tutorial and Shimmering silver for the drawers) 
Practice paper*- I love working on black, especially for this project. 
Dotting tool* (or something similar) to transfer the design.  

*All available as part of the Round Brush Starter and Flat Brush Starter kit

Transfer your favourite feather design

How to paint feathers with You Can Folk It - Step 1 painting the centre.

Step 1: Once you have transferred your feather onto the practice paper, using your liner brush, paint your centre line from the bottom of the feather to near the top.  
Tip: you may need to add a little water to your paint or Drying Time extender to help the brushstroke flow, especially if you are working on a larger feather.  

Step 2: To paint the strands of the feather, roll the paintbrush in the paint (as Carol teaches in her video here) to remove the excess before painting.  Although this is a very forgiving design, you want to avoid blobs of paint near the centre.  

How to paint feathers - step 2 adding brushstrokes


Step 3: Start painting your strands working from the centre line to the outside.  Don't try to be too straight, don't think too much...the wobblier the better sometimes! As you can see, some lines are 'brighter' than others and that's ok too. It will all add to the finished look.  

Tip: Don't be tempted to flick the brush when you are doing this. Just like when painting Folk Art, always pull the brush and lift near the end of the brush stroke.  

Painting feathers with You Can Folk It - how to

Step 4: Continue working down one side of the feather. As you paint, try to change the 'wobble' in your brush strokes. This will give you gaps in the feather like a real one. 

Painted feather from You Can Folk It

Step 5: Repeat the process down the other side.   

Adding a second layer to your feather

Step 6: Now you have done the first layer, it is time to build it up.  For this I used a dryer brush meaning I did not add water to my paint and I kept painting brushstrokes even when there wasn't much paint on my brush.  Here is what my brushstrokes would have looked like without the finer ones underneath.  You can see they are much less thought out but just add texture to the final feather. 

Painted feather from You Can Folk It
Here is the finished feather. 
Note: As you get more confident painting feathers, you may find that instead of painting two layers, the finer brushstrokes and dryer ones will come naturally to you as you paint, that's fine, the effect will be the same. Like we always say at Folk It, it will all come with practice. 

Purple feathers painted in a wreath. Learn how with You Can Folk It

Once you have mastered the feather, have fun and play with ideas. Here, I drew round a bowl, following the circle with each centre line and filled in both sides of each feather. 

There is so much you can learn using the same brushes and techniques taught in our kits, if there is something you want to try, go for it and if you aren't sure, get in touch or attend one of our workshops, we are always happy to help.  

I do hope you enjoy this tutorial, if you have any questions or have a go yourself, please leave a comment, we'd love to hear from you.  

Happy Folking, 

Toni x 


SHARE:

Saturday, 6 April 2019

Play with pattern


When I was learning to paint and teaching, one thing I loved was combining different elements to create something different.  Whether you have learned daisies, roses, ribbons or all three, there are numerous ways you can combine them to create something unique.  There were always some elements for me though that pair so well together, I found myself pairing roses and delicate lace time and time again in different ways.

Hand painted gift box decorated with folk art style roses and a lace pattern


This month, for our theme in April we are focusing on pattern and I just couldn't help but look through a few of my old pattern folders and came across this design.

Vintage Roses and lace design created by Carol Sykes from You Can Folk It

Mixing vintage roses, flat brush leaves and lace, it creates a delicate pattern that I will be working with throughout the month. So join me as I play with colour and play with this design to show you how you can create many different looks with just one design.  

If you would like to have a go at painting this design and want to join in and discover all the different looks you can create throughout the month, you can download the design from our Pinterest Folk It pattern board.  

I do hope you will join me on this journey :) 

Love, Carol x 


SHARE:

Monday, 10 December 2018

Christmas Cupcakes in 10 easy steps


What you need: 
Card/envelope/mountboard (or bauble mount board) 
Tracing paper & transfer paper*
Flat Brush, Medium Liner Brush and Dotting tool* 
You Can Folk It Cupcakes painting kit 
DecoArt Americana acrylics in Razzle Berry, Holly Green, Lamp Black and Titanium (Snow) White 
Drying Time extender*

*All included in our Flat Brush Starter Kit


An outline of a cupcake with a snowman sat on the top.

Step 1: transfer our Snowman cupcake pattern to your surface. This will fit perfectly on one of our square mount boards or baubles. 


Painted white silhouette of the a snowman topped cupcake.

Step 2: To help the colours on your final piece pop, base coat the entire area of your design with white using your flat brush.  


White silhouette of a snowman topped cupcake with pencil lines marking out the details


Step 3: Transfer the lines you need back onto the painted area.  


Snowman topped cupcake - with painted areas of red (the cupcake wrapper) and green (for the Snowmans hat and scarf)

 Step 4: Using your flat brush again, base coat the cupcake wrapper in red and the top of the snowman's hat using Green.  Before base coating the rim of the hat and the scarf, add a little white to make it just slightly lighter.


Hand painted snowman topped cupcake with highlighted and shaded areas to make it look 3D

Step 5: Using the Razzle Berry, float colour onto the cupcake to add texture, just as you would in our cupcakes kit.  Don't forget to add rosy cheeks too! 

Step 6: Using white, float colour around the base of his hat to highlight it. 

Handpainted snowman topped cupcake design. The snowman is dressed in a green tartan hat and scarf to compliment the red festive cupcake wrapper.

Step 7: Using your liner brush, add a pattern to his scarf and hat.  Begin with Razzle Berry and Black before adding white lines, edging and tassels. (Don't forget to add a little bobble on his hat too!)   

Step 8: Using the large end of the dotty tool, add his eyes and mouth.  Using the small end, add two dots of white to each eye.  Add his carrot nose using the liner brush (or you can apply it using the dotting tool) 

Handpainted snowman topped cupcake design Christmas card. Thesnowman wears a green tartan hat and scarf and the red cupcake wrapper is decorated with white berries and leaves

Step 9: Float white lines on the cupcake (as shown in our kit) and add berries to the area using the dotting tool. 

Step 10: Apply Crystal Glamour Dust to the design as you paint to create that all important sparkle at winter time.  

Hand painted snowman topped cupcake Christmas card design painted on to a card and mount board bauble shape that can be used as a gift tag

Don't fancy making a card? Why not try adding it to one of our baubles?


SHARE:

Wednesday, 21 November 2018

The beauty of Bauernmalerai

November is about all things vintage at Folky HQ as part of our #funwithfolkit painting challenge.  This week, we thought we would indulge in a little Bauernmalerai painting - a version of folk art originating from Germany, Austria and Switzerland.  Using the round brush, it uses our beloved comma strokes as well as the c and s strokes.  If you have some of our Flat Brush kits you may have learnt these brushstrokes, the only difference is that in this project you paint them using the round brush.  If you are up for the challenge, it certainly is a lovely design to paint. 

For this project, you will need:

Liner brush 
No 3 Round Brush 
True Ochre, 
Tomato or Country Red, 
Warm White, 
Antique Green,
French Grey Blue, 
Burnt Umber
To Antique and complete the tray you will need:
DecoArt Metallic lustre in Copper Kettle 
Soft, lint free cloth
Your chosen varnish

Traditional decorative painting - Bauernmalerai pattern outline


Once you have transferred your design, begin by base coating your roses in Red and Ochre.  

Step by step images of how to paint Bauernmalerai inspired roses and tulips using Folk Art brushstrokes.

To paint the roses load your brush with Red/Ochre and side load with warm white. 
First, paint 2 comma strokes to the bottom of your rose then fill your circle using C strokes to create the rose as shown above. 

An image of a plain tea tray and the painted design that will be added to it. The design consists of red and yellow roses and blue tulips with a decorative border


To paint the Tulip, load your brush with French Blue Grey and side load with Warm White. 
Using s strokes, paint the outer petals before using comma strokes to paint the centre.  

Using your liner brush (loaded with Antique Green) apply the stems. 

Painted white tray decorated with a traditional Bauernmalerai design featuring red and yellow roses and blue tulips

To paint your leaves, load your brush with Green and side load with the True Ochre.  Paint your S strokes to the tulips.  

Next, using the same colours, paint the comma strokes around the centre and edge of the design. 

A photo of the completed Bauernmalerai pattern featuring red and yellow roses and blue tulips on a plain white tray next to the pattern/design sheet


Next, paint the edge pattern around your tray. (If you are choosing to do this on a different project, you could use this design as a border or leave it out).

A photo of the sides of the tea tray decorated with hand painted daisies and leaves in the Bauernmalerai style

We have painted our flowers with the blue/red side loaded with white. Finish by painting the comma strokes with green side loaded with white. 

Once we were certain the tray was completely dry, we decided to complete the Vintage inspired project by Antiquing the tray.  To do this we mixed 3 parts Drying Time extender and 1 part Burnt Sienna before applying this to the tray.  You can check out our video tutorial here

Next, apply a little metallic lustre to the edges and handles of your tray.  Leave to dry before varnishing. 

A photo of a wooden tray that has been painted white and hand painted with a Bauernmalerai inspired design of yellow and red roses and blue tulips. A wash of brown has been applied over the top of the tray to tone down the colours and give the tray an antique look


SHARE:

Monday, 22 October 2018

Paint your own pumpkin tray - perfect for Halloween


You will need:
You Can Folk It! Brushes & Tools
Medium Liner, Flat Brush, Dotting Tool
DecoArt Americana: Tangelo Orange, Burnt Umber, Warm White, 
Avocado, Bright Yellow
Other: Practice paper, tracing paper, transfer paper

Before painting your project, practice all the elements on the practice paper. (You can find the patterns on our Folk It patterns Pinterest board.)  It's always a good idea to try painting the larger Pumpkin from the practice sheet first before moving onto the smaller ones.


1. Add a touch of Burnt Umber to Tangelo Orange and paint around the stem

2. Add a touch of Burnt Umber to Warm White and paint the stem

3. Add water to Burnt Umber and with this watery mix & your liner brush apply uneven diagonal lines to the stem

4. Add a touch of Tangelo Orange to Warm White and starting at the back paint each section of the Pumpkin using a 'C' stoke. 

5. Apply a second coat of this mix if necessary.  Tangelo Orange is a transparent colour, therefore we are creating a base so that the colour stays vibrant.  If you are painting onto a light coloured surface you can omit this step.

6. Next apply a coat of Tangelo Orange to the front sections.

7. Float Burnt Umber. (This is a technique we teach in our Flat Brush Cupcakes and Babushka kit) Before beginning this step, study the pumpkin below for a moment, bearing the following in mind... The Burnt Umber is going to create a shade, so we are floating the darker colour to any section that is behind another.  

8. Float Warm White on the edges of the Pumpkin that sit in front of another.  By using this technique, we help flat objects take shape. To the eye, dark colours recede so look further away and light colours advance and so appear closer. 


9. Make a wash with your flat brush using plenty of water and Bright Yellow and apply over the whole Pumpkin, see how this has reduced the whiteness of the floated highlights, this is a great way to dull your floated colours if you have just started learning...it also gives the Pumpkin a lovely warm glow.


10. The leaves are created using the wiggle stroke as taught in the Butterflies lesson, a comma stroke using the flat brush and combining the 2 together.  If you have not yet progressed to this level, then use your favourite leaf. 


11. The blossoms are as taught in the Oriental Blossom Lesson.  Use Warm White to paint each of the Petals and apply dots using Burnt Umber & Tangelo Orange.  


Once you are happy with your skills, you can create your final design.  If you wanted to create your own wreath design, you can learn more about how to do that here. To create your wreath, begin by painting the pumpkins.  When painting the stalks, try to paint them in different directions to add variety. 

Next, add your leaves.  Using single leaves and clusters, aim to fill the majority of your circle.  If you do not feel comfortable using the ruffled technique, use whichever technique you do feel comfortable with.  We painted leaves in a few sizes, again to add interest to the design.  

Next, add single blossom flowers around the wreath - don't worry if they overlap areas you have already painted.  Finally, identify any areas that look empty and add dots (using the small end of your dotting tool) and small comma strokes using your liner brush.  

To seal your work, you could use DecoArt wax however, if you have painted a tray as we have done, it is better to opt for a couple of coats of varnish to protect your project.  
SHARE:

Wednesday, 29 August 2018

How to paint wreaths - part 3


We may have welcomed another month of the painting challenge this August but our head is still buzzing with ideas from last months wreath theme. The answer? To combine them both of course! This August, we took out our bright paints and set to work creating this beautiful heart wreath. Painted wreaths can come in all shapes and sizes as you demonstrated last month and we love this heart shaped one.


Here's the colours we opted for - styling our roses with a lighted background and more vibrant petals to really make them pop but have a play with colour and see which colours you prefer and find a look that suits your style.  

When we began to paint this idea, we did wonder what we had let ourselves in for. After all, when you have a new idea buzzing away in your head that you are excited about, it can be a little scary to try and translate that onto the page for fear that it won’t measure up to your imagination. We were so pleased when the risk paid off and so we have put together a little tutorial to help you create your own heart wreath. We have drawn the template using circles where the roses should be painted, however there is nothing stopping you from replacing those circles with daisies, oriental blossom flowers, or even butterflies if you’re really thinking outside the box. Try something new today.


Step 1: Using your template and transfer paper (this can be found in the starter kits or in our online shop) to transfer the po using your template and transfer paper (this can be found in the starter kits or in our online shop) to transfer the pattern to whatever surface you’re working on. Depending on surface you may need to resize the pattern to fit.


Step two: Begin by painting the circles that will make up your Vintage Roses. Using the role of three/five from the first instalment of this wreath series, we filled in 5 circles using the pink and three circles of each other colour. If you are painting on black paper as we did,  you may find you need two coats of paint for each circle.  When these are dry, add the centres and the petals.  As you can see we have alternated the direction of the flowers around the heart and this has been marked on the pattern for you.


Step three: Once your Vintage Roses are dry, begin filling in your leaves. Here we used the round brush leaves as taught in our vintage rose kit.


Step 4: Once your leaves are dry, add the fillers to your heart. Here we used plain dots as well as dot roses in a variety of colours but you could add Dottie daisies or any other small design you wish.  As we mentioned earlier in the series,  keep taking a step back to look at your design as a whole and see if there is anywhere that needs filling.

Step five: finally using the liner brush from either  of our starter kits, add stalks to the leaves using comma strokes.

This would look great painted on to a A4 board and framed or onto a canvas.  If you have a go at painting this gorgeous wreath, do tag us on social media or use #funwithfolkit 

Happy Folking x 

SHARE:
© You Can Folk It!. All rights reserved.
designed by pipdig