Showing posts with label image transfer. Show all posts

Wednesday, 21 June 2017

Awesome DIY Image Transfer projects


There is no better feeling than creating something you love.  We've been getting creative at Folky HQ updating some old props and creating some fantastic projects ready for our shows.  The beauty of image transfer is that you have a wide range of choice over what you would like to add to your project.  Whether you want to add quotes and sentiments, family photos, bold typography or vintage style images, the choice is yours.  

We used our Series 2 Design book to add vintage style transfers to this plain freestanding piece of home decor to create a quirky centrepiece.

We absolutely love plain decorations like this popular free standing Love decoration because they have so much potential for creating something unique.  Using a variety of vintage inspired images from our Series 2 Design book, we copied the images using a laser jet printer and applied them randomly around this piece to create this fun project. 

Combine transfers and washes of colour to make the designs stand out. Turn unloved items into treasures.

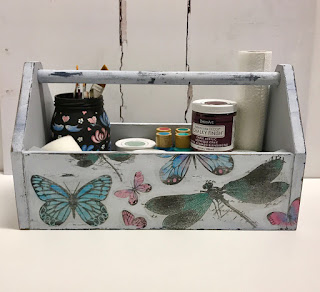
Transfers do not have to stay black and white though.  With this up cycled tool caddy, we applied the butterflies and dragonflies before adding splashes of colour.  To add colour to your project, add water to your acrylic to thin it enough to allow the image to show through and add it to the areas you want to.  


One of our favourite Chalky Finish colours is this dreamy Vintage so when someone brought a sad looking wooden mirror in to the office, we just had to give it a make over.  Using the 'Angels' quote from our Design book, we combined it with some hand painted angels (from our Series 1 Folky Christmas kit) and stencils. It's gone from unloved trash to treasure :) 

Vintage transfer from the Design book paired with You Can Folk It Oriental blossom. Kits available from www.folkit.co

This adjustable stool started life in Ikea; plain, black and practical, it was begging to be decorated.  Base coating it using white chalky finish, we added our gorgeous Vintage transfer.  To soften the look, we played around with our Oriental Blossom flowers.  Diverging from the original design, we paired them with leaves we teach you how to paint from our Rosebuds kit.  By mixing and matching brushstrokes in this way, we were able to create a unique pattern to compliment the transfer and also work with the shape of the stool.   

We were able to create such beautiful projects using our Series 2 Starter kit. When we were creating the second series of painting kits, we wanted to add something extra.  Image transfer was something we loved because of its versatility. Whether you wish to add vintage style images, bold typography or personal photos to your project, it is possible with this technique.

So, we packed our Starter kit with DecoArt Matte medium, sentiments perfectly designed for each project and a DVD full of instructions to guide you through the process.


Each project you see here used the contents of this kit along with our extra Design book which provides a great collection of images in addition to the sentiments we provide in each of our kits.  To find out more about these resources, check out our Series 2 kits here

For more inspiration and ideas for using the image transfer technique, you can also check out our Pinterest board.  Don't forget, we would love to see your creations.  Share them with us on our Social media accounts or tag us #youcanfolkit 

Happy Folking, 

The You Can Folk It team x 


SaveSaveSaveSave
SHARE:

Monday, 6 June 2016

How to create unique storage that everyone will admire


What you will need: 

Vintage suitcase (or similar)  


This month, we were featured in the fantastic Reloved magazine. If you haven't come across this publication, it is the go to magazine for the latest up-cycling inspiration. Since it went on sale, we have had so many enquiries about out gorgeous dragonfly and rosebuds up-cycled suitcase, we have put together this step-by-step how to for you to follow. 


1. As with our Vintage Rose and Oriental Blossom cases, begin by painting the whole case (inc. the metal details and handle) in DecoArt Chalky Finish paint (this time in Vintage)


2. Next, use a brush and apply DecoArt Metallic Lustre in Iced Espresso to the details (corners, locks handles etc) The reason for this is to give the wax something to adhere to. Leave the wax to dry completely. Once it is dry, buff with a dry, lint free cloth to give you the fantastic metallic look.


3. Next, copy your chosen designs using a Laserjet printer. Laser printed images do give the best results.  It is possible to use an ink jet printer but the ink may smudge as you seal the image. When you are ready, follow Carol's instructions on our Series 2 DVD's to help you prepare your surface and transfer the images. The stamps, dragonfly, hotel images as well as the ones we transferred on to the sides are all from our Series 2 Design book and have already been reversed for you.


4.  Once you have transferred the images, paint rosebuds from our Series 2 design around the 'Hotel Royal' transfer. There is no right or wrong way to do this; you can copy the design Carol has painted or paint your own pattern. Again, our add on kits contain DVD & full colour instruction booklet, complete with templates to trace so you can learn, step-by-step how to paint these beautiful rosebuds. 


5. Next, add designs to co-ordinate with the transfers you have added around the sides. On our suitcase, we added more rosebuds on the sides. Where the 'Angels' transfer had been added, Carol added dot roses using DecoArt Americana Acrylics in Plum, Titanium white and Avocado from our Series 2 Starter kit. Next, Carol added angels from our Series 1 Christmas kit using the round brush from the Series 1 Starter kit. Next, butterflies were painted on the top of the case near the handle.

NOTE: the design you create on your suitcase will depend on your own preferences and the kits you own so get creative and have fun, for example, you could add more rosebuds and a different quote if you didn't have the kit or didn't want to invest in both Series.

6. Leave to dry. After a couple of days when the paint has cured, using DecoArt's Round brush, apply a layer of DecoArt Creme wax (we used Clear Creme Wax) to protect it. Leave to dry and buff with a dry, lint free cloth to give it a soft sheen 

All that's left for you to do now is display your case for others to admire. Whether you use it to hold towels in your bathroom or as alternative storage solutions in your living room, it will be admired by all who see it. Why not find suitcases of different sizes and stack them to create a feature in your home? 

How would you paint yours? What would you use it for? We'd love to hear your ideas. 

Happy Folking, 


The You Can Folk It team x 
SaveSaveSaveSaveSaveSave
SaveSaveSaveSaveSaveSaveSaveSaveSaveSaveSaveSaveSaveSave
SHARE:
© You Can Folk It!. All rights reserved.
designed by pipdig