Showing posts with label painting tips. Show all posts

Tuesday, 14 January 2020

Upcycling ideas for your Christmas rubbish


Our first blog post of 2020 and no sooner did we ring in the new decade, we are already almost halfway through January.  This month, with everyone receiving lots of packaging along with their presents and many a box of Ferrero Rochers consumed (hands up, surely we aren't the only guilty party(?!) January is a great time to upcycle.

In the days when there are more and more calls to reduce the number of things we buy, we strive to buy less and less each week BUT what can we do to save items from landfill and reuse?  For us, upcycling is linked to slowing down - slowing down before we automatically throw something away, slowing down to consider whether we really NEED that new item or whether we can make something similar with what we have and also taking the time to upcycle something and devote the time it deserves.  If we do a half-hearted job, chances are we won't be happy with it and we will end up buying new anyway.

So you're at a point where you have a project to upcycle but have no idea where to start? Well first off we should mention that we are always here and always happy to help so if you have a question about a surface or project you're not sure how to paint and you would like advice, drop us an email at toni@folkit.co

However, we have put together a little blog for you to help guide you to find some answers when it comes to saving those boxes and tins from landfill so take a look and see if the answer you're looking for is here:

1) Ferrero Rocher boxes - these help to make wonderful wet palettes.  If we want to save money, we've got to look at our supplies first.  The first rules we teach students is a) take care of your brushes and they will take care of you and b) save your paints.  We often overestimate how much paint we need and don't use all of it in one sitting. Rather than throw it away, pop the lid on and come back to it another day.  Just make sure that you do change your greaseproof paper and refresh your sponge every 4-5 days to prevent mould. 

Handpainted chocolate box using folk art painting techniques by You Can Folk It

2) Chocolate boxes and gift boxes

These are the perfect projects because they are often small and contain flat surfaces to paint on as you gain confidence learning to paint 3D objects (which if you are just moving from 2D surfaces can take a bit of getting used to).  These items can be porous or may have a shiny surface.  If this is the case, chalky finish paint is great because you do not need to prep the surface or add primer.  If you do choose to use acrylic paint, we recommend adding Multi-Purpose Sealer to your paint to help it adhere to your project.  You can find out more about how to use this wonderful medium in this tutorial

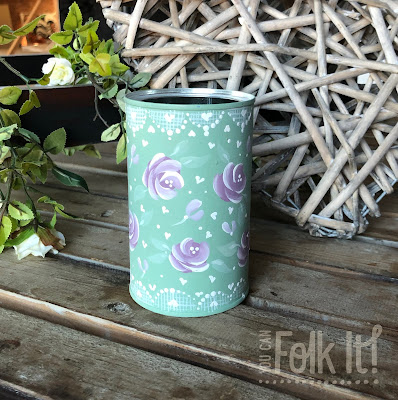
Painted coffee tin using Chalky Finish paint and our You Can Folk It Vintage Rose kit.

3) Coffee tins, cans and tubs

We love saving our tins to decorate and use for storage around the office. Nut tins, coffee jars, you name it they're perfect for storage.   Whether it is paintbrushes, pens and rulers or things that are just cluttering up the place but don't have a home, they are our go-to projects.  Similarly, chocolate tubs can help store lots of bulkier items in the home and kitchen.

We ask friends and family to save cans and tubs too so we can create a matching collection of storage in different heights and sizes to create a bit of a centrepiece - we might as well make a feature out of them.  If you have no need for extra storage, why not use them as packaging for next Christmas? They are perfect for housing gift cards or money, sweets or handmade baked goods for a loved one...and it gets rid of the need for unrecyclable wrapping paper. 

Find out more about how to prep items like these tins and tubs here.

Pringles and coffee tubs up cycled using You Can Folk It and DecoArt chalky finish paint

Another idea (if you remembered to save the lids!) is to cut a slit into the lid and create your very own money box.  Yes, money boxes are readily available but why not consume less, save that money and make your own? This is a fantastic project for kids too!

Old jars decorated with paint and folk art roses and designs

4) Glass

Once you have mastered the 3D surface, you can expand your skills and move on to glass. With so many beautiful bottles out there, you can create something really special.  I once went to a wedding where the centrepieces were all painted bottles filled with fairy lights.  They can make beautiful home decor but painting on glass requires a little work as you will read here. 

Old jam jars, glasses, vases are great projects but be aware, unless you use Glass paint, these will be for decorative purposes only and are not food or dishwasher safe.  

Handpainted wine bottle, decorated with You Can Folk It's rosebuds folk art design

...who says you need to wait for an empty bottle to paint? Why not co-ordinate the gift with the card and add a painted design on to the bottle before gifting instead of wrapping it?

We hope we have given you a few ideas to make the most of your Christmas packaging and given you the advice you need to complete up-cycling projects of your own.  At Folk It! we passionately feel that with a little time and effort, painting is a great way to help us to reduce, re-use and up-cycle, it can help us save money, do our bit for the planet all the while giving us a creative escape that we crave.

Happy Folking x


SHARE:

Tuesday, 21 May 2019

The worst advice I've heard

You'll need to invest years in learning something new, don't you know it takes thousands of hours to become an expert? How many of us have heard 'It takes 10,000 hours to master any skill' According to some, this is the key to mastering a skill and it was first seen in a paper written by Anders Ericsson in the '90s, a University Professor who reviewed studies of the practice habits of violin students from childhood through to adulthood.  Since then, the idea that we need to commit 10,000 hours to master something new has been widely discussed and referred to by many.  

The problem with this statement is that for many, it is daunting.  10,000 hours to be good at something? To be confident in your skills? Somehow it begins to sound like work, it feels stressful and for a lot of people, the element of fun seems to disappear upon hearing this.  

Carol Sykes from You Can Folk It painting a wall mural at The Handmade Fair


In all honesty, if I had heard this before I began my creative journey to learn Folk Art, I would have thought twice about it.  For me, I wanted something fun, some time for me in those early years of motherhood.  Yes, my ultimate goal was to be able to use my skills in the home, to paint my furniture, my walls...to transform my house to a home, but more than that I wanted to relax and enjoy the process.  

I was a complete beginner. I had no experience in painting or any other creative pursuits and my drawing abilities left a lot to be desired but in those classes, I found a creative pursuit that was skill based meaning that with practice, I knew I could achieve something. So if I knew I had to practice, to spend time developing my skills why do I have an issue with the above statement? 

For me, the flippant comment that it takes 10,000 hours can be so problematic for many thinking of learning a new skill.  Just as so many of us were told we are not creative by others; statements like these can stay with us for a long time.  For some, it may make the process of learning less enjoyable, others may give up in those early stages, and it may even discourage some individuals from beginning altogether.  

Before: red and white beginners Vintage roses

Confident and beautiful Vintage Roses painted on to a plant pot

One of our students - On the left is one of her first Vintage Rose projects, on the right is her vintage rose plant pot created months later after 20 minutes (almost) daily practice.   


As a student learning Folk Art and as a teacher, I strongly believe that small, regular bouts of practice are the most beneficial.  The advice I give my students in those early days when they need to teach their muscles to hold a brush and move the brush is to try to spend 20 minutes a day practicing your brushstrokes, whether that is with paint on your brush or just using water.  This will help build your skills and you will see a real difference in your brushstrokes in a few weeks.  

When we choose to try a new skill, very few of us wish to become an expert so why have we adopted the idea of 10,000 hours so readily? In a recent video, Josh Kaufman states that to learn anything, to go from a complete beginner to being good, to feeling confident about your skills takes about 20 hours.  Now doesn't that sound more achievable? It certainly feels more hopeful, more achievable...more fun!

Keep your practice sheets so you can see the progress you are making.  This student began with daisies and hindeloopen flowers (see sheets left and right of the image) and finished the workshop with the canal art roses (centre).  Her strokes became more confident with practice.
By being mindful that 20 minutes a day is all that stands between beginner brushstrokes and confident, well-shaped brushstrokes, we are less likely to give up when we hit an obstacle.  Those early hours of practice may be frustrating as you get the hang of how to hold and move your brush but if you can commit to 20 minutes a day, you will see your commitment pay off.  

So, next time you see the 10,000-hour rule somewhere, think twice.  Learning something new is achievable and it doesn't take years.  If, after your 20 hours is over, you wish to give up; walk away from it but don't dabble.  Don't listen to the voice in your head telling you to give up after a few mistakes, you may miss out on more than you think. 

What do you think? Do you agree with the 10,000 rule or has your learning experience been different? Please let me know in the comments. 

Carol x 


SHARE:

Tuesday, 3 October 2017

How to make your paints last longer


There's nothing we love more than browsing the paint colours and swatches at Folky HQ, deciding which ones we would like to use or which combinations will create a dreamy shade for a new project.   However, just like when you sit down to indulge in a bit of creative me time at home, it is very rare we can paint uninterrupted and use all our paints up and when you are painting, the last thing you need when painting your comma strokes is drying paint.  Even if you do get to enjoy an uninterrupted Folk It session (yay!) sometimes paints go such a long way, we end up wasting a lot of the paint we've poured out.  Fear not though, we are here to share a crafty secret that will change all that.  

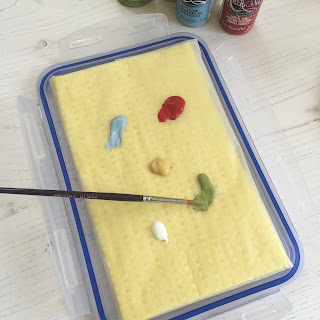
The most valuable piece of kit for us is a wet palette. This container will help keep your paints wet for a few days, perfect for those times when we get interrupted.  The great thing is that with a bit of time and a few supplies, you can create your own.  

For a wet palette you will need: 

An airtight container (we purchased a cheap klip lock style food container) 
Sponge cloth 
Baking paper (ensure that it is the unwaxed version, your paints will not sit well on waxed paper making blending your paints especially difficult) 
scissors 

Step 1: cut your sponge to size.  You will need the sponge to sit neatly inside the lid of the box once it is wrapped.  

Prevent waste and make your paints last longer with your own wet palette. For the price of a few household items, save money and art supplies.

Step 2: Lay your newly cut sponge cloth on your baking paper and cut your baking paper to size. (imagine you are wrapping the sponge just as you would a gift). 


Step 3: thoroughly wet your sponge cloth and squeeze out any excess water.  

Step 4: wrap the (now wet) sponge in the baking paper so that one side of the sponge is smooth.    

How to save money and paints - create your own palette

Step 5: lay the sponge in the lid of the box, add the acrylics you need and paint as normal :) in the event of any interruptions, simply clip the 'lid' on over it.  

Prevent waste and make your paints last longer with your own wet palette. For the price of a few household items, save money and art supplies.

Sit back, relax and enjoy your new palette! For the price of a few household supplies, you can rest easy that you can pop the lid on any time you wish and return to your project soon.  The box will keep the paints fresh for a few days (hopefully enough time to complete the project you are working on).  Make sure that you refresh your sponge with water and rewrap in fresh baking paper when it becomes too messy to use.  

Prevent waste and make your paints last longer with your own wet palette. For the price of a few household items, save money and art supplies.

If you have any handy hints and tips that make life easier when you are painting and crafting, do let us know, we love a good craft hack. 

Happy Folking x 


SHARE:

Tuesday, 26 September 2017

Brand New Folk Art workshop

We will be teaching everyone how to create the perfect base for their project and how to paint beautiful Folk Art designs.

The time has finally come! After a few setbacks over the last year, we are excited to finally announce our first brand new painting workshop.  If you came to visit us at the Handmade Fair recently, you will know that we have recently finished teaching a few Skills Workshops at the event and we definitely got a taste for it again.

Avid followers of You Can Folk It will know that we first introduced workshops back in 2016 but we had to take a step back due to personal reasons. That's why, after a bit of re-thinking and re-formulating, we are so excited to come back with a bang.  We have a fabulous new venue at Kempton Park and are excited to meet faces old and new for the fun filled, creative and inspirational day.

Learn to paint the comma stroke and it can be used to create so many different handpainted designs.

After over 20 years of painting, there is not a lot that we don't know! During the workshop, we will be concentrating on teaching each and every one of you have to use a Round Brush to paint three common Folk Art brushstrokes and learn how to put these together (just as you learn letters to put them together to write words) to create beautiful flowers and other designs that are not included in our Round brush series. Whether you are a fan of our kits already or are a complete beginner who has never held a brush before and you fancy learning something new, head on over to our workshop page.

Create these beautiful Folk Art sunflowers on our Round brush workshop.
These beautiful sunflowers are just one of the flowers Carol will be teaching on the day

However, the fun won't stop there, we ask that everyone who attends the course brings two small items; new accessories for the home or treasures that you have simply fallen out of love with to transform throughout the day.  These can be wooden, metal, glass or terracotta.  As well as learning the brushstrokes, we will also be taking you through the basics of preparing your project and creating a variety of finishes from using DecoArt's Weathered wood, antiquing and using metallic lustres to compliment your painted design.

We are kicking off our first round of workshops at Kempton Park but if you can't make the 11th November, worry not as we will be announcing more dates and venues for early 2018.  We hope to see you there!

SHARE:

Wednesday, 29 March 2017

How to paint on slate the right way

Paint on slate - how to tutorial

If we were to tell you the most common questions we get asked here at You Can Folk It, it would be how to paint on to different surfaces.  Within our kits, you receive the materials that are best for beginner projects, mount board and wood.  We chose these because they require no preparation beyond base coating and they are a delight to paint being small, manageable (thanks to the flat, smooth surface) and easily replaceable should you be unhappy with the finished result (though we have never met a customer yet who doesn't love their first project).  

Our recent tutorials have given you step by step instructions on how to paint on to plastic and glass objects that are often available and begging to be reloved instead of being thrown away.  However, what about slate? There are so many different slate products in the high street at the moment, from notice boards to coasters, placemats to photo frames.  With their rustic look and hand crafted appeal, they make the perfect addition to any home.  


So, if you want to add a few hand painted details, what do you need to know? 

1.  As with any surface, to help the paint adhere to your project as much as possible, you need to make sure that your surface is clean and free from dust and dirt.  You can do this by simply wiping down the surface with water and a lint free cloth.  

2. Being a porous surface, to paint on to slate you do not need a primer as the paint will adhere to the surface easily.


3. You can base coat your slate if you wish.  To create a matte finish similar to the natural slate, choose a beautiful shade of Chalky Finish paint.  
4. Plan your design around your surface. The natural characteristics of slate means there may be areas that you would not be able to add designs as easily as you hoped.  Think about this when you are designing your patterns.  

5.  As slate can be easily scratched, in order to protect your project from signs of wear and tear, the best way to finish it is to apply two coats of varnish.  Even though you are varnishing your project, there is no need to compromise on the matte finish.  Seal your slate using two coats of DecoArt Ultra Matte Varnish and leave to dry.  

Please note: We recommend leaving your project to cure for a few days before using them.  While paint and varnish can feel dry to the touch, they need a few days to cure completely.  

Happy Folking, 

Carol x 


SaveSaveSaveSave
SHARE:

Monday, 14 November 2016

5 mistakes you're making when painting comma strokes and how to fix them


When we meet our customers at shows or at our Ambassador courses, they will often say that they love to complete our dotty designs made popular by our Starter kits and Dotty collection but that they just can't get the hang of comma strokes.  For many, it seems like a huge leap of faith to suddenly swap your dotting tool for a paintbrush and it can be easy to become disheartened with your progress if we don't get it right first time.  Sound familiar? 

The thing is, not everyone will experience these 5 issues, some may only be missing one of them but each factor can make the difference between a wonky comma stroke and the brush stroke you've always dreamed about painting.  The great news is that each one of them is a minor thing and we see them time and time again but we also see that with awareness, practice and perseverance, these issues can be overcome and anyone can create the perfect comma stroke.  

So, what are you doing that is throwing your brushstrokes off track? 

When we are painting, it is easy to become so focused on the act of painting that we don't consider the fact that we might be doing something differently to what we have seen others do.  The next time you sit to paint a design from one of our Series 1 add on kits, we would like you to become aware of these issues and, if you see that these are something you do, work on improving them.  

1. Thinking too much


Well of course we need to concentrate, we are learning a new skill! Right? To a point.... Yes, we need to think about how we are sitting, where our paintbrush is pointing but once we have mastered those, we should let the brush do the work rather than our minds.  So often we become so hung up on creating the perfect curve, the neatest point, that we try to control the direction our brush is going and flick the bristles or pull the brush away too quickly from our paper.  

We will let you into a little secret here..... if you position your brush on the paper correctly and move your brush slowly, you will find you get a much smoother stroke.  It does not matter if each practice stroke is not perfect, what matters is that you sit back, relax and enjoy the process.  The funny thing is that once your paintbrush knows you're more relaxed it will work with you instead of fighting against you! 

2. Loading your brush with too much or too little paint.  


When you load your brush with too much paint, you will find that as you paint your comma stroke, the comma will not be flat but will have two ridges of paint on each edge of the stroke.  If you do not load your brush with enough paint, no matter how you move your brush to create the point, your brushstroke will fade away and disappear before you can finish it.  

To see how to load the correct amount of paint onto your brush, take a look at this video (you will have a similar demonstration on your DVD included with the add on kit you've bought). 


3. Holding your brush too flat. 

When we are striving for the perfect brushstroke, we want to get it right and it's easy to think that if we hold our brush flat meaning the handle is close to our practice paper, then it will help us to control the brush more when in fact it often makes it harder to use. 

To overcome this, you need to forget about the brushstrokes and the outcome and perfect the way you hold the brush. To help you paint the best comma stroke, sit upright and hold your brush in the hand you feel most comfortable using (Right handed people are no more successful at Folk Art painting than left handed people, everyone is on an equal footing when they first begin painting).  Without using any paint to begin with, simply place your brush on the paper and point the top of the handle towards your shoulder.  For example, if you are left handed, the handle should point slightly towards your left shoulder.  This means that your brush should be almost upright rather than pointing to a wall.  If you are right handed, your paintbrush should be pointing up and tilted towards your right shoulder.    

4. Holding your brush too high up. 

For many of us, when we have painted in the past, as a child or later on, no one has shown us how to hold a brush as there isn't necessarily a correct way to do so.  If you find that your brushstrokes are not coming out the way you would like them to, check where you are holding it.  If you grip your brush higher up on the wooden area, you are not alone and you need to reposition your grip now.  

To correct this mistake, you need to think of your brush almost like a pencil.  You should be holding your paintbrush close to the ferrule - the metal area of your brush.  Holding it here still allows you to see your comma strokes as you create them yet it gives you much more control when you are painting.  

5. Not putting enough pressure on your brush.  

It can be so easy to be scared of putting pressure on your brush when creating this lovely brushstroke and many new folkers tend to put just enough pressure on their brush for the bristles to touch the paper.  Doing this has a tendency to create thin, wobbly brushstrokes.  

To help you paint a confident, rounded comma stroke, as you hold your brush pointing towards your shoulder, press your brush towards the paper so that the bristles lay almost flat on the paper (but do not allow the metal ferrule to touch the paper) you will see the bristles spreading out slightly as you do (this helps to create the nice rounded shape at the top of the comma stroke).   Once you have added this pressure, to complete the stroke, slowly drag your brush and lift at the same time.  It is the process of removing this pressure and lifting the bristles away from the paper that helps to create the point at the end. 


It may seem daunting to try to tackle these issues but just as when you learn anything new, it will get easier and with enough practice, it will become automatic.  As you practice, you are teaching your body how to carry out these actions, building muscle memory until eventually, your body and hands will help you create confident brush strokes without you having to consciously think about it.  Whether you have already perfected this skill or have some way to go, the fun is in practicing.   For us, completed projects are wonderful but nothing can beat sitting down and just painting and not worrying about the outcome.  

Happy Folking! 


SHARE:
© You Can Folk It!. All rights reserved.
designed by pipdig