Showing posts with label how to. Show all posts

Thursday, 27 September 2018

Falling in love with Mandalas

When we chose September as Mandala month, we wondered whether it was a little ambitious.  We admire mandalas across social media on a daily basis but the great thing about them is that there is so much variety. From dotty mandalas to more intricate designs, they can truly be as unique and beautiful as each individual snowflake that falls. 

This gave us the idea that for September, instead of getting overwhelmed by all the different mandalas we could create, we would use one mandala template and have fun finding different ways to decorate it.   

A great mandala to practice your painting skills

Each project we have created we have started by transferring our design onto our journal using transfer paper before choosing our colours and designs.  Sometimes, we have had an idea in mind of the techniques we wanted to use like the one below... 

Mandala handpainted by Carol Sykes from You Can Folk It using folk art techniques


Here Carol used a simple floating technique to float DecoArt Americana in Snow (Titanium) white
 (this is a technique Carol teaches you in our Cupcakes and Babushka Flat Brush kits). This created such a delicate, ethereal look we couldn't help but love it.  


Carol Sykes from You Can Folk It created this mandala using Folk Art brushstrokes

Keeping things simple, using DecoArt Silver Sage Green, Carol painted each line using comma strokes with her liner brush before adding a few dots and filling any gaps with tiny hearts and a little French Mauve and warm white.  


A beautiful handpainted mandala created using delicate lace folk art techniques and comma strokes, all taught in the painting kits from www.folkit.co

Here, Rose chose to round off the mandala to simplify her pattern and filled it using our Delicate lace pattern and a few comma strokes.  

Bright mandala with a touch of metallic paint from You Can Folk It

Adding a touch of DecoArt Shimmering Silver along with Razzleberry and Teal Green, we used a mixture of dotting, delicate lace and comma strokes to decorate this one.  Delicate lace and comma stokes are a great way to fill a large area without painting solid blocks of colour and creating a more delicate mandala.

Handpainted mandala created using colours inspired by Jamaica

Our customers also decided to use our design and paint their own mandala.  Here, Vanessa from The Arc Shed has been inspired by the colours of Jamaica and we were amazed at how well our rosebuds work as the centre of this mandala. We would never have thought of it but it looks fantastic! 

A work in progress.... beautiful handpainted mandala using painting techniques from You Can Folk It

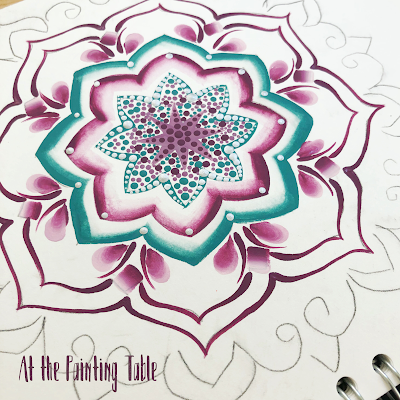
Still a work in progress, we are interested to see how this one turns out.  The painter behind At the Painting Table has combined a limited set of colours to create a mandala with quite a bit of unfilled space but instead of looking empty, it looks striking! 

Using one mandala template, you can decorate it in so many ways

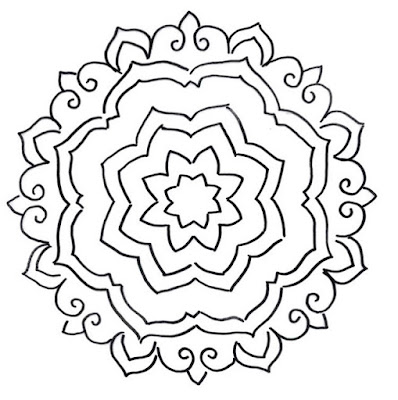
Our painting challenge is open to everyone so if you fancy using our mandala or creating your own, we would love to share it.  Just tag us or use #funwithfolkit. You can find a copy of our mandala here. 

We are so glad we tried something new this month, we hope you will be too x 

SHARE:

Wednesday, 29 August 2018

How to paint wreaths - part 3


We may have welcomed another month of the painting challenge this August but our head is still buzzing with ideas from last months wreath theme. The answer? To combine them both of course! This August, we took out our bright paints and set to work creating this beautiful heart wreath. Painted wreaths can come in all shapes and sizes as you demonstrated last month and we love this heart shaped one.


Here's the colours we opted for - styling our roses with a lighted background and more vibrant petals to really make them pop but have a play with colour and see which colours you prefer and find a look that suits your style.  

When we began to paint this idea, we did wonder what we had let ourselves in for. After all, when you have a new idea buzzing away in your head that you are excited about, it can be a little scary to try and translate that onto the page for fear that it won’t measure up to your imagination. We were so pleased when the risk paid off and so we have put together a little tutorial to help you create your own heart wreath. We have drawn the template using circles where the roses should be painted, however there is nothing stopping you from replacing those circles with daisies, oriental blossom flowers, or even butterflies if you’re really thinking outside the box. Try something new today.


Step 1: Using your template and transfer paper (this can be found in the starter kits or in our online shop) to transfer the po using your template and transfer paper (this can be found in the starter kits or in our online shop) to transfer the pattern to whatever surface you’re working on. Depending on surface you may need to resize the pattern to fit.


Step two: Begin by painting the circles that will make up your Vintage Roses. Using the role of three/five from the first instalment of this wreath series, we filled in 5 circles using the pink and three circles of each other colour. If you are painting on black paper as we did,  you may find you need two coats of paint for each circle.  When these are dry, add the centres and the petals.  As you can see we have alternated the direction of the flowers around the heart and this has been marked on the pattern for you.


Step three: Once your Vintage Roses are dry, begin filling in your leaves. Here we used the round brush leaves as taught in our vintage rose kit.


Step 4: Once your leaves are dry, add the fillers to your heart. Here we used plain dots as well as dot roses in a variety of colours but you could add Dottie daisies or any other small design you wish.  As we mentioned earlier in the series,  keep taking a step back to look at your design as a whole and see if there is anywhere that needs filling.

Step five: finally using the liner brush from either  of our starter kits, add stalks to the leaves using comma strokes.

This would look great painted on to a A4 board and framed or onto a canvas.  If you have a go at painting this gorgeous wreath, do tag us on social media or use #funwithfolkit 

Happy Folking x 

SHARE:

Thursday, 26 July 2018

How to paint a wreath - part 2


So, the other day, we had a go at building a floral wreath, combining a few flowers and features to paint a full wreath.  This week, we are going to look at a few other options to consider when you are designing your own unique pattern.


Option 1: The incomplete wreath

This option works with a circle but instead of wrapping your design around the whole circle, it consists of two halves.  Here, we used our Oriental blossom which gave us an irregular shape but you could adapt this to use Rosebuds, daisies or a mix of flowers.

Step 1: Draw your circle lightly using a compass and pencil or by drawing round a circle using the chalk paper to transfer your markings.


Step 2: Imagine you cut your circle in half horizontally. Like last time, we are going to work closely to the circle but won't be afraid to detour slightly.  Starting just above the half way line on the right hand side, draw your branch outline and finish at the opposite side. Add small branches on both sides of your line, again following the route of the circle.  Next, leave a gap and draw a similar line from the left side round to the right.  Now you should have two branches trailing the circle shape.  Paint your branch using a shade of brown of your choice.

Step 3: Using the rule of 3 or 5, add your blossom flowers where you like.  This will mean you will end up with 1 or 2 on the bottom branch and 2 or 3 blossom flowers on the top branch depending on how big your circle is and what you prefer.

Step 4: Finish your wreath by adding individual petals one by one.  This is where you will need to keep taking a step back and seeing where your design looks too empty or where you need to even up your pattern.

Option 2: The Floral wreath

This wreath is quite tight and is perfect for those smaller flowers like rosebuds, lavender heads or dotty flowers.

Step 1: Begin by drawing a short line from your circle towards the inside of the circle, following the line of the circle.  Next, about 1.5cm/2cm along the line, draw a line away from the circle. Continue to draw alternating lines around the whole circle.


Step 2:  Using your liner brush, paint a line around the circle (but don't paint the stalks yet). Add a rosebud to the end of each line you have drawn (as you can see each rosebud follows the direction of the stalk).

Step 3: Fill in the gaps between each rose bud with s stroke leaves.  As you can see, we could fit one leaf in most of the spaces in the inner ring and 1 or two leaves between the roses on the outer circle.  Keep observing your wreath as you paint. The key to creating an eye catching wreath is to space out your elements and not squash too many things in to one space.

Step 4: Using your liner brush, paint stalks from the rosebuds and from each leaf to your original circle.

Step 5: Take a look at your wreath. Are there any areas that feel empty? We found a few and used the small end of our dotting tool to add three dots in places to complete the design and even up the wreath.

Option 3: The curved wreath

This is a great design for when you want to paint a limited number of elements such as lavender or foliage.  If you haven't attended one of our painting workshops and aren't sure how to paint lavender, you can easily use our dotty lavender from the Flat Brush Starter kit 


Step 1: Imagine you have used a curved line to divide your circle in to sections.  Draw the last section of these lines across the circle, keep turning your page as you draw each one to make sure they flow in the same direction.  You should end up with something like this (above). If you do not feel confident drawing out this template, pop over to our patterns board to use ours.

Step 2: Using your round brush or dotting tool, paint each lavender stalk using purple (we used Plum from our Flat Brush Starter kit and white).  If, like we found, this created a nice wreath but left quite a bit of space in between the stalks, add extras in between to fill your wreath out nicely.


Step 3: Step back and take a look at your wreath.  Are there any spaces? Using your liner brush and some green paint (we used Hauser light green) we added a few long comma strokes to fill some areas.  We also used the small end of our dotting tool to again even up the circle.

We do hope you enjoy these patterns and ideas and if you do create a design after reading this post we would love to see it - just tag us or use #funwithfolkit to share.

Happy Folking x


SHARE:

Wednesday, 11 July 2018

How to paint a wreath - part 1


Wreaths are everywhere at the moment aren't they?! Whether they are being handpainted during an Instagram video, adorning a greetings cards or being featured on some gorgeous stationary, their popularity shows no signs of waning.

We have certainly seen the attraction of wreaths since launching our Folky Christmas kit a few years ago.  There is something so relaxing about layering up the different shades of paint and creating the wreath design to create a beautiful festive greetings card. However, what was once a symbol of the Christmas period has now become much more versatile. Whether they are made of flowers, ribbon, photos or pom poms, there is a wreath for every style and every occasion and this is also becoming the case for those wreaths we paint.

For our #funwithfolkit painting challenge this month, we have been focusing on wreaths and it is clear that this has captured the imagination of so many of you.  If you don't fancy creating your own classic foliage wreath from our Dotty Collection painting kit, we thought we would put together a few steps to help you create your own painted wreaths using the kits you already have.

Create a template to guide you when you are designing your wreath

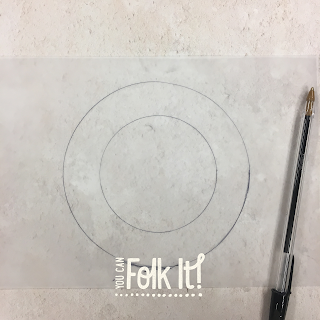
Step 1: Create a guide for you to work to by drawing round a circle or using a compass.  If you feel like you would like more structure to work with, draw a smaller circle within the larger circle.

Use the Rule of 3 and add flowers to your wreath, space them evenly around your ring.

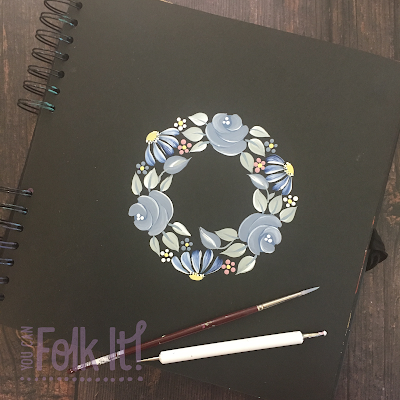
Step 2: When creating your wreath, it helps to balance out some of the larger elements (e.g. vintage roses or daisies) with smaller elements (dotty flowers and leaves) The great thing here is that there are no limits - you can include what you want and leave out flowers or brushstrokes that you are less confident with.  A good tip to remember is to stick with odd numbers.  On a smaller wreath, work with three larger elements like we did here. If you are working on a larger wreath, use 5 flowers and so on to suit the size of your finished piece, this will make the finished piece more aesthetically pleasing.

First, mark out where your largest flowers will be.  Here we began with roses arranging them around the circle.

Use the rule of 3 - add your large flowers to the ring, if there is space, rotate your page and add three more or three different flowers

Step 3: Next, because we had enough space, we rotated our design and added three daisies before adding leaves with our round brush (again, adopting the rule of 3 to add leaves to each side of the roses).  Remember: You can work slightly inside and outside of your guide (as we have in the placement of the leaves) but always try to stay close to your original guide to prevent a wonky or uneven wreath!


When creating a wreath, you may be the type of person who likes to plan where you will add each element. To do this, you can draw out a pattern in a sketch book to trace and transfer it to your painting journal.  The important thing is that you find a process that suits you.

After adding your larger elements, fill any gaps with smaller items such as Rosebuds, dot flowers or comma strokes


Step 4: Once you have added the larger flowers and details, take a look at your wreath to see where there are gaps and fill with smaller details like dot flowers, rosebuds, a sprig of lavender or berries....anything that takes your fancy.

Folk Art painted wreath from You Can Folk It

Step 5: Once your wreath is complete, sit back and admire!


If you have created it as you paint and would like to keep the pattern, leave your design to dry before covering with transfer paper and drawing out a rough guide of where everything is.  As you can see, we have traced within the edges of the painting. This means that when you come to paint it, you will cover the lines you have transferred.  This is a great way to build up a collection of patterns and it means that you can try it again using different colours.

Pattern from You Can Folk It using different painting kits to create a beautiful painted floral wreath

We'd love to see your finished wreaths - tag us in your social media posts and use #funwithfolkit

Happy Folking xx

SHARE:

Monday, 26 March 2018

How to paint Snowdrops


For this project you will need: 

DecoArt Americana Acrylic in Green Tree and Snow White (also known as Titanium White)
Medium Brush liner, No 3 Round Brush and Dotting tool (available separately or as part of our Round Brush Starter kit
Comma stroke lesson (available within our Round brush add on kits) 
Chalk pen (optional) 

Using the medium liner brush and DecoArt Americana Acrylic in Green Tree, add a little water to your paint to make your strokes go further and start by practicing the stems.  Imagine you are painting walking sticks and paint the hook to the left and right, trying to keep the stems as straight as possible.  Don't worry if your paint runs out a little at the end, you can always mask this when you add the comma stroke leaves


Next practice adding the petals using the No. 3 Round Brush and comma stroke leaves using the liner brush as shown above.  Play around with using just white and try using Green Tree tipped with white.


Paint your Terracotta pot using the Relic Chalky Finish.  (If you wish to use this pot outdoors once it is completed, make sure you cover every inch of the pot including the hole at the bottom to prevent the pot absorbing water).  The Snowdrops are placed approximately 3cm apart, alternating 1 long and 1 short.  The Daisies are 2cm apart 1 high and 1 low.  You can use a chalk pencil to mark the design, but you may find it easier to paint the design straight onto the pot without the constraints of having to follow a line.


Paint the stems.  Working on surfaces that are not flat is always going to be more challenging, so try practicing on inexpensive items like recycled packaging first, the more practice you do, the easier it becomes.


Complete the rest of the Snowdrops


Next, add the daisies along the top lip of the pot.  


Finish with a coat of wax or varnish to preserve the design.

As we mentioned earlier, it is possible to use hand painted terracotta pots outside, but if they are going to come in to contact with water it is very important that you prepare the pot correctly.  There are two ways to do this

1. Make sure every inch of the pot is completely sealed with the Relic chalky finish paint (including the hole in the bottom) so that the terracotta cannot absorb any water.  Once you have completed the pot, finish it with a couple of coats of weatherproof varnish.

2. Add equal amounts of DecoArt Multi Purpose Sealer to your Chalky Finish and Acrylic paint.  By doing this, it means that no varnishing is necessary but as before, ensure that every inch of the surface is coated with the paint and sealer.

Once you have completed your project, remember to wash your brushes ready for next time - look after your brushes and they will look after you.


SHARE:

Monday, 19 March 2018

How to paint on to soap


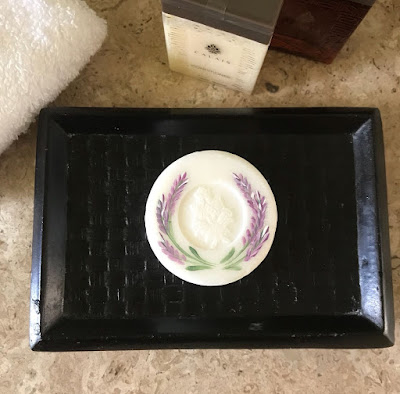
Painting on to soap, decorative painting, folk art, painting project. butterfly, lavender

I first learned to paint onto soap years ago when I first discovered Folk Art. I had seen decorated soap before but always thought it was something other people did, not something as easily achievable as it is.  

Sometimes, when you are learning to paint, you want to try something different, sometimes you wish to give a unique gift...the great thing is this project ticks both boxes.  I was recently on holiday in Mexico and their complimentary soaps were so lovely, I just couldn't resist painting them! 

For this project you will need: 

A bar of soap of your choice 
Paint Adhesion Medium or Multi Purpose Sealer 
The design of your choice (I chose Butterflies and the Lavender design taught in our Round Brush Course
For these designs I used the No3 Round Brush, Liner brush and Flat brush from both of our Starter Kits 
DecoArt Americana Acrylic (I used Blue Violet, Warm White, Plum, Lamp Black and Hauser light Green)

Painting on to soap, decorative painting, folk art, painting project. butterfly

Step 1: Begin by applying a coat of Sealer (or Paint Adhesion Medium) to the area you wish to add your design to.

Step 2: Once the sealer is dry (you can speed the process with a hair dryer if you wish), paint your chosen design. With both of the soaps, I tried to choose designs that worked with the shape/detail already on the soaps. Leave the design to dry.

Step 3: Finish by painting 3 more thin layers over your design, drying with a hairdryer each time to help the drying process along and dry each layer.

Step 4: Leave to dry for a couple of days for the paint and sealer to cure (dry and harden completely).  The layers of sealer creates something similar to a transfer on the soap.  Once it has been allowed to cure, this means you can use the soap as you would a normal bar of soap and the design will remain firmly in place.

Painting on to soap, decorative painting, folk art, painting project. lavender


I hope you have fun with this project.

Happy Folking,

Carol x
SHARE:

Tuesday, 3 October 2017

How to make your paints last longer


There's nothing we love more than browsing the paint colours and swatches at Folky HQ, deciding which ones we would like to use or which combinations will create a dreamy shade for a new project.   However, just like when you sit down to indulge in a bit of creative me time at home, it is very rare we can paint uninterrupted and use all our paints up and when you are painting, the last thing you need when painting your comma strokes is drying paint.  Even if you do get to enjoy an uninterrupted Folk It session (yay!) sometimes paints go such a long way, we end up wasting a lot of the paint we've poured out.  Fear not though, we are here to share a crafty secret that will change all that.  

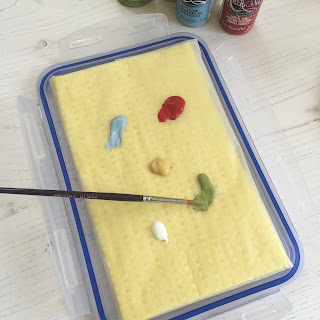
The most valuable piece of kit for us is a wet palette. This container will help keep your paints wet for a few days, perfect for those times when we get interrupted.  The great thing is that with a bit of time and a few supplies, you can create your own.  

For a wet palette you will need: 

An airtight container (we purchased a cheap klip lock style food container) 
Sponge cloth 
Baking paper (ensure that it is the unwaxed version, your paints will not sit well on waxed paper making blending your paints especially difficult) 
scissors 

Step 1: cut your sponge to size.  You will need the sponge to sit neatly inside the lid of the box once it is wrapped.  

Prevent waste and make your paints last longer with your own wet palette. For the price of a few household items, save money and art supplies.

Step 2: Lay your newly cut sponge cloth on your baking paper and cut your baking paper to size. (imagine you are wrapping the sponge just as you would a gift). 


Step 3: thoroughly wet your sponge cloth and squeeze out any excess water.  

Step 4: wrap the (now wet) sponge in the baking paper so that one side of the sponge is smooth.    

How to save money and paints - create your own palette

Step 5: lay the sponge in the lid of the box, add the acrylics you need and paint as normal :) in the event of any interruptions, simply clip the 'lid' on over it.  

Prevent waste and make your paints last longer with your own wet palette. For the price of a few household items, save money and art supplies.

Sit back, relax and enjoy your new palette! For the price of a few household supplies, you can rest easy that you can pop the lid on any time you wish and return to your project soon.  The box will keep the paints fresh for a few days (hopefully enough time to complete the project you are working on).  Make sure that you refresh your sponge with water and rewrap in fresh baking paper when it becomes too messy to use.  

Prevent waste and make your paints last longer with your own wet palette. For the price of a few household items, save money and art supplies.

If you have any handy hints and tips that make life easier when you are painting and crafting, do let us know, we love a good craft hack. 

Happy Folking x 


SHARE:

Wednesday, 29 March 2017

How to paint on slate the right way

Paint on slate - how to tutorial

If we were to tell you the most common questions we get asked here at You Can Folk It, it would be how to paint on to different surfaces.  Within our kits, you receive the materials that are best for beginner projects, mount board and wood.  We chose these because they require no preparation beyond base coating and they are a delight to paint being small, manageable (thanks to the flat, smooth surface) and easily replaceable should you be unhappy with the finished result (though we have never met a customer yet who doesn't love their first project).  

Our recent tutorials have given you step by step instructions on how to paint on to plastic and glass objects that are often available and begging to be reloved instead of being thrown away.  However, what about slate? There are so many different slate products in the high street at the moment, from notice boards to coasters, placemats to photo frames.  With their rustic look and hand crafted appeal, they make the perfect addition to any home.  


So, if you want to add a few hand painted details, what do you need to know? 

1.  As with any surface, to help the paint adhere to your project as much as possible, you need to make sure that your surface is clean and free from dust and dirt.  You can do this by simply wiping down the surface with water and a lint free cloth.  

2. Being a porous surface, to paint on to slate you do not need a primer as the paint will adhere to the surface easily.


3. You can base coat your slate if you wish.  To create a matte finish similar to the natural slate, choose a beautiful shade of Chalky Finish paint.  
4. Plan your design around your surface. The natural characteristics of slate means there may be areas that you would not be able to add designs as easily as you hoped.  Think about this when you are designing your patterns.  

5.  As slate can be easily scratched, in order to protect your project from signs of wear and tear, the best way to finish it is to apply two coats of varnish.  Even though you are varnishing your project, there is no need to compromise on the matte finish.  Seal your slate using two coats of DecoArt Ultra Matte Varnish and leave to dry.  

Please note: We recommend leaving your project to cure for a few days before using them.  While paint and varnish can feel dry to the touch, they need a few days to cure completely.  

Happy Folking, 

Carol x 


SaveSaveSaveSave
SHARE:
© You Can Folk It!. All rights reserved.
designed by pipdig