Showing posts with label Level 2. Show all posts

Thursday, 31 January 2019

How to paint your own Folk Art Valentine's card

White card painted with a traditional folk art design in red created by Carol Sykes from you Can Folk It.

So you've got our kits but Valentine's Day is coming up (or some other special occasion) and you just don't want to paint any of the usual designs, you want to create something different, you want to try something new. Well, we may just have the thing for you. 

The great thing about Folk Art painting is that the same basic brushstrokes can be used in so many different ways, once you've learnt these brushstrokes, you can create something entirely new without learning any new techniques. Here, we have used elements from our painting kits to design something a little more traditional, we hope you enjoy the tutorial. 


You will need:

A card and envelope (or gift bag!)
A round brush  
A flat brush 
DecoArt Americana Acrylic in the colour of your choice 
(we used Lamp Black, Warm White, Country Red, Hauser Light Green and Baby blue*)
Transfer paper* 
Dotting Tool*

*available in our Round Brush Starter kit 

I began by creating a basic template for you to trace onto your card that you can find here. This is larger than the mountboard as I use a wooden heart as my template. 

Begin by transferring your design on to your card. We tried this design in a variety of colour ways - white on black, black on white, red on white and colour on white.  The choice is yours, play with colour and see which you are drawn to the most. 


Speaking from experience, begin in the centre of the design and work outwards to prevent smudges! 


Black paper with a traced design and painted heart next to a folk art pattern on tracing paper

Using your round brush, fill the centre heart in the colour of your choice. When it is dry, add three comma strokes down the right hand side of the heart using the liner brush. 

Black paper with three brushstrokes showing you how to paint a folk art tulip

Paint your tulip using the round brush.  Begin painting the centre comma stroke. For the side petals, flick the tip in the opposite direction.  Optional: if you feel confident, side load your brush with a contrasting colour when painting your side petals. 

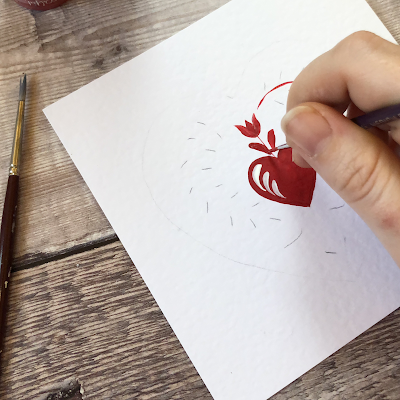
Red heart and folk art tulip being painted on to a white greetings card

If you wish, add comma stroke leaves using your liner brush to complete the tulip. We did this for some versions we painted and not for others - play with your design and see what you prefer.  

White traditional folk art design by Carol Sykes being painted on to a black beckground

Using your Flat Brush and the s stroke we teach in our Rosebuds kit, add leaves around the heart. Using the liner brush, add branches through the centre of the leaves.  Using a contrasting colour, connect each leaf with smaller branches (see below).  If you don't feel confident using your liner brush, draw the line using a Uni Posca Paint pen in a matching colour.   
Add two leaves at the bottom of the pattern.

Black card painted with a traditional folk art design created by Carol Sykes from You Can Folk It next to some white roses

Using your Round brush, add bluebirds under the heart.  

A black greetings card painted decorated with a white traditional folk art design against a brick wall.

Optional: tip the brush with your contrasting colour when painting the birds (something we teach in our Bluebirds kit).  

Handpainted white card being decorated using dots of paint

Using the small end of your dotting tool and your chosen colour, edge the larger heart with dots of paint. To do this, paint triangles of dots with the points facing outwards not inwards. 


Three cards all painted using the same folk art design inspired by Valentines day in different colours.  Black on white card, white of a black card and colour on a white card.

Play with colour.  We painted the design using white/black on black, black/white on white and also a colour version using the colours from our Round Brush Starter kit


Black card hand painted with a Valentines inspired folk art design using a monochromatic palette.  Pictured against a brick wall with a porcelain bird

As you can see, in some versions of the card, we have added dot daisies and details, in others, we have painted the main design only.  The choice is yours, play with it and have fun! 

We hope you enjoy our take on a more traditional Folk Art design - perfect for Valentines Day.  

Happy Folking xx 


SHARE:

Thursday, 8 November 2018

Paint your own folky Polar Bear

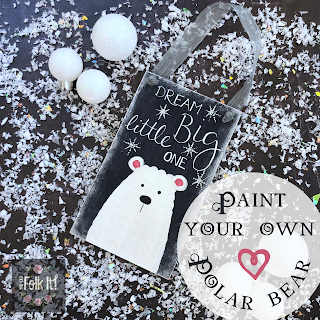
A dark hand painted plaque painted with a polar bear and snowflakes. The handwritten quote on the plaque says 'Dream Big little one' and is threaded with silver ribbon to hang on a door.


Following the success of our Folky Fox recently, we have gone from Autumn to Winter with this brand new tutorial.  

To complete this level 2 tutorial, you will need: 

DecoArt Chalky Finish paint in Honor 
Sandpaper, tracing paper* and transfer paper* 
Sponge*
Dotting tool*, Flat Brush* & Liner brush*
DecoArt Titanium (Snow) white* (or any white you have), Lamp Black and Antique Rose* 
DecoArt Dazzling Metallics in Shimmering Silver 
Sakura Gelly Roll pen in White 
DecoArt Metallic lustre in Silver Spark

*All included in our Flat Brush Starter kit 

Practice paper, paintbrushes, DecoArt Metallic Lustre and the polar bear traced pattern from You Can Folk It

 Preparing your plaque: 

 Using the sponge, base coat the plaque using the Honor chalky finish paint.  You can speed this process up with a hair dryer if you like. 
After applying a couple of coats, lightly sand the MDF plaque before transferring your design on to the surface.  

A photo showing DecoArt Americana Acrylic in Warm white and practice rows of C strokes painted using the Flat brush in the picture


Practicing your brushstrokes: 

For the Polar Bear you will need to practice the C stroke taught in the Rosebuds kit.  When you are confident painting single ones, practice painting each one side by side in rows.  


Painting your polar bear:

Using the warm white and flat brush, base coat the whole of the polar bear.  Using the Antique Rose, paint the inner part of the bears ears.  When this is dry, paint rows of c strokes over the whole of the bears body starting at the top and working down, leave to dry. Take care to try to overlap the rows a little to create your fur pattern.  

Next, using your liner brush and the black paint, add his eyes and nose. 

A photo of the completed dark blue rectangular wooden plaque painted with a polar bear and decorated with snowflakes. The phrase 'Dream Big Little One' is hand written across the top

Final touches: 

Using the silver paint and Dotting tool, add dotty snowflakes on the plaque. Leave to dry.  If you wish to add the lettering, use the Gelly Roll pen (or a fine Uni Posca paint pen) to copy over the transferred lettering.  You may need to keep wiping the tip of the pen with a tissue to make sure the tip does not get clogged with paint.  Finally, using the sponge, add the Metallic lustre around the edges of the plaque and add some ribbon to hang.  

If you did not wish to add the writing we have provided why not stamp a name on to personalise or just add more dotty snowflakes.  

Happy Folking x 

SHARE:

Monday, 29 October 2018

Paint your own Autumnal wreath in 5 simple steps

Handpainted wreath painted in Autumn colours of greens, browns and golds with red berries

The days are getting shorter and the air is adopting a chill, Autumn is certainly taking a hold both inside and outside of Folky HQ.  

Handpainted folk art design in Autumn colours of reds, browns and oranges surrounded by pots of DecoArt Americana paint

Over the last couple of weeks we have been cracking open those warm orange and golds, deep, rich browns and earthy greens to create a few Autumnal projects to fit with this months #funwithfolkit theme.  After sharing this on social media, so many of you asked for the pattern so here is a quick tutorial.  

You will need: 

Practice paper, transfer and tracing paper*
pencil
A brown, green, gold and red paint 
(Sandra used Asphaltum and Autumn Red but you could use Traditional Burnt Sienna and Country Red)
We also used Emperors Gold and Avocado
No 3 Round Brush & Dotting tool*

*Available in our Round Brush Starter Kit 

Pattern outline of a wreath made up of comma strokes

Step 1: Take your pattern and transfer it onto your practice paper or project 

Practice boards from You Can Folk It featuring an outline of a wreath and a painted version using red, green, brown and gold

Step 2: To paint your comma strokes, fill your round brush with Avocado or Raw Umber and tip your brush with the Emperors Gold (a technique taught in our Daisy Details kit

Step 3: Paint alternating bunches of green and brown comma strokes to add variety to your wreath. 

Folk It autumnal wreath painted in browns, golds and greens and decorated with red berries

Step 4: Using the red, add berries around the wreath and leave to dry. 

Step 5: Add a little gold to your brush and on a paper towel, gently rub off the excess. Dry brush a little gold over each of the berries and dot a little brown in each one. 

Your wreath is now complete! If you fancy a more festive look, why not try using two shades of green and red and gold or use a paler green and grey tipped with silver - this would look great finished with white and silver mistletoe berries! 

Happy Folking everyone x   


SHARE:

Wednesday, 21 June 2017

Awesome DIY Image Transfer projects


There is no better feeling than creating something you love.  We've been getting creative at Folky HQ updating some old props and creating some fantastic projects ready for our shows.  The beauty of image transfer is that you have a wide range of choice over what you would like to add to your project.  Whether you want to add quotes and sentiments, family photos, bold typography or vintage style images, the choice is yours.  

We used our Series 2 Design book to add vintage style transfers to this plain freestanding piece of home decor to create a quirky centrepiece.

We absolutely love plain decorations like this popular free standing Love decoration because they have so much potential for creating something unique.  Using a variety of vintage inspired images from our Series 2 Design book, we copied the images using a laser jet printer and applied them randomly around this piece to create this fun project. 

Combine transfers and washes of colour to make the designs stand out. Turn unloved items into treasures.

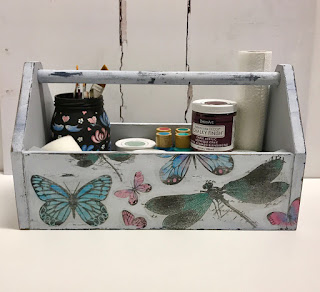
Transfers do not have to stay black and white though.  With this up cycled tool caddy, we applied the butterflies and dragonflies before adding splashes of colour.  To add colour to your project, add water to your acrylic to thin it enough to allow the image to show through and add it to the areas you want to.  


One of our favourite Chalky Finish colours is this dreamy Vintage so when someone brought a sad looking wooden mirror in to the office, we just had to give it a make over.  Using the 'Angels' quote from our Design book, we combined it with some hand painted angels (from our Series 1 Folky Christmas kit) and stencils. It's gone from unloved trash to treasure :) 

Vintage transfer from the Design book paired with You Can Folk It Oriental blossom. Kits available from www.folkit.co

This adjustable stool started life in Ikea; plain, black and practical, it was begging to be decorated.  Base coating it using white chalky finish, we added our gorgeous Vintage transfer.  To soften the look, we played around with our Oriental Blossom flowers.  Diverging from the original design, we paired them with leaves we teach you how to paint from our Rosebuds kit.  By mixing and matching brushstrokes in this way, we were able to create a unique pattern to compliment the transfer and also work with the shape of the stool.   

We were able to create such beautiful projects using our Series 2 Starter kit. When we were creating the second series of painting kits, we wanted to add something extra.  Image transfer was something we loved because of its versatility. Whether you wish to add vintage style images, bold typography or personal photos to your project, it is possible with this technique.

So, we packed our Starter kit with DecoArt Matte medium, sentiments perfectly designed for each project and a DVD full of instructions to guide you through the process.


Each project you see here used the contents of this kit along with our extra Design book which provides a great collection of images in addition to the sentiments we provide in each of our kits.  To find out more about these resources, check out our Series 2 kits here

For more inspiration and ideas for using the image transfer technique, you can also check out our Pinterest board.  Don't forget, we would love to see your creations.  Share them with us on our Social media accounts or tag us #youcanfolkit 

Happy Folking, 

The You Can Folk It team x 


SaveSaveSaveSave
SHARE:

Friday, 1 April 2016

Get to know our Daisy Details kit this Spring

(Level 2)

Our Daisy Details design is perfect for Spring and our daisy projects have been getting a lot of love recently. If you were trying to decide which add on's to choose, here is a bit more information about this gorgeous kit. 

Once you’ve completed your first step in your painting journey and completed the dotty designs in the Series 1 Starter kit, you’re now ready to move on to the next step in learning Folk Art Painting with a level 2 Folk It! kit.  There are 2 kits at level 2  – this kit and Bluebirdshttp://www.folkit.co/collections/series-no-1-starter-kit/products/bluebirds. The beauty of our range is that you are free to choose your favourite or to complete them both. As with all our kits, Carol will teach you, step-by-step, how to paint comma strokes using the round brush and liner brush. She will also show you how to  ‘tip’ the brush – a great technique used to add additional colour and create depth to your painting in one easy stroke.

DON'T FORGET: You’ll need supplies from the ‘Starter Kit’ to complete this kit. 

KIT CONTAINS

Daisy Details Design
MDF Heart
Hanging Twine
Greetings Card
Mount Bound
Envelope
Instruction Guide
Step by Step DVD


Begin by practicing the techniques and start decorating the heart, card & envelope that comes with this kit. This is just the beginning though. As your confidence grows, you can start adding daisies to anything. Why not try adding them to:


Plain Kraft gift bags (co-ordinate the tag using the dot daisies from the Series 1 Starter Kit)


Add daisies to gift boxes

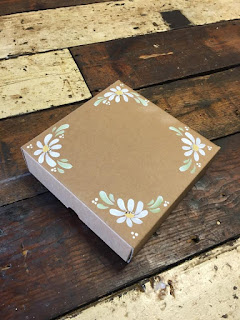
Gift boxes. You can add the daisies using our pattern designed for the hanging heart, or add daisies to each corner. Find out here how to create different daisy shapes.

DON'T FORGET: You’ll need supplies from the ‘Starter Kit’ to complete this kit. 
SHARE:
© You Can Folk It!. All rights reserved.
designed by pipdig