Showing posts with label folk art. Show all posts

Thursday, 28 February 2019

The beauty and history of Matryoshka dolls

Just as Sheffield is known for it's steel, The Full Monty and Hendersons Relish, Russia is known for its Matryoshka (or Babushka) dolls.  Beautifully decorated in handpainted Russian Folk Art designs they are often painted as Russian Peasants but may also be painted to depict fairytale characters and people of importance.  Despite the variations, one thing is certain, they have become a symbol of Russia, part of their culture and not only a popular item within Russian homes but in the homes of all those who have visited.  

Russian Matryoshka or Babushka dolls beautifully handpainted with folk art flowers and designs

Recently welcoming some Russian guests to Sheffield, I was honoured and touched when they gave me a set of Russian dolls.  Both sets I own have been given to me by young people who were not aware of my love of Folk Art or my company.  I love seeing these on my mantelpiece, not only because of the gorgeous handprinted decoration but because of the colours.

First seen in Russia in the late 1800's, there are a few ideas regarding how they first came to be.  It is thought that they were inspired by the nesting boxes of China and Japan.  In Japan, nesting dolls were loved by many and consisted of 7 dolls, the largest made in the image of Fukurojuro, the Japanese god of happiness which opened to reveal 6 other lucky gods.

Wanting to find a way to preserve Russian culture, Savva Mamontov opened a workshop with the sole purpose of creating childrens dolls to help illustrate different aspects of their culture.  Part of the workshop group, Sergei Maliutin was inspired by the Japanese dolls. Pairing up with Vasiliy Zvyozdochkin, a wood turner, Maliutin began designing the decoration.

The first set of Matryoshka dolls ever created depicting a family
The very first set of Matryoshka Dolls created by Maliutin and Zvozdochkin

Right from the beginning, the dolls were made to depict peasant women. Dressed in womens clothing, you will most likely see them with Babushkas or kerchiefs around their heads.  They have certainly become a symbol of family, of Motherhood and the strong female role within Russian culture often being referred to as Matryoshka (meaning little matron) dolls or Babushka (meaning Grandma) dolls.

When we looked into the history of these dolls a bit further, we loved hearing that traditionally, making these sets would be a family affair.  Beginning with the smallest doll, made out of a single piece of wood, the others would be carved or turned out of two pieces before being decorated by the whole family.  They were traditionally painted to depict everyday life and so many were seen (much like the original set) holding items such as bread or flowers.

Since then, their decoration has developed.  Seen as a great educational tool and toy suitable for story telling, you can find dolls decorated to depict fairy tales and stories, animals or important figures in history.  However, we have to admit that our favourite is still the more traditional design.
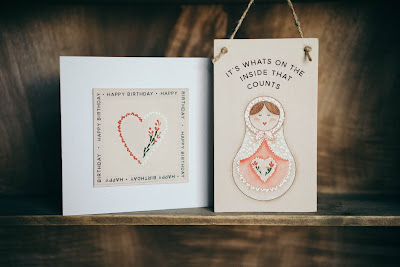
You Can Folk it Babushka painting kit - heart and doll design

When we were designing our very own Matryoshka Doll to paint,
we just had to include a babushka headscarf and apron. 


I liked the Russian Dolls before I even owned a set of my own but being presented with sets as gifts from young women made it clear just how successful Mamontov, Maliutin and Zvyozdochkin were in their vision to create something that would become an symbol of Russian culture.  It is true that they hold a certain charm and beauty that communicates the importance of family, friendship and love and that message seems to have endeared itself to the hearts of many, in Russia and beyond.  I know I will certainly treasure my own sets for many years to come.

Happy Folking,

Love Carol x


SHARE:

Monday, 30 April 2018

Join our #funwithfolkit monthly challenges


You may remember my admission once upon a time that I am not very good at painting without a purpose.  It's true, I would love to be one of those people overflowing with creative inspiration and the imagination of a child but sadly, it isn't the case.  That's part of the reason I fell in love with Folk Art because I finally found an art form I could master, designs I could follow step by step.

Personalise anything with You Can Folk It vintage roses and folk art painting

When I sit down to paint these days, I still like to have prompts, ideas of what to create or which colour palette to choose.  That is why we have decided to begin our Monthly challenges to inspire you to have #funwithfolkit Each month we will be providing a simple prompt to inspire your practice or your project, from pattern ideas to colour inspiration they can be interpreted in whichever way your creative mind takes you.

Wake and make - You Can Folk It daisy details, folk art painting and hand lettering

There are no rules when it comes to our monthly challenges.  Each theme can be used to inspire just one practice page or it can influence a few.  You can use it to help create a project, gift or a greetings card.  However you choose to use our theme, please tag us in your posts and use the hashtag #funwithfolkit

Each month, we will share your images across our social media and the most liked posts will be shared on our blog and in our newsletter.

DecoArt American Acrylics, You Can Folk It

So, starting tomorrow and throughout May, our first theme will be beautiful Rainbows.  I picked this one following my recent colour mixing adventures as it is a great opportunity to play with colour if you wanted to take the theme less literally.  We hope this theme makes you smile as much as we do and that you will have some great #funwithfolkit

Here's to a month filled with fun, Folk It, colour and creativity

Happy Folking x

SHARE:

Wednesday, 15 February 2017

5 benefits of learning to paint


It's true that the world of crafting has enjoyed much more attention in the last few years; maybe thanks to celebrities like Kirstie Allsopp and maybe thanks to the economy. It is certainly true that many crafters have embraced the up cycling trend as we begin to think outside the box instead of buying what we need straight off the shelf.

While many dabble with paper craft and card making, some delve in to baking and others decide to try their hand at sewing, many are often hesitant to learn to paint.  At each show we do, we hear so many people saying 'Oh I couldn't possibly paint' followed by their exclamations that they haven't got an artistic bone in their body...they failed art....they were told many years ago they were just not good enough. The list goes on.  The thing is, we are no strangers to these excuses, we've all said them but it made us wonder, why do we persevere? Why should we learn to paint? In all honesty, there are so many reasons why we should get out of our comfort zone and create but here are our top 5 reasons why we love to Folk It!


1.  It takes us away from the 'real world' When we paint, whether it is with our dotty tool or paint brush, we relax.  We don't have space to worry about the other things that are going on in our lives because we are busy concentrating on creating beautiful patterns or improving our brush strokes. There is no better feeling of 'being in the flow', that wonderful state where the hours seem to fly by.  We are not surprised when we hear that scientific studies have found that learning to paint can help us feel calmer, alleviate depression and keep our brains sharp.  For Folk It founder Carol, it is a form of meditation, a way of relaxing and even after 20 years of painting, she says there is no better feeling than the satisfaction and sense of accomplishment that comes with painting a new design or completing a new project.

2. It allows us to re-discover our creative side.  For children, being creative is part of their daily lives but as we grow up, it becomes harder to hold on to that creativity.  Whether the enemy of creativity is outside (family, an unsupportive teacher or a friend) or within us (the critical voice that often seems to get louder the more we try to do something for ourselves), by the time we reach adulthood, we've often lost or damaged that creative part of us.  Being creative can help us become creative in other areas of our lives - to think outside of the box, to solve problems easier, to see the lighter side of life.

3. It helps co-ordination and dexterity.  Hand-eye co-ordination is so important and one of the activities children are encouraged to do when they are developing this skill is art.  By picking up a paintbrush or a dotting tool, it strengthens these abilities, improves these skills.  We love to hear stories from customers who have learnt to Folk It and found that it has helped them maintain mobility in their hands when they are struggling with medical conditions or that it has been a fun activity to help them rehabilitate their arms and hands after a stroke or accident.

4.  It is economical. Our main purpose for starting our Folk It journey was to teach people to paint, to help them realise that they can be creative...that it is not a magic skill only for a chosen few.  Once our customers got their hands on our kits however, they began to use our designs to breathe new life in to home decor they had fallen out of love with.  In a society where we are often looking for ways to be more frugal, You Can Folk It can help transform the most tired of possessions and personalise a gift.

5. It brings people together.  This is probably our favourite reason, especially in a world where many of us spend too much time on our phones.  There is nothing better than painting with a friend or loved one.  We cannot tell you how much we love our Ambassador courses because it is fantastic to see people inspiring each other.  Painting together starts natural conversation, stimulating learning and sparks so many ideas.  In an environment like that, you can't help but have fun.

Above all else though, learning to paint should never be taken too seriously.  The fantastic thing about Folk Art is that anyone can learn to master the skills with practice.  There's nothing worse than putting pressure on yourself for your work to be perfect straight away.  The fun is in the journey, the practice you do.  So grab your painting kits, get together with a friend, pop in the DVD and learn to Folk It.

Happy Folking,

The You Can Folk It team x


SHARE:

Saturday, 28 January 2017

Don't recycle....Upcycle


With the holiday season behind us, one thing that we have in our house (in addition to the lovely gifts we received) is lots of packaging; boxes, tins and jars that we cannot bear to throw away because they are too pretty, too sturdy and too useful to send to landfill.

In time's when we are always looking for ways to save a bit of cash, one of the best ways to save is to create your own storage.  This does not mean, however, that your DIY storage has to be plain, undecorated or boring.

This week, we have been making use of our old sweet tubs and taking inspiration from vintage hat boxes to up-cycle our first project, just for you. We loved the look of some vintage hat boxes we found that were covered in beautiful roses. Although we have just used our rose design, you could add some stencilling to add to the hat-box feel, though the stencil you use will depend on the size of your project.  


For this project, you will need: 

A tub of your choice 
Flat base coating brush

Choose your project.  A Haribo sweet tub or chocolate tub is perfect for creating up cycled storage

The first decision you need to make is to decide what you will be upcycling.  This is a great project for experimenting with painting on different surfaces, for example painting on curved surfaces is very different to painting on to flat surfaces.  If your project doesn't go to plan, it can still be recycled and it hasn't cost you any money. We chose a leftover sweet tub from our Christmas gifts that was just going to be re-cycled.  

The beauty of DecoArt Chalky finish paint is that you can paint straight on to the surface without fear of the paint flaking off at a later date.  However, one thing you will need to do before you begin painting is to wipe down the tub completely with a mixture of vinegar and water to remove any greasy fingerprints.  Any greasy fingerprints left on the surface will prevent the paint from adhering to the surface.  


Once you've decided which shade of Chalky Finish paint you would like to use, begin painting the tub using a flat brush.  Be sure to cover every inch of the tub with the paint.  


1. Once the Chalky Finish base coat has dried, using your finger or, cloth or old brush apply Rose Gold Metallic Lustre around the lid.  Tip: if your lustre has hardened, put a little water in the jar, screw the lid back on and leave for a couple of hours or overnight to soften.  

2. Using the patterns, randomly place roses around the edge, alternating between 1 rose, 2 roses and 3 rose clusters.  Tip: to make it look more professional, trace a few of the roses off the edge as Carol has done here.  Next trace the larger cluster in the centre of your project, or in this case, the lid. Note: the patterns should print at the correct size. 

Next fill in the roses using your round brush from the Series 1 Starter kit as instructed on the Vintage Rose tutorial DVD. For this project, Carol used DecoArt Americana Naphthol Red. However, you can create a similar shade by mixing our Series 1 Tomato red with a bit of Lamp black, also from the Series 1 kit.  (To learn more about mixing colours, click here). 

3. Using Avocado green from the Series 2 kit, add the leaves following the tutorial from the Vintage Rose DVD.  Tip: If you do not have the Series 2 Starter kit, you could use the Hauser Light Green from our Series 1 Kit.  


Now you have the pattern to work with, add your comma strokes to paint your vintage roses, tipping your brush with Warm White - you can watch the full tutorial  on the DVD supplied in our Vintage Rose add on kit

Using your liner brush, add stalks to your leaves using Avocado around the tub.

Once you design is dried, using the warm white, add comma strokes using your liner brush. Finish by adding some 'filler foliage' this has been created by loading the end of the round brush with avocado and tipping the brush with white.

Leave to dry and apply a coat of Clear Creme wax using a round brush to protect your beautiful new  storage. You can either use it once it has dried or buff the wax with a soft, lint free cloth to create a soft sheen to your container. 


Happy Folking, 

Carol xx 

SHARE:

Monday, 14 November 2016

5 mistakes you're making when painting comma strokes and how to fix them


When we meet our customers at shows or at our Ambassador courses, they will often say that they love to complete our dotty designs made popular by our Starter kits and Dotty collection but that they just can't get the hang of comma strokes.  For many, it seems like a huge leap of faith to suddenly swap your dotting tool for a paintbrush and it can be easy to become disheartened with your progress if we don't get it right first time.  Sound familiar? 

The thing is, not everyone will experience these 5 issues, some may only be missing one of them but each factor can make the difference between a wonky comma stroke and the brush stroke you've always dreamed about painting.  The great news is that each one of them is a minor thing and we see them time and time again but we also see that with awareness, practice and perseverance, these issues can be overcome and anyone can create the perfect comma stroke.  

So, what are you doing that is throwing your brushstrokes off track? 

When we are painting, it is easy to become so focused on the act of painting that we don't consider the fact that we might be doing something differently to what we have seen others do.  The next time you sit to paint a design from one of our Series 1 add on kits, we would like you to become aware of these issues and, if you see that these are something you do, work on improving them.  

1. Thinking too much


Well of course we need to concentrate, we are learning a new skill! Right? To a point.... Yes, we need to think about how we are sitting, where our paintbrush is pointing but once we have mastered those, we should let the brush do the work rather than our minds.  So often we become so hung up on creating the perfect curve, the neatest point, that we try to control the direction our brush is going and flick the bristles or pull the brush away too quickly from our paper.  

We will let you into a little secret here..... if you position your brush on the paper correctly and move your brush slowly, you will find you get a much smoother stroke.  It does not matter if each practice stroke is not perfect, what matters is that you sit back, relax and enjoy the process.  The funny thing is that once your paintbrush knows you're more relaxed it will work with you instead of fighting against you! 

2. Loading your brush with too much or too little paint.  


When you load your brush with too much paint, you will find that as you paint your comma stroke, the comma will not be flat but will have two ridges of paint on each edge of the stroke.  If you do not load your brush with enough paint, no matter how you move your brush to create the point, your brushstroke will fade away and disappear before you can finish it.  

To see how to load the correct amount of paint onto your brush, take a look at this video (you will have a similar demonstration on your DVD included with the add on kit you've bought). 


3. Holding your brush too flat. 

When we are striving for the perfect brushstroke, we want to get it right and it's easy to think that if we hold our brush flat meaning the handle is close to our practice paper, then it will help us to control the brush more when in fact it often makes it harder to use. 

To overcome this, you need to forget about the brushstrokes and the outcome and perfect the way you hold the brush. To help you paint the best comma stroke, sit upright and hold your brush in the hand you feel most comfortable using (Right handed people are no more successful at Folk Art painting than left handed people, everyone is on an equal footing when they first begin painting).  Without using any paint to begin with, simply place your brush on the paper and point the top of the handle towards your shoulder.  For example, if you are left handed, the handle should point slightly towards your left shoulder.  This means that your brush should be almost upright rather than pointing to a wall.  If you are right handed, your paintbrush should be pointing up and tilted towards your right shoulder.    

4. Holding your brush too high up. 

For many of us, when we have painted in the past, as a child or later on, no one has shown us how to hold a brush as there isn't necessarily a correct way to do so.  If you find that your brushstrokes are not coming out the way you would like them to, check where you are holding it.  If you grip your brush higher up on the wooden area, you are not alone and you need to reposition your grip now.  

To correct this mistake, you need to think of your brush almost like a pencil.  You should be holding your paintbrush close to the ferrule - the metal area of your brush.  Holding it here still allows you to see your comma strokes as you create them yet it gives you much more control when you are painting.  

5. Not putting enough pressure on your brush.  

It can be so easy to be scared of putting pressure on your brush when creating this lovely brushstroke and many new folkers tend to put just enough pressure on their brush for the bristles to touch the paper.  Doing this has a tendency to create thin, wobbly brushstrokes.  

To help you paint a confident, rounded comma stroke, as you hold your brush pointing towards your shoulder, press your brush towards the paper so that the bristles lay almost flat on the paper (but do not allow the metal ferrule to touch the paper) you will see the bristles spreading out slightly as you do (this helps to create the nice rounded shape at the top of the comma stroke).   Once you have added this pressure, to complete the stroke, slowly drag your brush and lift at the same time.  It is the process of removing this pressure and lifting the bristles away from the paper that helps to create the point at the end. 


It may seem daunting to try to tackle these issues but just as when you learn anything new, it will get easier and with enough practice, it will become automatic.  As you practice, you are teaching your body how to carry out these actions, building muscle memory until eventually, your body and hands will help you create confident brush strokes without you having to consciously think about it.  Whether you have already perfected this skill or have some way to go, the fun is in practicing.   For us, completed projects are wonderful but nothing can beat sitting down and just painting and not worrying about the outcome.  

Happy Folking! 


SHARE:
© You Can Folk It!. All rights reserved.
designed by pipdig