Showing posts with label chalky finish. Show all posts

Friday, 19 May 2017

6 creative DIY planters for your summer garden


Whether you have a home full of plants and flowers or a small outdoor space with only room for a few small planters, adding colour to your home is so worthwhile after a dark and grey winter.  We have put together 6 creative ideas to help inspire you. Whether you wish to fill your planters with flowers, succulents or herbs, create a display that will make you smile. 

DecoArt chalky finish paint is fantastic for base coating projects as the surface needs no preparation and there are a wide variety of colours - even more once you begin mixing.

For each of our pots, we chose to base coat them with DecoArt Chalky Finish paint.  For some we used the colour straight from the pot, for others, we mixed our own custom colour for our pastel theme. 


Once the pots were dry, we used the paints from our Series 1 and Series 2 Starter kits to add each of the designs from our add on ranges.  At Folk It, we begin by teaching you dotty designs from our Starter kits before we move on to teaching you brushstrokes to create the designs (like our bluebirds above) in our 'add on' lessons.  The beauty of Folk Art is that it is a skill based art, a skill anyone can learn just as anyone can learn to write.  With patience and practice, each and every one of us can paint these brushstrokes whether we believe we are creative or not.

Our Series 1 pots 

Using DecoArt Chalky Finish and You Can Folk It Series 1 Starter and Daisy details kit, we created this beautiful planter perfect for any home.

Our gorgeous Daisy pot was first base coated using a mix of DecoArt chalky finish in New Life and Everlasting, both from our Colonial colour set.  Once dry, we painted our Daisies on using the templates and techniques from our Daisy Details kit and art supplies from the Starter kit.  Add the stalks and leaves using Hauser Light Green and the liner brush.

Whether you use this pretty pot to hold a beautiful gardening gift or your favourite plant, it will be loved. Decorated using DecoArt Chalky Finish and bluebirds from You Can Folk It's Series 1 painting kits.

To create our next pot, we used the beautiful yellow shade 'Delicate' from DecoArt.  To decorate our sunny Bluebirds planter, we first added a border of dot daisies and hearts from our Series 1 Starter kit using Baby blue and Warm White (full instructions are included in both the instructional booklet and the DVD).  Next, using the comma strokes taught in our add on kits, we painted two bluebirds either side of the pot and added a simple heart between them.

Basecoated in beautiful blue and decorated using traditional Folk Art techniques taught in the Delicate lace painting kit from You Can Folk It

This pot has been getting so much love across our Social media channels! This pretty planter was first painted in 'Serene', a beautiful place blue from the chalky finish range.  Using our liner brush and the techniques we teach in our Delicate Lace kit, we added detail around the top of the pot because sometimes simple is the best.

Our Series 2 planters 

Update any home or garden with this beautiful blossom covered pot decorated using the step by step painting kits from You Can Folk It

It is no secret that our favourite colour within the chalky finish range is 'Vintage' so of course it became the base coat for our gorgeous Oriental Blossom pot. Using the templates and techniques from this add on kit, we were able to paint these pretty flowers on to both sides of the pot, perfect for Spring or Summer don't you think?

Learn how to paint these beautiful butterflies using the step by step painting kits from You Can Folk It

We created this warm, pastel orange by mixing Everlasting with a smidgen of Delicate and dash of Smitten.  One helpful tip when mixing your colours is to make a note of the ratios you use, paint half a lollypop stick with the shade and make a note of the paints you've used.  You may only use it once but just in case you wish to use it again, you will then build up a colour reference tool you can refer to again and again.  We added two fluttering butterflies here using white and the fabulous Plum colour provided in the Series 2 Starter kit.  

Learn how to paint pretty rosebuds using the step by step painting kits from You Can Folk It

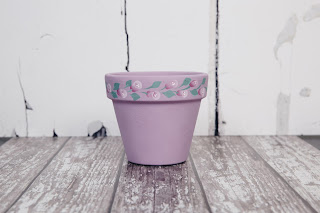
Another custom colour, we created this by mixing the dramatic 'Victorian' with 'Everlasting' both from our Heritage colour collection.    To compliment this beautiful shade, we blended our Plum and Titanium white from the Series 2 Starter kit to create the rosebuds around the top of the planter.  For the leaves we mixed a pale green using the Avocado and Titanium white, again from the Starter kit.  

To complete the pots, we finished with two coats of DecoArt Ultra Matte Varnish to protect these beautiful planters.  We chose this varnish specifically, not only because it is water based but because it maintains the matte look of the chalky finish paint we used.  

There you go. Six beautiful ideas to inspire your summer garden.  The beauty of these designs and our kits is that once you have learnt the techniques we teach you in each one, you can mix and match the designs to create a unique project that you love.  Which planter are you itching to recreate? We'd love to hear your comments and thoughts.  As always if you have any questions about these projects we are happy to help.  

Happy Folking x 


SHARE:

Saturday, 28 January 2017

Don't recycle....Upcycle


With the holiday season behind us, one thing that we have in our house (in addition to the lovely gifts we received) is lots of packaging; boxes, tins and jars that we cannot bear to throw away because they are too pretty, too sturdy and too useful to send to landfill.

In time's when we are always looking for ways to save a bit of cash, one of the best ways to save is to create your own storage.  This does not mean, however, that your DIY storage has to be plain, undecorated or boring.

This week, we have been making use of our old sweet tubs and taking inspiration from vintage hat boxes to up-cycle our first project, just for you. We loved the look of some vintage hat boxes we found that were covered in beautiful roses. Although we have just used our rose design, you could add some stencilling to add to the hat-box feel, though the stencil you use will depend on the size of your project.  


For this project, you will need: 

A tub of your choice 
Flat base coating brush

Choose your project.  A Haribo sweet tub or chocolate tub is perfect for creating up cycled storage

The first decision you need to make is to decide what you will be upcycling.  This is a great project for experimenting with painting on different surfaces, for example painting on curved surfaces is very different to painting on to flat surfaces.  If your project doesn't go to plan, it can still be recycled and it hasn't cost you any money. We chose a leftover sweet tub from our Christmas gifts that was just going to be re-cycled.  

The beauty of DecoArt Chalky finish paint is that you can paint straight on to the surface without fear of the paint flaking off at a later date.  However, one thing you will need to do before you begin painting is to wipe down the tub completely with a mixture of vinegar and water to remove any greasy fingerprints.  Any greasy fingerprints left on the surface will prevent the paint from adhering to the surface.  


Once you've decided which shade of Chalky Finish paint you would like to use, begin painting the tub using a flat brush.  Be sure to cover every inch of the tub with the paint.  


1. Once the Chalky Finish base coat has dried, using your finger or, cloth or old brush apply Rose Gold Metallic Lustre around the lid.  Tip: if your lustre has hardened, put a little water in the jar, screw the lid back on and leave for a couple of hours or overnight to soften.  

2. Using the patterns, randomly place roses around the edge, alternating between 1 rose, 2 roses and 3 rose clusters.  Tip: to make it look more professional, trace a few of the roses off the edge as Carol has done here.  Next trace the larger cluster in the centre of your project, or in this case, the lid. Note: the patterns should print at the correct size. 

Next fill in the roses using your round brush from the Series 1 Starter kit as instructed on the Vintage Rose tutorial DVD. For this project, Carol used DecoArt Americana Naphthol Red. However, you can create a similar shade by mixing our Series 1 Tomato red with a bit of Lamp black, also from the Series 1 kit.  (To learn more about mixing colours, click here). 

3. Using Avocado green from the Series 2 kit, add the leaves following the tutorial from the Vintage Rose DVD.  Tip: If you do not have the Series 2 Starter kit, you could use the Hauser Light Green from our Series 1 Kit.  


Now you have the pattern to work with, add your comma strokes to paint your vintage roses, tipping your brush with Warm White - you can watch the full tutorial  on the DVD supplied in our Vintage Rose add on kit

Using your liner brush, add stalks to your leaves using Avocado around the tub.

Once you design is dried, using the warm white, add comma strokes using your liner brush. Finish by adding some 'filler foliage' this has been created by loading the end of the round brush with avocado and tipping the brush with white.

Leave to dry and apply a coat of Clear Creme wax using a round brush to protect your beautiful new  storage. You can either use it once it has dried or buff the wax with a soft, lint free cloth to create a soft sheen to your container. 


Happy Folking, 

Carol xx 

SHARE:

Wednesday, 24 August 2016

Create the perfect crackle finish every time with DecoArt's Weathered Wood.


At You Can Folk It HQ, we love creating new projects and playing with different mediums and products to create different surfaces to add our Folk Art designs on to. One product we have been loving lately is DecoArt's Weathered wood. This fantastic liquid can help us turn any plain surface into one with texture and detail by causing your paint to crack and split.   Following our journal makeover, we have had so many questions about using weathered wood, we thought we would let you know how to use it well to create the best finish for each and every one of your future projects. 

Use DecoArt's weathered wood medium between two different colours/layers of paint to create cracks in your paint. This gives any project a vintage, aged look.

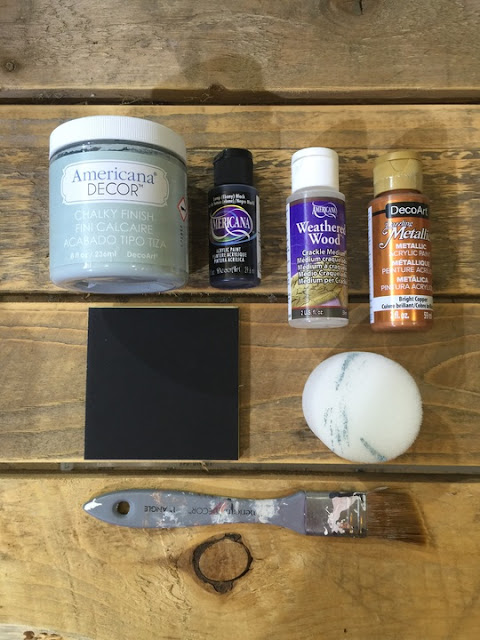
For this project, you will need: 

2 different colours of Decoart Americana or Chalky Finish Paints 
Base coating brush sponge 
Mount board for practice - this is great as it won't warp and we can add any practice boards we don't use for a project to our painting journal.


DecoArt weathered wood is known as a 'sandwich crackle' because it has to be sandwiched between 2 layers of paint to work. How you apply the top layer of paint determines how the crackle will appear, so it's always a good idea to try out variations before starting a project.

Here you can see some of the different effects you can create:

By applying the paint using a sponge or a brush, DecoArt Weathered wood creates different cracks on the surface of your project.

Depending on the look you wish to create, you can apply a dark colour on the base and a lighter colour on top or vice versa.  If you are using DecoArt Americana Acrylic or chalky finish paint for both layers, they can be used in any order you wish.  However, when you are using Dazzling Metallics, as we have done (see mount board No 4) metallics do not crackle. For this reason they can only be used as the base coat, not the top coat.

So now you have chosen your colours, let's begin.

Step 1. Basecoat your board and leave to dry. As always, you can leave your paint to dry naturally or speed the process up with a good old hairdryer.

Step 2. Apply a layer of the crackle medium and allow to dry naturally. This normally takes around 30 minutes.You'll know it's ready for the next step when your fingers don't stick to the surface.

Step 3 - Apply your top coat.  Feel free to mix a custom colour for your top coat but never water down your paint as this will affect the medium and prevent it from working as well. Once you've got your topcoat ready, this is where the magic happens! Two factors contribute to the crackle pattern you end up with; what you apply the top coat with and how thick you apply the top coat.

Applying paint with a sponge - dabbing the top coat onto the crackle medium. The trick to this method is to always work in a methodical way. Don't go back over the area you've already added paint to as this will remove the paint you've just applied.  On mount boards 1 & 3 above, you will see this method creates a lovely spidery pattern which is often finer than when you apply it with a brush.

Next, create some test samples using a brush to apply the top coat. When applying the paint lay the paint down gently, don't apply any pressure to the brush - you need to aim for a nice solid covering in one coat.

Again, once you've laid the paint down, don't go back over it, otherwise you will remove the paint. The main reason for this is that the top coat activates the weathered wood and it turns to a jelly like substance that is easily disturbed.

When applying the paint with a brush, the direction in which you apply the paint with a brush is the direction in which the cracks will form. Looking at examples 2 & 4 above, you can see that the paint has been applied with a brush using vertical strokes.  Had the paint been applied from left to right, the result would have been horizontal cracks.   

When painting circular or cylindrical items, apply DecoArt's weathered wood with a sponge. Creating vertical or horizontal lines would look severe and distract the eye from its shape.


The direction becomes important when you are considering the finished look of your project.   For a circular project for example, applying the paint with a sponge is the best option. As you can see from the enamel bucket we painted (above), the spidery cracks give it a beautiful finish. Creating lines of crackle would have distracted from the shape. However, when painting a wardrobe for example, by applying the top coat vertically, the cracks begin to enhance the shape of each panel you apply it to. 


Applying the top coat of paint in varying thicknesses will change the size of the cracks that form on your project.  Thicker paint will create larger cracks and a thin layer of paint will create finer cracks.  Never water down your paint or change the consistency in any way.

There are so many ways you can use crackle and there are so many factors that change the appearance of the finished look. Play with different colours and investigate whether you prefer light colours underneath or deeper shades as the base coat.   Why not try applying with a brush in a cross hatch motion which will give you a different effect once again. The great thing is with this medium is that you do not need to apply the medium all over the object or surface.  It's fun to just apply patches of weathered wood to the base or vary the thickness of the topcoat to change the size of the cracks you wish to form (as the love heart above shows).  

Change or update the look of any item with DecoArt Weathered Wood medium. We love the crackled, aged effect it creates.

Once we were happy with our crackled items, we used DecoArt Metallic Lustres to add stencils to some of them and also dry brushed the lustre around any raised areas/edges to give each one a bit of sparkle.  Whether you wish to leave them plain, stencil them or add a bit of Folky detail on your projects, each one will look nothing less than beautiful. 

Happy Folking, 

The You Can Folk It team xx


SaveSaveSaveSave
SHARE:
© You Can Folk It!. All rights reserved.
designed by pipdig