Showing posts with label liner brush. Show all posts

Thursday, 11 April 2019

How to paint feathers

This month, after three years of promising my daughter that I would up-cycle her chest of drawers (a bargain £40 from the charity shop - 100% wood, no veneer here and beautiful dove tail joints, without wanting to sound like my Grandma, they don't make them like they used to!) I finally got round to painting them.  Her new bedroom, purple wallpaper adorned with feathers and grey carpet were the inspiration...so out came the DecoArt Yesteryear Chalky Finish, Americana's in purples and greens, my trusty Vintage Rose kit and silver for a few feathers.  I'll be honest, I never painted a feather in my life but in for a penny, in for a pound I went for it. Worst case scenario? I'd sand and repaint it.   


I shared a few photos on social media and wow! Who'd have thought you'd all fall in love with feathers like you did.  You requested a tutorial and so I sat down last night and thought, how on earth did I do it.... Here are the steps I went through though I will say, if you have not begun your journey with the liner brush yet, this is a great project to try, it is easier than it looks and it is very forgiving.  

I have drawn out a few feather outlines for you to download here.  When you are practicing, I would suggest working with a smaller version first just to get the feel of painting them.  

You will need: 

DecoArt Americana in your choice of colour (I used Dove Grey for the tutorial and Shimmering silver for the drawers) 
Practice paper*- I love working on black, especially for this project. 
Dotting tool* (or something similar) to transfer the design.  

*All available as part of the Round Brush Starter and Flat Brush Starter kit

Transfer your favourite feather design

How to paint feathers with You Can Folk It - Step 1 painting the centre.

Step 1: Once you have transferred your feather onto the practice paper, using your liner brush, paint your centre line from the bottom of the feather to near the top.  
Tip: you may need to add a little water to your paint or Drying Time extender to help the brushstroke flow, especially if you are working on a larger feather.  

Step 2: To paint the strands of the feather, roll the paintbrush in the paint (as Carol teaches in her video here) to remove the excess before painting.  Although this is a very forgiving design, you want to avoid blobs of paint near the centre.  

How to paint feathers - step 2 adding brushstrokes


Step 3: Start painting your strands working from the centre line to the outside.  Don't try to be too straight, don't think too much...the wobblier the better sometimes! As you can see, some lines are 'brighter' than others and that's ok too. It will all add to the finished look.  

Tip: Don't be tempted to flick the brush when you are doing this. Just like when painting Folk Art, always pull the brush and lift near the end of the brush stroke.  

Painting feathers with You Can Folk It - how to

Step 4: Continue working down one side of the feather. As you paint, try to change the 'wobble' in your brush strokes. This will give you gaps in the feather like a real one. 

Painted feather from You Can Folk It

Step 5: Repeat the process down the other side.   

Adding a second layer to your feather

Step 6: Now you have done the first layer, it is time to build it up.  For this I used a dryer brush meaning I did not add water to my paint and I kept painting brushstrokes even when there wasn't much paint on my brush.  Here is what my brushstrokes would have looked like without the finer ones underneath.  You can see they are much less thought out but just add texture to the final feather. 

Painted feather from You Can Folk It
Here is the finished feather. 
Note: As you get more confident painting feathers, you may find that instead of painting two layers, the finer brushstrokes and dryer ones will come naturally to you as you paint, that's fine, the effect will be the same. Like we always say at Folk It, it will all come with practice. 

Purple feathers painted in a wreath. Learn how with You Can Folk It

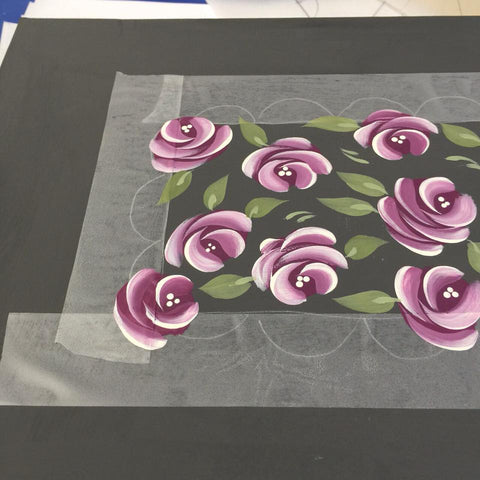
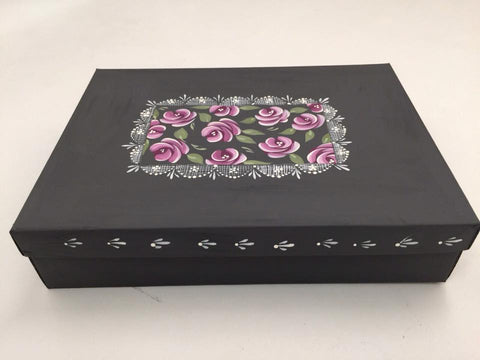
Once you have mastered the feather, have fun and play with ideas. Here, I drew round a bowl, following the circle with each centre line and filled in both sides of each feather. 

There is so much you can learn using the same brushes and techniques taught in our kits, if there is something you want to try, go for it and if you aren't sure, get in touch or attend one of our workshops, we are always happy to help.  

I do hope you enjoy this tutorial, if you have any questions or have a go yourself, please leave a comment, we'd love to hear from you.  

Happy Folking, 

Toni x 


SHARE:

Thursday, 17 January 2019

Inspired by music and having #funwithfolkit

Canal Art Roses and Daisies painted on to a vintage vinyl record.

This month, our challenge has been to find inspiration in music.  While we may turn up our favourite tunes in the studio while we paint, that is usually where our inspiration ends! We are pleased to say however, that our inspiration and yours has taken us by surprise. Pairing our painting kits with music has created a range of great ideas and we thought we'd round up a few for you.


You Can Folk it's folk art daisies painted to create musical notes

Musical notes - when you're practicing brushstrokes, it can be fun to create something new with them and play with ideas without committing too much time in case your idea doesn't work out.  These daisy notes by In Blume are a lovely twist on our Daisy Details kit.

                         Black and white handpainted birthday card. The card has a large A painted with musical notes and symbols

At the Painting Table has created this lovely card by painting a little music using her liner brush.  Painting with your liner brush is a little different to painting comma strokes but once you've mastered it, this brush is perfect for painting more delicate designs. 

3 different cards featuring strips of music sheets and painted using folk art brushstrokes.

Carol recently went to visit friends in South Africa and got creative with her friend Ronel.  Armed with some free music sheet printables, she used them to create a border before adding some liner brush patterns and hearts.  We think the black heart would make a great Valentines card for the music lover in your life. What do you think? 

An outline of a guitar painted by You Can Folk It! using folk art comma strokes and dots

Take a silhouette and decorate it with a few liner brush strokes to create your own unique design.  Sandra used a mixture of comma strokes, lines and dotting to create this pretty pattern.  For the strings she used a Micron pen.  If you don't feel comfortable using a liner brush for the longer lines and swirls, why not use pens or colouring pencils and just use the brush for the comma strokes?  

Handpainted cards, one black, one white.  Both feature a square of vintage music sheets that have been painted on to using You Can Folk It painting kits.

Get your hands on some old music sheets to create some Vintage vibes? Here we toned down the background (you don't want the music distracting from your painted design) using a little Antiquing.  If you want to know more about how to do this, check out our You Tube tutorial

A circle of music paper framed by hand painted lace like designs from You Can Folk it

Use a little music to create a centrepiece and add a little lace around it.  Learn to paint our delicate lace design using our kit and then follow our great tutorial to build on those skills and learn to create your own patterns. 

An old radio that has been hand painted with Roses using You Can Folk It's Vintage roses kit.  Photographed with painting in progress and the finished radio in the owners home

Jo from The Original Craft Co doesn't get much time to herself but inspired by this months theme, she knew the perfect project.  Sitting unloved in a corner of her home, she dusted off her tired looking radio and gave it a new lease of life with our Vintage Roses kit.  


Handpainted white Edelweiss flower on black paper.  White petals with a white and yellow centre.

Inspired by a song, At the Painting Table searched for this pretty flower and used her Folk Art round brush skills to create a version of her own.  Once you've learned the techniques from our kits, it just goes to show you can create and paint so much more.  

When we first came up with our monthly themes for our painting challenge, we thought it would give us a focus, a way to inspire us and we are so pleased that it has done that and so much more.  Once again, we are blown away with all that you can do with a few brushstrokes.  

Happy Folking! 


SHARE:

Monday, 30 November 2015

Tutorial: How to design a delicate lace pattern


Our Delicate Lace pattern is a fantastic design to add borders and edging to your project. Use it on its own or combine it with one of our other kits, it is so versatile and looks lovely wherever you paint it. Today, we will be teaching you how to get the most out of your kit and showing you how to design your own delicate lace patterns. 

The equipment you will need for this is...
  • tracing paper 
  • a marker pen 
  • a pencil and eraser 
  • light or dark transfer paper depending on your project 
  • different sized coins 
  • low tack masking tape
  • paints and paintbrushes of course!
Before you add your delicate lace, first basecoat your gift box in DecoArt's Chalky Finish paint in 'Relic', a gorgeous dark grey. (No primer needed)
DecoArt Americana paints needed: 
Carol used DecoArt's American acrylic in warm white from our Series 1 kits to paint the delicate lace .
The vintage roses (our Series 1 add on kit) were painted using DecoArt's Americana acrylic in: Plum (from our Series 2 Starter kit) and warm white.  The leaves were painted using Avocado from of Series 2 Starter kit. 
How to design your Delicate Lace:
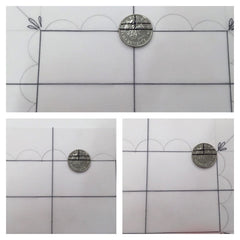
 Step 1: on your tracing paper, draw out the rectangle/square you wish to edge in a size you need. Then mark it into quarters.

Use a marker pen to draw the square/rectangle so you can rub pencil marks out later - designing lace is a process of trial and error (as all the best things are!)
Step 2: make lines as shown here onto your chosen coins - you can choose whichever size you like but we like 10p and 5p coins :)
Step 3: using the lines you've drawn as a guide, start drawing your scallops. Begin in the centre and work outwards.
The scallops will either fit nicely or need spacing out slightly - this is where you will need your eraser.
INSPIRATION: before you paint your scallops, play with designs - try diagonal, horizontal and vertical lines. Edges can be finished with dots and comma strokes. You can also add dot hearts, dot roses or daisies into the scallops themselves! This is another excellent addition to a painting journal.


Step 4: before painting your lace design onto your object, use your transfer paper to draw your scallops out and mark off your rectangle.  Depending on the design you wish to paint in the centre, you might want to use low tack masking tape to mark it out.
Mask the area you wish to paint to give you a crisp shape.
Step 5: Add your lace design to frame your design.

When the low tack masking tape is removed, your design will look as though it has been cut out giving it a completely different look to a more structured design that would simply sit in the centre. Draw out your semi circles and fill them with your chosen lace design. 

Before you sit back and enjoy your creation, take a look to see if you have overlooked any details.  Why not add patterns to the rim of the lid to complete your project.
Use your completed box as an alternative to gift wrap or keep it for yourself.
All that is left to do now is enjoy your box. Whether you choose to use it an alternative to gift wrapping or keep it for yourself, it will be admired by anyone who sees it :) 
I hope you enjoy this tutorial and as always, we would love to see your designs on our Facebook page. If our Delicate Lace kit is not in your collection already, you can find it here.
Happy Folking, 
Carol x 
SHARE:
© You Can Folk It!. All rights reserved.
designed by pipdig