Thursday 31 May 2018

10 fantastic ways to paint with rainbows


 Rainbow inspiration from You Can Folk It

Last month, we announced our fun new painting challenge.  Choosing a range of broad themes for our painters to have fun with each month we hoped they would inspire your journal pages and projects.  Our first month, a month filled with beautiful rainbows has not disappointed as we have been fascinated by your projects.  We were so inspired, we couldn't resist getting involved ourselves.  Here are a few gorgeous projects we have created and admired over the last month.  

Hand painted rainbow decorations look beautiful on this freestanding lego project

Helen from Mindful Crafts has recently discovered these fantastic freestanding Lego decorations and given him a rainbow makeover.  


Carol Sykes from You Can Folk It created this beautiful rainbow using techniques from their flat brush kits available from www.folkit.co

Our Flat Brush Cupcakes and Babushka kits teach you how to 'float' colour to create depth and dimension in your painting. Here, Carol used this technique to create a beautiful rainbow. 

A rainbow makeover for You Can Folk It's dot rose design from the Round Brush kit

One of our customers (@at_the_painting_table) transformed our Dot rose design using all the colours of the rainbow.

Dotty daisies from You Can Folk It's round brush starter kit - rainbow style

Jackie @jacbnimble_crafts indulged in a little dotting and we love rainbow daisies! 

Using a muted rainbow of colours and a liner brush to paint this dandelion clock

We got out our liner brush and did a little practice using a muted rainbow, not as bold as the bright palette but still as pretty

Play and experiment with colour - You Can Folk It vintage roses in rainbow colours

Sometimes it's fun to break the rules and experiment and Rose creates beautiful projects when she does just that! You can create the most interesting and eye catching paintings when you play with colour. 

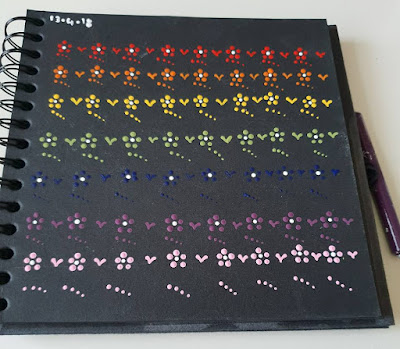
We used paint pens and our comma strokes to create this fun painting

We revisited our childhood with this splatter painting and had great fun making a mess! 


Vikki @take_time_out discovered our kits at the Handmade Fair and there's been no stopping her creativity ever since.  Here she mixed rainbow dots with brush lettering while she took time out to create.


Handpainted flowers transformed by a bright and fun rainbow palette

We adapted our Bluebird flowers to create something unique and the rainbow colours certainly helped us do that! 


You Can Folk It Oriental Blossom flowers look beautiful in rainbow colours.  A great project when learning to paint.

Using floating (from our Cupcake and Babushka kits) and our Oriental Blossom kit, @at_the_painting_table used the theme literally and created this beautiful flower rainbow.  

One thing is for sure, the first monthly theme of our Painting challenge has inspired some new and exciting ideas.  Painting with rainbow colours is so fun, we doubt we have seen the last of this theme.  As we move forward to our next theme, flora and fauna, we look forward to seeing more gorgeous projects and journal pages from all you Folkers :) 

Happy Folking x  


SHARE:

Monday 21 May 2018

No reciclar ... reutilizar! Crea hermosos elementos de almacenamiento con You Can Folk It!


Una cosa que tenemos en casa es muchas cajas, latas y tarros. No los recicles! En cambio, dales vida con un hermoso cambio de imagen. Esta semana, hemos estado utilizando nuestras antiguas tinas de dulce y nos hemos inspirado en las cajas de sombreros vintage para mejorar nuestro primer proyecto, solo para ti. Nos encantó el aspecto de algunas cajas de sombreros vintage que encontramos cubiertas de hermosas rosas.

Para este proyecto, necesitarás:

Un contenedor de plástico de su elección

La primera decisión que debe tomar es decidir qué va a decorar. Este es un gran proyecto para experimentar: pintar sobre superficies curvas es muy diferente a pintar superficies planas. Si su proyecto falla, aún puede reciclarse y no le ha costado dinero. Elegimos una tina dulce de plástico que iba a ser reciclada.


La pintura de acabado DecoArt Chalky se puede pintar directamente en la superficie, no requiere preparación. Sin embargo, una cosa que tendrá que hacer antes de comenzar a pintar es limpiar el recipiente por completo con una mezcla de vinagre y agua para eliminar las huellas dactilares grasosas. Cualquier grasa que quede en la superficie evitará que la pintura se adhiera a la superficie.

DecoArt Chalky finish paint requires no preparation!

Una vez que haya decidido qué tono de pintura Chalky Finish le gustaría usar, comience a pintar la bañera con un pincel plano. Asegúrese de cubrir cada pulgada de la bañera con la pintura.
Decorate old plastic containers with roses and Metallic lustre


1. Una vez que la capa base de Chalky Finish se haya secado, con el dedo, la tela o el pincel viejo, aplique Rose Gold Metallic Lustre alrededor de la tapa. Consejo: si su brillo metálico se ha endurecido, ponga un poco de agua en el recipiente, vuelva a atornillar la tapa y déjela reposar durante un par de horas o durante la noche.

2. Usando los patrones, coloque rosas al azar alrededor del borde, alternando entre 1 rosa, 2 rosas y 3 racimos de rosas. Consejo: para que se vea más profesional, trace algunas de las rosas que Carol ha hecho aquí. A continuación trace el clúster más grande en el centro de su proyecto, o en este caso, la tapa. Nota: los patrones deberían imprimirse con el tamaño correcto.

A continuación, rellena las rosas con el pincel redondo del kit básico de la serie 1 como se indica en el DVD tutorial de Vintage Rose. Para este proyecto, Carol usó DecoArt Americana Naphthol Red. Sin embargo, puede crear un tono similar mezclando nuestro Tomate rojo de Serie 1 con un poco de Negro de lámpara, también del kit de Serie 1. (Para obtener más información sobre cómo mezclar colores, haga clic aquí).

3. Usando Aguacate verde del kit de la Serie 2, agregue las hojas siguiendo el tutorial del DVD Vintage Rose. Consejo: Si no tiene el kit básico de la Serie 2, puede usar el Hauser Light Green de nuestro kit de la serie 1.


Ahora tiene el patrón para trabajar, agregue sus trazos de coma para pintar sus rosas vintage, inclinando su pincel con Blanco cálido: puede ver el tutorial completo en el DVD proporcionado en nuestro kit adicional Vintage Rose.
Usando su cepillo de liner, agregue los tallos a sus hojas usando DecoArt Americana en aguacate alrededor de la tina.
Una vez que el diseño esté seco, usando blanco cálido, agregue comas usando su pincel de recubrimiento. Para finalizar, agregue un poco de "follaje de relleno". Esto ha sido creado cargando el extremo del cepillo redondo con aguacate y vertiendo el cepillo con blanco.
Deje que se seque y aplique una capa de cera Clear Creme con un cepillo redondo para proteger su hermoso y nuevo almacenamiento. Puede usarlo una vez que haya secado o pulido la cera con un paño suave y sin pelusa para crear un suave brillo en su contenedor.

From an old chocolate tub to beautiful storage

Happy Folking, 

Carol xx 
SHARE:

Tuesday 8 May 2018

The 5 must have items in our painting stash


The five products that we wouldn't be without when using our painting kits

As a painter, there is nothing worse than getting into your flow and realising you are missing something you need.  Hours can fly by when you're in the creative zone but if you aren't prepared, if you haven't got what you need to hand, it can be incredibly frustrating. This was one of the reasons we were so passionate about the contents of our Starter kits.  We wanted to provide everything you needed (with the exception of a pot of water and kitchen towel!) so that as soon as you got hold of your kit, you could enjoy that excitement and get stuck in straight away without more trips to the craft shop.

Over the years, as we have developed our skills we have found extra bits and bobs we find ourselves reaching for time and again....

1. Kitchen roll.  A rather uninspiring start to our list we know but a definite must have! Perfect for cleaning our dotting tools, mopping up any little spillages and drips as well as drying off our brushes after each wash.  As the DecoArt Americana colours are so beautiful and the consistency is specially formulated for Folk Art, we prefer not to dilute the paint for our brushstrokes.  If you aren't sure if you are loading your brush properly for those perfect comma strokes, check out this tutorial.

Save your DecoArt Americana paints by creating and using a wet palette - easy DIY project

2. A wet palette. This is such a simple addition to your painting kit yet it makes all the difference.  There is nothing worse than wasting paints and as many of our designs don't require a large amount of paint, a wet palette is a must have.  As we head towards warmer times in the UK, we certainly notice a difference in the drying  times of our paints and so we need to do our best to prevent our paints turning in to a gloopy blob!

One of our customers used Scotch magic tape to mask off parts of this design ready for the greeting.
Photo courtesy of @at_the_painting_table

3. Scotch Magic Tape (the green one). Tape is always handy but in addition to holding down practice paper when we like to take our creativity outside, we love this tape for masking.  Although 3M do create a Scotch Removable tape (the blue one) we have found that it is not sticky enough for us.  If this magic tape is a tad sticky for our surface, pressing it once or twice on to our clothes often does the trick in removing some of the adhesive.  If you have some tape, why not try masking off a square or strip to create a clean edge in your painting?


4. Sakura Gelly Roll pen.  We have started to use these in the last few years at our events.  Although we still prefer to use our Transfer paper, when you are drawing out 300+ templates for a Grand Make or teaching a large group of painters, it can be handy to use to draw out your desired pattern.  (however, be aware this pen is obviously less forgiving than our transfer papers so wherever you leave a mark, you will need to paint over the top).  More recently, we have also used it to add writing to our projects.  From simple block lettering to fancy faux calligraphy, this white pen looks great on a dark background.

5.  Last but not least is our Drying time extender.  Featured in our Flat Brush Starter kit, we use it to help our paints blend seamlessly together to create a beautiful effect for our flat brush designs.  We also use it on our wet palettes when we are painting not just outside but as we are demonstrating at events.  Warm areas and rooms with lots of people can dry out your paints so this is great to help keep your paints workable and again, reduces paint wastage (always a good thing!)

So there you have it... our top 5 must haves for our painting kit, we hope you find it useful.  What is in your painting kit that you just couldn't live without? Leave us a comment, we'd love to know.

Happy Folking x
SHARE:
© You Can Folk It!. All rights reserved.
designed by pipdig