 |
It's no secret that we love our suitcases at the minute. After our Cherry blossom and butterflies suitcase that travelled to Frankfurt with us, we got started on another new one. There is always a temptation to play it safe when we are up cycling; to choose the muted colours and classic finishes but this time, we gave ourselves a challenge to break out of our comfort zone and create something a bit more daring!
For this project we used:
A vintage suitcase (of course!)
DecoArt Chalky finish paint in Romance and Rustic
DecoArt Metallic lustre in Copper kettle and Black Shimmer
You Can Folk It Series No 1 Starter kit
You Can Folk It Series No 2 Starter kit
You Can Folk It Series 1 Vintage Rose kit
You Can Folk It Series 1 Delicate lace kit
You Can Folk It Series No 1 Starter kit
You Can Folk It Series No 2 Starter kit
You Can Folk It Series 1 Vintage Rose kit
You Can Folk It Series 1 Delicate lace kit
Pencil, 12" ruler and eraser
We base coated the case first using DecoArt's Chalky finish paint in Romance. However, this turned out to be a little too bright even for our daring project and so we added a little of the Chalky Finish in Rustic, a deep brown shade, to tone it down ever so slightly. To accentuate the details, we used DecoArt's Metallic lustre in Copper kettle.
We then marked out our canvas to make sure the pattern was straight. Using the ruler, we began by drawing a line down the centre both horizontally and vertically. We then laid the ruler along the these centre lines and, using the width of the ruler, continued to draw lines to the edges of the case.
We ended up with enough space to paint three columns of roses, with one column in between - this was to be used later for our scallops.
To paint the roses, we mixed the Antique Rose with Pebble and Titanium white for the petals. For the leaves, we mixed Avocado with Pebble and Titanium white (Series 2 Starter kit). Adding the Pebble to the colours gave the roses a muted effect to match the base that we toned down earlier.
We painted the roses in alternate squares then added the leaves around each one which gave us the brick like pattern.
Using the liner brush and titanium white, we added random cross hatching patterns between the roses.
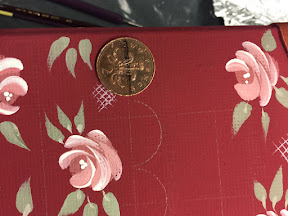
Next, we marked out our scallops using a 2p coin (which is just over 2.5cm in diameter for those of you outside England). To do this, mark the coin down the middle and line this mark up with your line on the project to ensure your scallops are always the same size. We added a line of scallops down both sides of the blank row.
Begin by placing your coin in the centre of your project and work outwards to the edges leaving some space between each scallop so they don't overlap. Beginning in the centre means that each end will end up with the same size scallop. This project ended with a full scallop at each end but sometimes you will end up with half a scallop or less - this doesn't matter as long as its equal on both sides!
Next, we filled each scallop. To do this, use your liner brush to paint straight comma strokes. Begin with a large stroke in the centre (1) working to one side (2) then the other (3), all the time, staying a few millimetres from the line you have drawn. Next, use your dotting tool to add dots along the outside line (4). Again, begin in the centre to create the largest dot and then work outwards.
Next, to highlight these three rows of roses, once our design was completely dry we added a wash. To create this effect, we mixed Titanium white with water to make a wash. The mix should resemble skimmed milk once you've mixed it. Use a sponge or brush to apply a thin layer inside each of the pattern strips.
Finally, we used our dotting tool to add extra details to fill any gaps. We added groups of three dots, single dot hearts and comma strokes painted with a liner brush all using titanium white. There was no pattern for this, simply stand back from your project and see where your eye is drawn to - normally we focus on areas that are not uniform and where there is a gap that needs filling.
Once you have completed your project, if it is a suitcase or a piece of furniture, buff up your Metallic lustre to make it shine and add a layer of DecoArt's clear Creme Wax to protect your piece.

Here is our finished suitcase! After we had added the design on the top, we felt that the Copper colour was a bit lost on the suitcase and so we simply went over the details with Metallic lustre in Black Shimmer. The beauty of pieces like these is that they can be repainted if you don't like something. We hope that like us, you will be inspired to break away from your comfort zone and make some bold and daring choices on your next You Can Folk It project.
Happy Folking,
The You Can Folk It team x


Absolutely live this project! Need to find a vintage suitcase!
ReplyDelete