Showing posts with label ideas. Show all posts

Tuesday, 3 July 2018

10 painting projects to inspire you


Well another month has flown by and so has another monthly theme for our #funwithfolkit challenge.  When we posted our first Flora and Fauna themed project, we never expected it would be as popular as it was, getting thousands of views within the first week of being posted.  If you haven't seen it yet, why not pop over to the blog post here for a look. 

It seems that there are two camps for these challenges, those that love incorporating the themes in to their Folk It designs and those that run with it to create their own unique ideas.  However you interpret them, we love them all.  Here we have rounded up our favourites for the month of June.  


Inspired by Cath Kidston, we love Jackys version - complete with You Can Folk It's Vintage Roses and ladybirds

Jacky from Chloe and Kato recently rediscovered her painting mojo and created this beautiful spray of daisies and roses - inspired by her favourite mug! We have to say though, it is definitely cuter with a few ladybugs. 


Fabric painting from Jackie - such a beautiful scarf and our Sunflower design looks great against the blue fabric

Painting on fabric takes practice, painting on silk is a labour of love but Jackie from Jacbnimble Crafts has done brilliantly creating this scarf for her friend.  

Jaxs used our Butterflies and Vintage Rose painting kits to decorate these pretty pots #giftidea #folkart

Jaxs from Vintage Crafts by Jax has created these gorgeous purple plant pots using our Butterfly and Vintage Rose kits.   By using a limited colour palette she has created a beautiful set of gifts that really stand out.  

Beautiful Vintage roses and cute bees! We love it!

The lovely Folker from At the Painting Table has got creative to add the cutest bees to these delightful yellow roses - the perfect painting project for summer


Painted dragonfly - decorated using You Can Folk It's Round Brush Starter kit

Vanessa has found this lovely dragonfly shape to decorate for the Flora and Fauna theme.  Dot daisies, dot roses and other dot patterns, it's got it all!

Vintage roses in a variety of fun colours inspired by wildlife - such a unique idea.

Stepping away from shapes and projects, Helen has used the Flora and Fauna theme to inspire her colour choices in her practice pages...what a great idea.  

Sandra from You Can Folk It designed this dragonfly project for our #funwithfolkit painting challenge.  She combined our Delicate lace design and dot patterns to complete the project.

Sandra felt inspired after creating our Bee tutorial to create a different project.  Featuring a unique Dragonfly design on the lid, she added a few dot daisies and vintage lace to the box to complete it. 

This wooden duck from Nazlie is just stunning. Decorated using our Vintage Rose painting kit

These ducks are so popular at the minute with crafters.  Using a French blue base coat and our Vintage Rose kit, Nazlie from Cositas Bonitas has turned this into a real centrepiece. 

Freestanding wooden decorations are great to decorate with Folk It painting kits available from www.folkit.co

Who would have thought a Folked up owl would look so pretty! Helen from Mindful Crafts used our popular Round Brush Starter kit to decorate this owl beautifully.

Vikki fell in love with her You Can Folk It Starter Kit and started getting creative - she creates such great designs with her dotting tool.

Vikki discovered our stand and our kits at the Handmade Fair and she's been hooked ever since - we love the original and unique designs she has been creating with her dotting tool and this Dragonfly design worked perfectly for June's theme! 

So as we head in to July, this month in our #funwithfolkit painting challenge, we are concentrating on wreaths.  Whether they are dotty or festive, floral or not, we can't wait to see them all! 

Happy Folking! 


SHARE:

Thursday, 31 May 2018

10 fantastic ways to paint with rainbows


 Rainbow inspiration from You Can Folk It

Last month, we announced our fun new painting challenge.  Choosing a range of broad themes for our painters to have fun with each month we hoped they would inspire your journal pages and projects.  Our first month, a month filled with beautiful rainbows has not disappointed as we have been fascinated by your projects.  We were so inspired, we couldn't resist getting involved ourselves.  Here are a few gorgeous projects we have created and admired over the last month.  

Hand painted rainbow decorations look beautiful on this freestanding lego project

Helen from Mindful Crafts has recently discovered these fantastic freestanding Lego decorations and given him a rainbow makeover.  


Carol Sykes from You Can Folk It created this beautiful rainbow using techniques from their flat brush kits available from www.folkit.co

Our Flat Brush Cupcakes and Babushka kits teach you how to 'float' colour to create depth and dimension in your painting. Here, Carol used this technique to create a beautiful rainbow. 

A rainbow makeover for You Can Folk It's dot rose design from the Round Brush kit

One of our customers (@at_the_painting_table) transformed our Dot rose design using all the colours of the rainbow.

Dotty daisies from You Can Folk It's round brush starter kit - rainbow style

Jackie @jacbnimble_crafts indulged in a little dotting and we love rainbow daisies! 

Using a muted rainbow of colours and a liner brush to paint this dandelion clock

We got out our liner brush and did a little practice using a muted rainbow, not as bold as the bright palette but still as pretty

Play and experiment with colour - You Can Folk It vintage roses in rainbow colours

Sometimes it's fun to break the rules and experiment and Rose creates beautiful projects when she does just that! You can create the most interesting and eye catching paintings when you play with colour. 

We used paint pens and our comma strokes to create this fun painting

We revisited our childhood with this splatter painting and had great fun making a mess! 


Vikki @take_time_out discovered our kits at the Handmade Fair and there's been no stopping her creativity ever since.  Here she mixed rainbow dots with brush lettering while she took time out to create.


Handpainted flowers transformed by a bright and fun rainbow palette

We adapted our Bluebird flowers to create something unique and the rainbow colours certainly helped us do that! 


You Can Folk It Oriental Blossom flowers look beautiful in rainbow colours.  A great project when learning to paint.

Using floating (from our Cupcake and Babushka kits) and our Oriental Blossom kit, @at_the_painting_table used the theme literally and created this beautiful flower rainbow.  

One thing is for sure, the first monthly theme of our Painting challenge has inspired some new and exciting ideas.  Painting with rainbow colours is so fun, we doubt we have seen the last of this theme.  As we move forward to our next theme, flora and fauna, we look forward to seeing more gorgeous projects and journal pages from all you Folkers :) 

Happy Folking x  


SHARE:

Tuesday, 19 April 2016

Five Folky up-cycling projects we love

It's true that we see so many projects from our lovely customers and while many favour making cards and gift bags with our designs, some transform an unloved item into something beautiful: to fall in love with a boring object once more, to show a sentimental item a bit of TLC or to up-date a piece of furniture that no longer fits into new decor. Here, we have chosen a few projects that we love, for their transformation, for the stories behind them and their creativity. 

1.  Up-cycling projects come in all shapes and sizes and we just adore this apprentice dresser Anthea has folked up for her daughter to play with. Tiny furniture and dot roses? What's not to love!
up-cycled apprentice dresser using You Can Folk It's Series 1 Starter kit
Anthems daughter now has the prettiest dresser to play with! 

2. If you have seen our Storage and Organisation board on Pinterest, you know we love great ideas for displaying our bits and bobs and we love this handmade photo frame Rose has created. Using an old picture frame, twine and mini pegs, she has created this beautiful dot rose photo frame.  

An old picture frame can be up cycled into great storage for photos. Rose has added dot roses from You Can Folk It's Series 1 Starter kit
Rose saved money by turning an old picture frame into a quirky photo frame using the supplies and techniques from our Series 1 Starter kit. 

3.  One of our Folkers had a rather unloved Elephant in her possession but as it once belonged to her Mother she was reluctant to pass it on. After she discovered Folk It, she saw a perfect opportunity to give him a little makeover.  Using our Series 1 Starter kit, she added a few dot roses and eyes.  Now, despite the damage he has received after all the years he was loved, he is loved once more. What a great story! 
An unloved heirloom was given a makeover with You Can Folk It's painting kits. Reloved!
The elephant was first decorated using deco patch before adding a few roses  from our Starter kit. 


4. After she gave her daughter's room a facelift, Anna decided to do the same for the old chest of drawers that was in there too. Bought in the 70's by her parents, the dark brown wood made the drawers a functional item, but certainly not a beautiful one. After searching Pinterest for a bit of colour inspiration, she opted to create this beautiful ombre effect by adding some pink paint she used to paint the bedroom to some DecoArt Chalky finish paint in Lace. Using our dot rose hearts from our Series 1 Starter kit, she added detail to each drawer and finished the top with our Series 2 Oriental blossom. 

An Ombre paint effect and beautiful details thanks to You Can Folk It's Starter & Oriental blossom kit.
Anna used DecoArt's new Rose gold metallic paint and warm white to paint the roses. 


The oriental blossom looks beautiful on this up-cycled set of drawers
Anna used the same Rose Gold metallic paint and blended it with a pink shade she mixed from our Series 1 acrylics to create the shimmery blossom she painted on the top. 
 5. Faye has had this great desk in her room for a while but she thought it lacked something. She loves our Vintage Rose kit and after creating her own custom made templates to fit the table top and drawers, she got to work. We think the desk is now a work of art!

We teach you how to paint beautiful roses and leaves in our kits which contain, not only a comprehensive instruction booklet, but a DVD too. 

Creating beautiful pieces of furniture was one of the reasons Folk Art was created and we love the fact that, centuries later, people are using our kits to create re-loved items for their home.  If you have an up-cycling project that features a bit of Folk It, please do let us know. 

Happy Folking, 

Carol & the team xx
SHARE:

Saturday, 17 October 2015

Five great ways to add writing to your Folk It projects


So you have painted up something you are proud of and you want to add writing as a finishing touch but what do you use? There are a number of options available and your choice may depend on the finished look you want and personal preference so here are a few of our favourites for you to choose from.

1. Transfers

Our Series 2 kits contain phrases and words for you to transfer onto your projects. For each project we have created tailor made transfers for each one.  We understand that not everyone likes their handwriting or you may want something a bit more formal to finish off your masterpiece and once you have got to grips with using the transfers you can create your own to add to those projects and to ones from Series 1 if you wish.

Use DecoArt Matte medium to transfer writing to your project in our Folk It Series 2 kits
Transfers make it easy to add phrases and words to projects. 
2. Painting

Trust us, if you practice enough, you can learn to use your liner brush well enough to write with it. It's true, it takes commitment and yes, there may be times when you want to throw the brush and your paints through the window and wish to never see them again.  However, trust us when we say it is so worth it when you paint with a flow that wasn't there before. Give your work a finished look by adding dots of paint at the ends of your lines.

Use a liner brush to write onto your Folk It projects
It is possible to use a liner brush to write onto your project 

Another option is to draw letters onto your work and fill them in with paint. This is quite difficult on smaller projects but possible on larger ones.  We have pinned a great tutorial showing you how to do this here.

Draw on letters and fill with paint
Draw and paint on letters to your project 

3. Permanent markers

These are a great option for writing onto your project and like paint, using different colours can give you a different look. There are a few things to remember when using these though...

You have to leave your project to dry. Yes, it seems like an obvious thing to say but we've all been there; we are excited, we think the paint is dry or we hope we can get away with it, or most irritating of all, 99% of it is dry and just as we are finishing off our masterpiece, the paint catches and you can't hide it. If in doubt, leave it for an extra couple of hours. When you are writing with the permanent marker, you will find it does clog up. You're paint is dry so why is this happening? The reason is that your paint will still pick up a bit of 'transfer' that clogs up the end of the pen. Don't worry, all you need to do is keep wiping the tip of your pen with a piece of tissue.

It is easy to write directly onto your Folk it project with a permanent marker
Add writing with a permanent marker - play with colour and nib widths.

4. Uni Posca Paint pens

Available in a range of sizes (the tips range from extra thick to ultra fine) and colours (including metallic) these pens can be used on a wide range of surfaces. If you have seen some of our previous tutorials, you will have seen that Carol is a fan of these and has used them to personalise table decorations recently for her sons wedding.  These are a great alternative to using a liner brush, especially on curved and uneven surfaces.  If you would like more information, you can find it here.

Carol used Posca paint pens to personalise these wedding table decorations
Carol used Posca pens to personalise table decorations
5.  Stamps and stickers

Although this is not a medium we use at Folk It, we know a lot of our Folkers, being a crafty lot, have other resources available to them.  Providing beautiful, uniform writing, stamps and stickers are a fantastic option and our many people often use these to add sentiments and writing to their project. With many great designs available, there is one for any project. Whether stamped directly onto the project or onto card and added as an embellishment, it can be the finishing touch to your work.

Add stamps to your Folk It project to add detail
Stamp directly onto your project or, create a little embellishment as one of our Folkers has done here. 

So there you have our top five ways to add writing.  These are by no means the only options available  but these are the ones we use and see most often.  If you use a different method, we would love to hear about it.


Happy Folking,

The Folk It team x
SHARE:

Monday, 28 September 2015

Beautiful and easy dot inspired makeover


Makeover tutorial

Moving house can be exciting and stressful in equal measure. For some of us, it means moving into the house of our dreams where every room matches our tastes. For some of us, we know our home is going to be a work in progress and there are many projects that are on our 'to-do' list. 

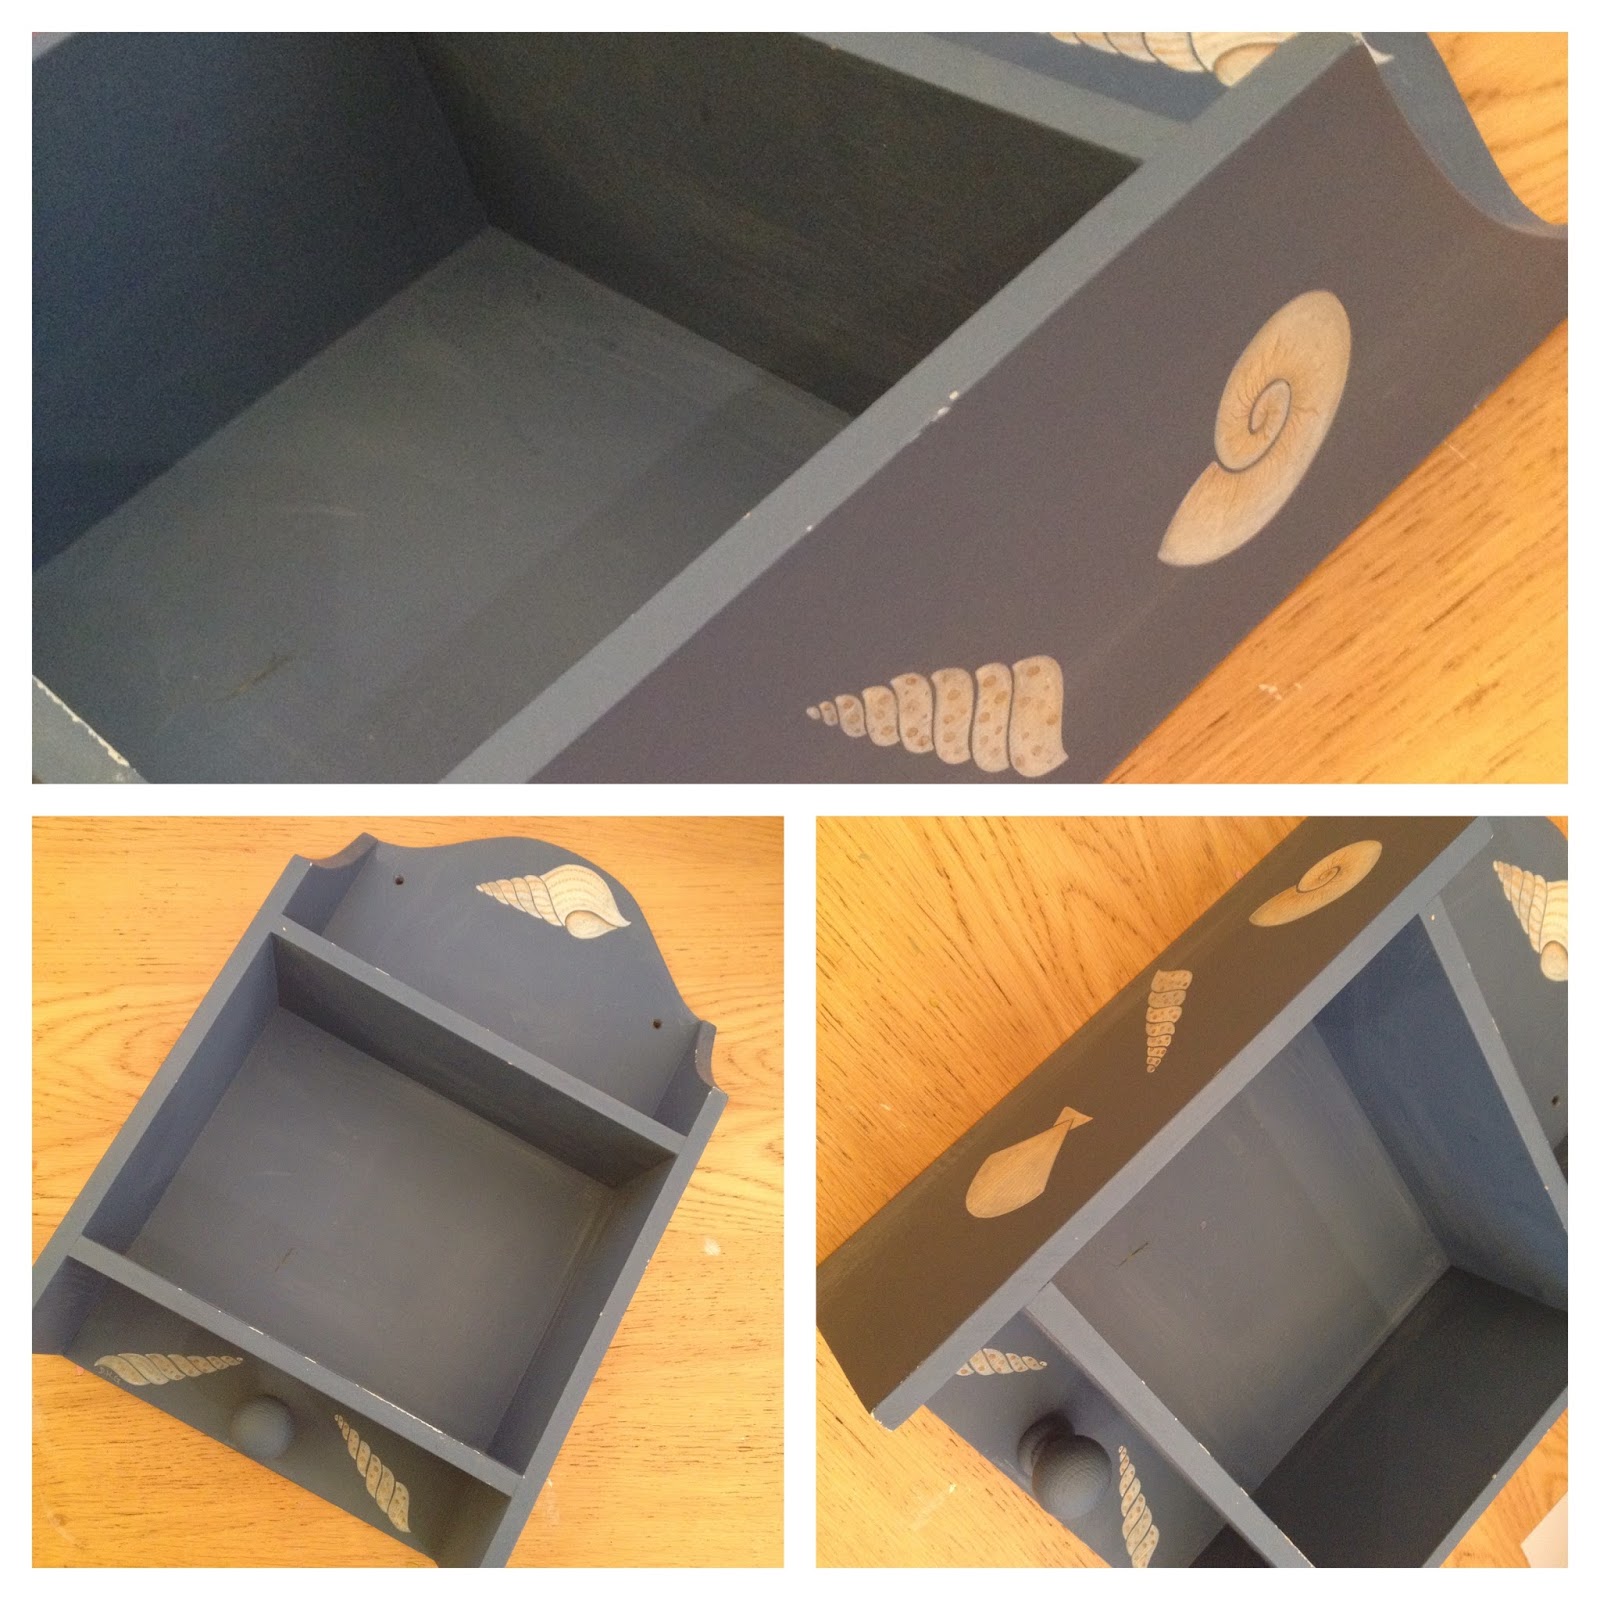
One of the best parts of moving home is inheriting items that you wouldn't have thought of buying before but there are also items that needs a bit of TLC.  Our most recent project was one of these items. One of our friends was discussing her new home the other day and mentioning how they didn't have the cash to update the dated decor. One of her solutions for now was to check out the sales and buy new accessories - much needed towels, toothbrush holders and mats.  When we saw this cute little shelf that she wanted to throw out, we had to step in and rescue it. When we saw it we thought it would be the perfect project for a dotty design - something a bit different from what we've created before. As we have recently celebrated International Dot Day and have seen how versatile the humble dot is we thought we would use them here.
Here we've put together a quick guide to how we transformed it.  


You will need:

Small storage item of your choice

Folk It Starter kit Dotting tool
Heart template from our Series 1 Starter kit
Folk It No 3 Round brush (from our Starter kit)
DecoArt Chalky Finish paint - we used Relic and Treasure
to co-ordinate with accessories.
DecoArt Americana Acrylics - we used Baby Blue, Warm White and Lamp Black from the Starter Kit.
Roller brush
Flat brush for painting the corners
Fine sandpaper
Vaseline for distressing (optional) 


up-cycling, tutorial, shelves, shelf
The original shelf - complete with dated decoration

We have said it before but the beauty of DecoArt's Chalky Finish paint is that you do not need to sand or prep your project before you begin. As the shelf had been sat in an empty house for a while, we did give it a wipe down with a damp cloth to remove dust and grime. Once it dries, if you would like to distress your shelf, add a layer of vaseline to areas where you don't want the paint to stick. We began painting the shelf with the Chalky Finish paint in Relic, using an old flat brush to reach the awkward corners on the inside. Allow to dry.


Paint a second coat and allow it to dry, if you have applied Vaseline, using a dry cloth, now rub the areas where you have applied it to remove the paint.  Next, we transferred the template onto the shelf by placing the template in the area we wanted the design, placing the transfer paper chalk side down underneath the pattern and tracing over it with the small end of our dotting tool. We chose to add a heart on the top and sides of the shelf.


Next, using the old flat brush, we added one coat of Americana Decor Chalky Finish in Treasure to the edges of the shelf. Once it had dried, using the sandpaper from our Starter Kit, we rubbed areas of the shelf (including the small handle at the bottom) to allow the Relic grey through. (Again, if you used Vaseline on these areas, you would simply rub off the paint instead with a dry cloth). In some areas, we kept sanding to reveal small patches of the original colour through too.


Decoart, paint, shelf, up-cycle, re-paint, basecoat
The new shelf is now ready to decorate :)

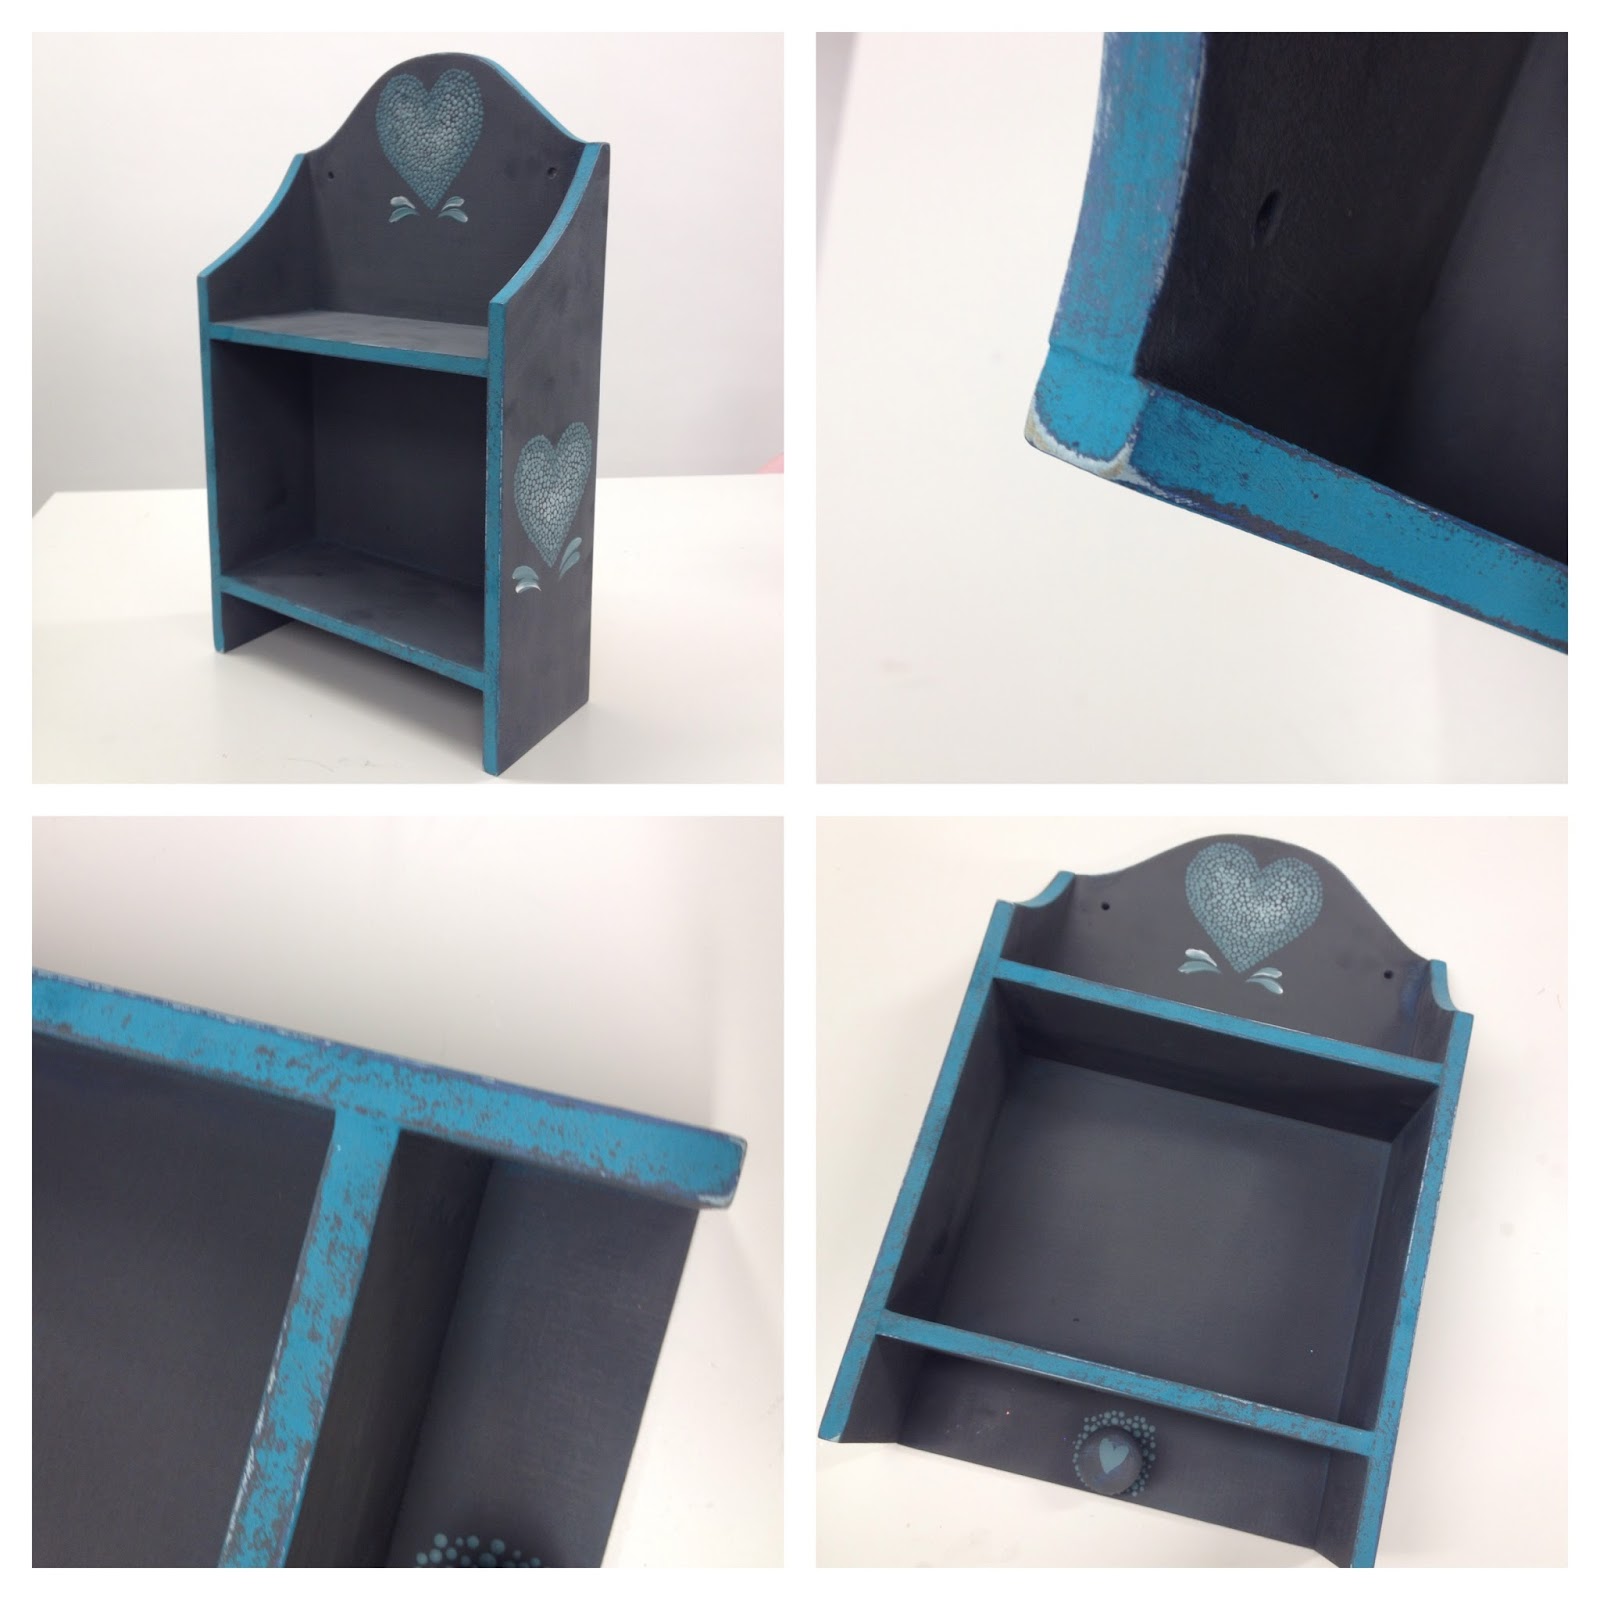
Now comes the fun part! Using our template as a guide and working our way inwards from the edge we started dotting. We mixed our dark blue with baby blue and black and started with that but as we worked around the heart we kept adding white to lighten the colour. This meant that it created a lovely Ombre effect on the design with the lightest dots being in the middle.  To fill the heart we used a mixture of small and large dots using the tool. Once we had completed the hearts on the top of the project, we used exactly the same process for the hearts on the side.


We filled the heart with dots, using a dotting tool. A great project for up-cycling/furniture makeover. Add white as you go for an ombre effect
Filling in the heart was rather therapeutic and we were pleased with the overall effect. 
To finish the project, we added small comma strokes below the hearts to add a bit more detail but these are optional. You could add whatever extra details you wish. As we are always telling our Folkers to remember the little details, we painted a small heart on the little handle at the bottom and added dots around it.


Added detail from comma strokes for the dot filled heart
Adding detail to the completed hearts
Finally, the little shelf was unrecognisable and the Relic and Treasure really compliment each other. Thankfully, our friend is over the moon with it and is so happy she didn't throw it away.  The great thing about this project is that anyone can do it whether they Folk It or not. All you need is a bit of paint, patience and a dotting tool.

Makeover completed. A dot heart project anyone can complete
Our completed shelf. 


SHARE:
© You Can Folk It!. All rights reserved.
designed by pipdig