Showing posts with label upcycle. Show all posts

Saturday, 28 January 2017

Don't recycle....Upcycle


With the holiday season behind us, one thing that we have in our house (in addition to the lovely gifts we received) is lots of packaging; boxes, tins and jars that we cannot bear to throw away because they are too pretty, too sturdy and too useful to send to landfill.

In time's when we are always looking for ways to save a bit of cash, one of the best ways to save is to create your own storage.  This does not mean, however, that your DIY storage has to be plain, undecorated or boring.

This week, we have been making use of our old sweet tubs and taking inspiration from vintage hat boxes to up-cycle our first project, just for you. We loved the look of some vintage hat boxes we found that were covered in beautiful roses. Although we have just used our rose design, you could add some stencilling to add to the hat-box feel, though the stencil you use will depend on the size of your project.  


For this project, you will need: 

A tub of your choice 
Flat base coating brush

Choose your project.  A Haribo sweet tub or chocolate tub is perfect for creating up cycled storage

The first decision you need to make is to decide what you will be upcycling.  This is a great project for experimenting with painting on different surfaces, for example painting on curved surfaces is very different to painting on to flat surfaces.  If your project doesn't go to plan, it can still be recycled and it hasn't cost you any money. We chose a leftover sweet tub from our Christmas gifts that was just going to be re-cycled.  

The beauty of DecoArt Chalky finish paint is that you can paint straight on to the surface without fear of the paint flaking off at a later date.  However, one thing you will need to do before you begin painting is to wipe down the tub completely with a mixture of vinegar and water to remove any greasy fingerprints.  Any greasy fingerprints left on the surface will prevent the paint from adhering to the surface.  


Once you've decided which shade of Chalky Finish paint you would like to use, begin painting the tub using a flat brush.  Be sure to cover every inch of the tub with the paint.  


1. Once the Chalky Finish base coat has dried, using your finger or, cloth or old brush apply Rose Gold Metallic Lustre around the lid.  Tip: if your lustre has hardened, put a little water in the jar, screw the lid back on and leave for a couple of hours or overnight to soften.  

2. Using the patterns, randomly place roses around the edge, alternating between 1 rose, 2 roses and 3 rose clusters.  Tip: to make it look more professional, trace a few of the roses off the edge as Carol has done here.  Next trace the larger cluster in the centre of your project, or in this case, the lid. Note: the patterns should print at the correct size. 

Next fill in the roses using your round brush from the Series 1 Starter kit as instructed on the Vintage Rose tutorial DVD. For this project, Carol used DecoArt Americana Naphthol Red. However, you can create a similar shade by mixing our Series 1 Tomato red with a bit of Lamp black, also from the Series 1 kit.  (To learn more about mixing colours, click here). 

3. Using Avocado green from the Series 2 kit, add the leaves following the tutorial from the Vintage Rose DVD.  Tip: If you do not have the Series 2 Starter kit, you could use the Hauser Light Green from our Series 1 Kit.  


Now you have the pattern to work with, add your comma strokes to paint your vintage roses, tipping your brush with Warm White - you can watch the full tutorial  on the DVD supplied in our Vintage Rose add on kit

Using your liner brush, add stalks to your leaves using Avocado around the tub.

Once you design is dried, using the warm white, add comma strokes using your liner brush. Finish by adding some 'filler foliage' this has been created by loading the end of the round brush with avocado and tipping the brush with white.

Leave to dry and apply a coat of Clear Creme wax using a round brush to protect your beautiful new  storage. You can either use it once it has dried or buff the wax with a soft, lint free cloth to create a soft sheen to your container. 


Happy Folking, 

Carol xx 

SHARE:

Tuesday, 19 April 2016

Five Folky up-cycling projects we love

It's true that we see so many projects from our lovely customers and while many favour making cards and gift bags with our designs, some transform an unloved item into something beautiful: to fall in love with a boring object once more, to show a sentimental item a bit of TLC or to up-date a piece of furniture that no longer fits into new decor. Here, we have chosen a few projects that we love, for their transformation, for the stories behind them and their creativity. 

1.  Up-cycling projects come in all shapes and sizes and we just adore this apprentice dresser Anthea has folked up for her daughter to play with. Tiny furniture and dot roses? What's not to love!
up-cycled apprentice dresser using You Can Folk It's Series 1 Starter kit
Anthems daughter now has the prettiest dresser to play with! 

2. If you have seen our Storage and Organisation board on Pinterest, you know we love great ideas for displaying our bits and bobs and we love this handmade photo frame Rose has created. Using an old picture frame, twine and mini pegs, she has created this beautiful dot rose photo frame.  

An old picture frame can be up cycled into great storage for photos. Rose has added dot roses from You Can Folk It's Series 1 Starter kit
Rose saved money by turning an old picture frame into a quirky photo frame using the supplies and techniques from our Series 1 Starter kit. 

3.  One of our Folkers had a rather unloved Elephant in her possession but as it once belonged to her Mother she was reluctant to pass it on. After she discovered Folk It, she saw a perfect opportunity to give him a little makeover.  Using our Series 1 Starter kit, she added a few dot roses and eyes.  Now, despite the damage he has received after all the years he was loved, he is loved once more. What a great story! 
An unloved heirloom was given a makeover with You Can Folk It's painting kits. Reloved!
The elephant was first decorated using deco patch before adding a few roses  from our Starter kit. 


4. After she gave her daughter's room a facelift, Anna decided to do the same for the old chest of drawers that was in there too. Bought in the 70's by her parents, the dark brown wood made the drawers a functional item, but certainly not a beautiful one. After searching Pinterest for a bit of colour inspiration, she opted to create this beautiful ombre effect by adding some pink paint she used to paint the bedroom to some DecoArt Chalky finish paint in Lace. Using our dot rose hearts from our Series 1 Starter kit, she added detail to each drawer and finished the top with our Series 2 Oriental blossom. 

An Ombre paint effect and beautiful details thanks to You Can Folk It's Starter & Oriental blossom kit.
Anna used DecoArt's new Rose gold metallic paint and warm white to paint the roses. 


The oriental blossom looks beautiful on this up-cycled set of drawers
Anna used the same Rose Gold metallic paint and blended it with a pink shade she mixed from our Series 1 acrylics to create the shimmery blossom she painted on the top. 
 5. Faye has had this great desk in her room for a while but she thought it lacked something. She loves our Vintage Rose kit and after creating her own custom made templates to fit the table top and drawers, she got to work. We think the desk is now a work of art!

We teach you how to paint beautiful roses and leaves in our kits which contain, not only a comprehensive instruction booklet, but a DVD too. 

Creating beautiful pieces of furniture was one of the reasons Folk Art was created and we love the fact that, centuries later, people are using our kits to create re-loved items for their home.  If you have an up-cycling project that features a bit of Folk It, please do let us know. 

Happy Folking, 

Carol & the team xx
SHARE:

Monday, 28 September 2015

Beautiful and easy dot inspired makeover


Makeover tutorial

Moving house can be exciting and stressful in equal measure. For some of us, it means moving into the house of our dreams where every room matches our tastes. For some of us, we know our home is going to be a work in progress and there are many projects that are on our 'to-do' list. 

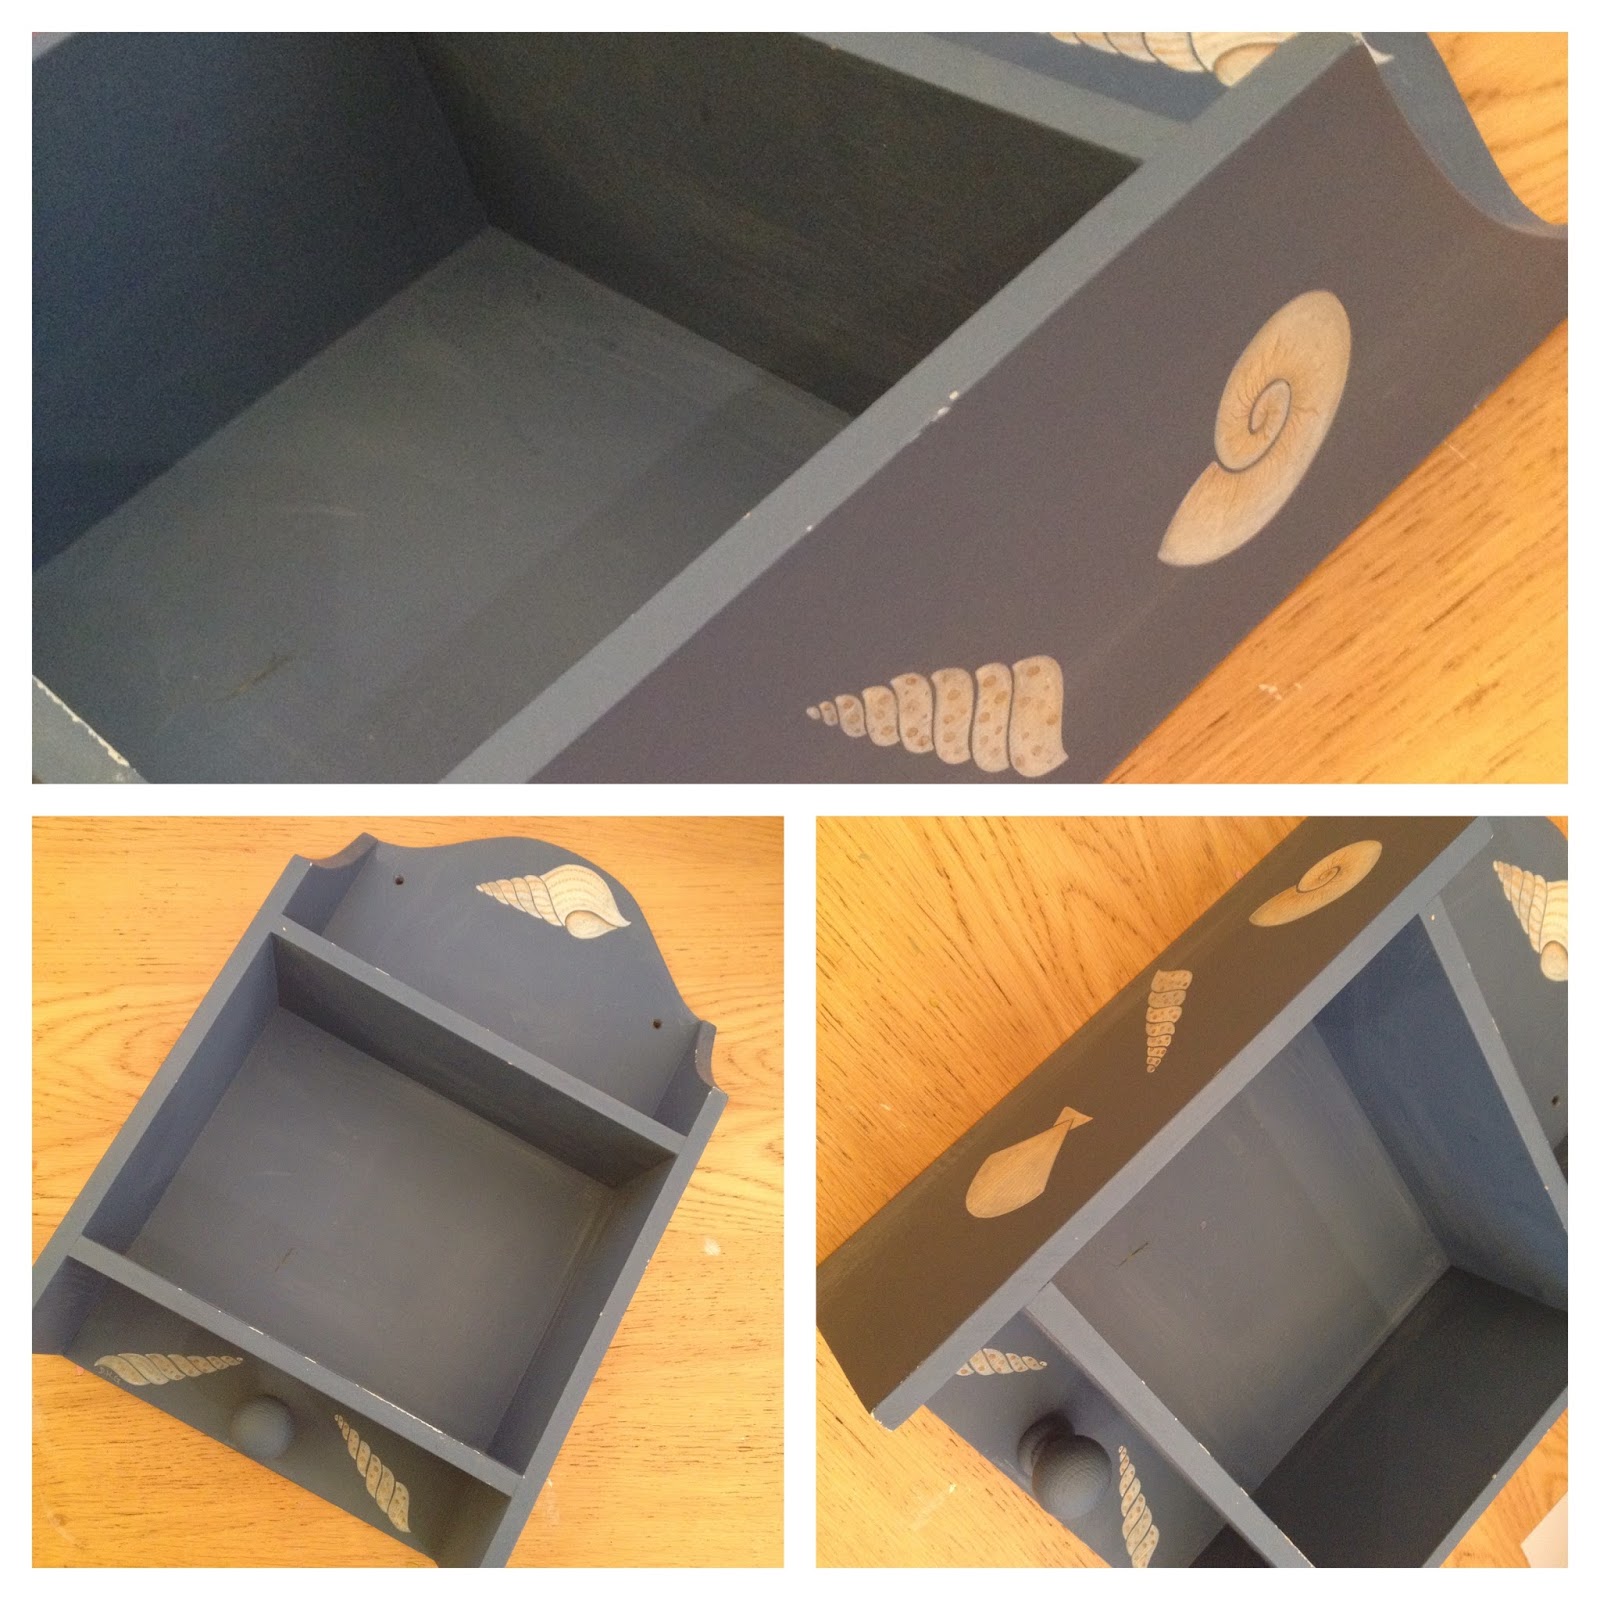
One of the best parts of moving home is inheriting items that you wouldn't have thought of buying before but there are also items that needs a bit of TLC.  Our most recent project was one of these items. One of our friends was discussing her new home the other day and mentioning how they didn't have the cash to update the dated decor. One of her solutions for now was to check out the sales and buy new accessories - much needed towels, toothbrush holders and mats.  When we saw this cute little shelf that she wanted to throw out, we had to step in and rescue it. When we saw it we thought it would be the perfect project for a dotty design - something a bit different from what we've created before. As we have recently celebrated International Dot Day and have seen how versatile the humble dot is we thought we would use them here.
Here we've put together a quick guide to how we transformed it.  


You will need:

Small storage item of your choice

Folk It Starter kit Dotting tool
Heart template from our Series 1 Starter kit
Folk It No 3 Round brush (from our Starter kit)
DecoArt Chalky Finish paint - we used Relic and Treasure
to co-ordinate with accessories.
DecoArt Americana Acrylics - we used Baby Blue, Warm White and Lamp Black from the Starter Kit.
Roller brush
Flat brush for painting the corners
Fine sandpaper
Vaseline for distressing (optional) 


up-cycling, tutorial, shelves, shelf
The original shelf - complete with dated decoration

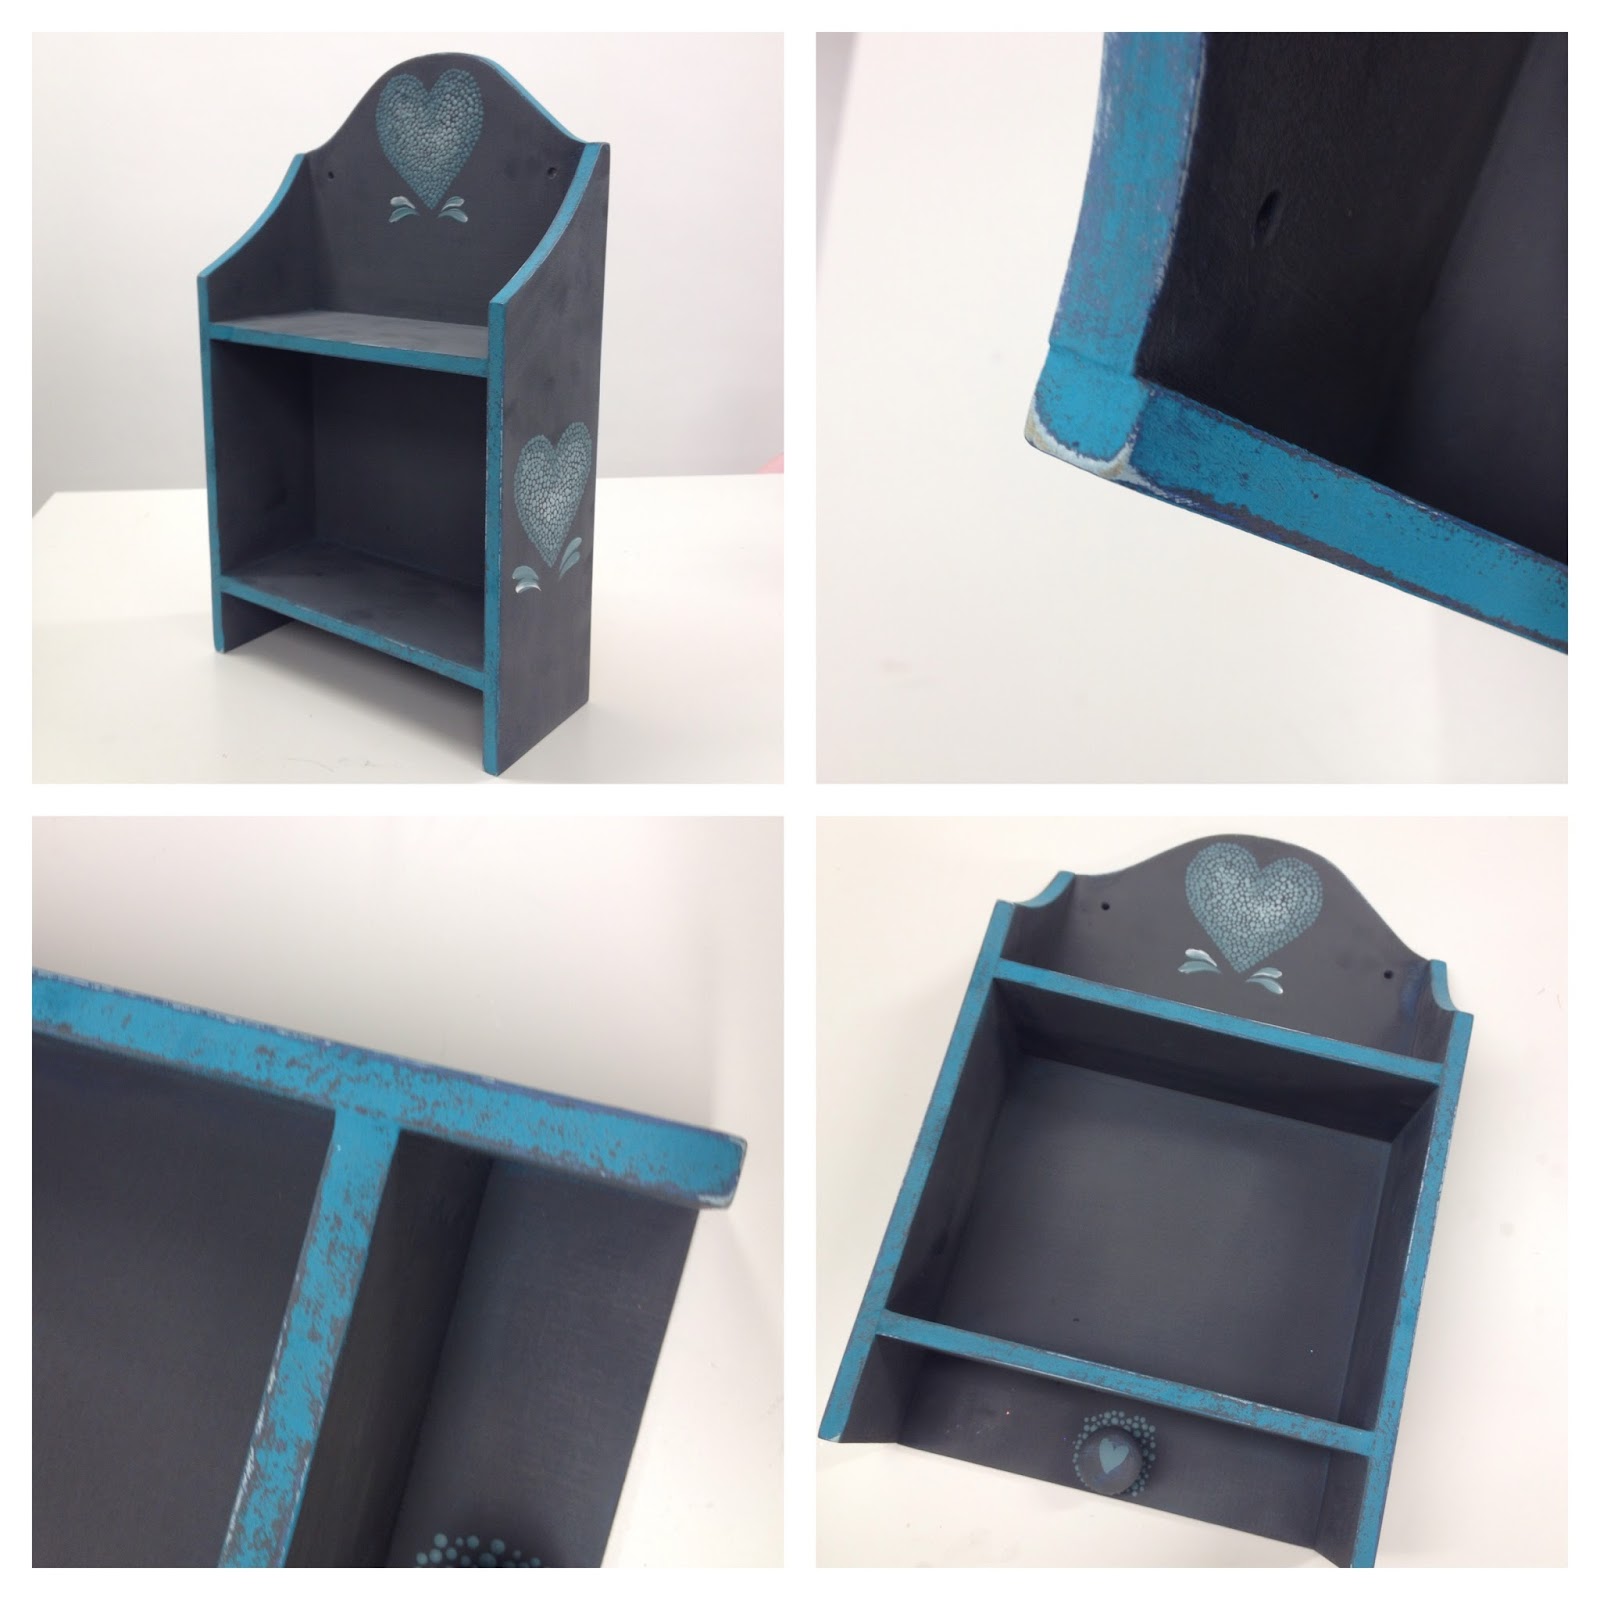
We have said it before but the beauty of DecoArt's Chalky Finish paint is that you do not need to sand or prep your project before you begin. As the shelf had been sat in an empty house for a while, we did give it a wipe down with a damp cloth to remove dust and grime. Once it dries, if you would like to distress your shelf, add a layer of vaseline to areas where you don't want the paint to stick. We began painting the shelf with the Chalky Finish paint in Relic, using an old flat brush to reach the awkward corners on the inside. Allow to dry.


Paint a second coat and allow it to dry, if you have applied Vaseline, using a dry cloth, now rub the areas where you have applied it to remove the paint.  Next, we transferred the template onto the shelf by placing the template in the area we wanted the design, placing the transfer paper chalk side down underneath the pattern and tracing over it with the small end of our dotting tool. We chose to add a heart on the top and sides of the shelf.


Next, using the old flat brush, we added one coat of Americana Decor Chalky Finish in Treasure to the edges of the shelf. Once it had dried, using the sandpaper from our Starter Kit, we rubbed areas of the shelf (including the small handle at the bottom) to allow the Relic grey through. (Again, if you used Vaseline on these areas, you would simply rub off the paint instead with a dry cloth). In some areas, we kept sanding to reveal small patches of the original colour through too.


Decoart, paint, shelf, up-cycle, re-paint, basecoat
The new shelf is now ready to decorate :)

Now comes the fun part! Using our template as a guide and working our way inwards from the edge we started dotting. We mixed our dark blue with baby blue and black and started with that but as we worked around the heart we kept adding white to lighten the colour. This meant that it created a lovely Ombre effect on the design with the lightest dots being in the middle.  To fill the heart we used a mixture of small and large dots using the tool. Once we had completed the hearts on the top of the project, we used exactly the same process for the hearts on the side.


We filled the heart with dots, using a dotting tool. A great project for up-cycling/furniture makeover. Add white as you go for an ombre effect
Filling in the heart was rather therapeutic and we were pleased with the overall effect. 
To finish the project, we added small comma strokes below the hearts to add a bit more detail but these are optional. You could add whatever extra details you wish. As we are always telling our Folkers to remember the little details, we painted a small heart on the little handle at the bottom and added dots around it.


Added detail from comma strokes for the dot filled heart
Adding detail to the completed hearts
Finally, the little shelf was unrecognisable and the Relic and Treasure really compliment each other. Thankfully, our friend is over the moon with it and is so happy she didn't throw it away.  The great thing about this project is that anyone can do it whether they Folk It or not. All you need is a bit of paint, patience and a dotting tool.

Makeover completed. A dot heart project anyone can complete
Our completed shelf. 


SHARE:

Sunday, 26 July 2015

You can Folk It! Decorations on a budget

Carol Sykes from You Can Folk It shows you how to transform cheap supplies into beautiful table decorations

Hey! We're back with a purse friendly project that you'll definitely find handy if you've got any party planning on the horizon. 

So, parties can cost a pretty penny, what with food, music, drinks…the list goes on. So when it comes down to the decorating it's always handy to scrimp and save where possible. We're going to show you just a few ways you can create an effective but more importantly cheap alternative to those pricey table decorations on the high street using inexpensive objects and just a few folky hints and tips. 

So what are you wanting to repurpose? We've opted for plastic plates and tin buckets (available from stores such as B&M, The Range and a lot of local supermarkets) as well as one of our popular MDF hearts which are available from our 'Art Supplies' section of our website. 
Create wedding decorations on a budget with You Can Folk It, DecoArt and Uni Posca pens
YOU WILL NEED
Plastic plates, MDF hearts & tin buckets
Americana Decor Chalky Finish Paint in Relic, Carbon & Lace
Tracing & Tranfer paper
Dotting Tool
Posca Paint Pens (White & Black)
Twine

First things first, start by painting up your pieces with Americana Decor Chalky Finish paint in shade 'Relic' - there's no need for a primer here as this paint gives an instant overall opaque finish. Go ahead and let that dry then we'll move onto decorating each pieces individually, starting with the plate (or soon to be…candle holder!)
Basecoating cheap plates and buckets with DecoArt Chalky Finish paint
Create beautiful table decorations for a fraction of the cost with Folk It and DecoArt paint
PLASTIC PLATE  |  CANDLE HOLDER

1. Take your dotting tool and using the chalky finish paint you originally used to paint the plate with (we've used white paint in this tutorial just to show you how we paint the design) go around the outer edge creating dot hearts or flowers. 

2. Leave this to dry fully, the design shouldn't be obvious at this point but more like a raised pattern on the surface. 

3. Take a dry brush and dip gently in white paint, using a piece of tissue wipe off the majority of the paint leaving as little as possible on the bristles. 

4. Lightly sweep the bristles of the dry brush across the surface of your painted design, the raised areas should pick up the limited paint on the brush revealing your design with a rough, rustic finish. Keep brushing your design until your get your desired finish.
Create your own DIY wedding decorations using You Can Folk It and DecoArt paints
MDF HEART  |  TABLE NUMBER PLAQUE

1. Take a dry brush just as before for the plate, apply a small amount of paint and wipe the majority off on a tissue. 

2. Using repeat motions, sweep your brush in multiple directions across the surface of the heart, this transforms the look from a completely smooth and consistent colour to a rustic and textured look. 

3. Once fully dry again, using a paint marker, write the required number. 

4. This is where you get to add a little decoration, using our favourite paints from Americana Decor with our Folk It! comma strokes and dot details using the Folk It! dotting tool and medium liner brush.

5. Finally, thread some twine through the predrilled hole and it's ready to be tied around anything from a vase to a plant pot or in our case…a candle. 
Create DIY wedding centrepieces with You Can Folk It and DecoArt chalky finish paint
TIN BUCKET  |  LABELLED FLOWER POT

1. Using a piece of tracing paper, draw up the design you wish to transfer onto your tin, we're going to paint a heart to use as a name plaque. 

2. With a sheet of carbon paper, you can easily transfer the design without any hassle.

3. Paint up the heart with Americana's 'Carbon' and leave this to fully dry before attempting to write on it, this time we used a white Posca paint pen.

4. Pop in some flowers, we've used this lovely faux roses and it's all good to go. 

Folky Tip: Why not try the same dry brush process that we used on the heart and plate to add some texture to the outside of the tin?

Create your own beautiful wedding centrepieces with this craft tutorial from You Can Folk It
So that's a quick and easy way to create your very own budget friendly decorations. Here at Folk It! we love to see your creations so if you give this tutorial a go be sure to share it and tag us using the hashtag #youcanfolkit

Have a folky week,
Carol x
SHARE:
© You Can Folk It!. All rights reserved.
designed by pipdig