Hey! We're back with a purse friendly project that you'll definitely find handy if you've got any party planning on the horizon.
So, parties can cost a pretty penny, what with food, music, drinks…the list goes on. So when it comes down to the decorating it's always handy to scrimp and save where possible. We're going to show you just a few ways you can create an effective but more importantly cheap alternative to those pricey table decorations on the high street using inexpensive objects and just a few folky hints and tips.
So what are you wanting to repurpose? We've opted for plastic plates and tin buckets (available from stores such as B&M, The Range and a lot of local supermarkets) as well as one of our popular MDF hearts which are available from our 'Art Supplies' section of our website.
YOU WILL NEED
Plastic plates, MDF hearts & tin buckets
Americana Decor Chalky Finish Paint in Relic, Carbon & Lace
Tracing & Tranfer paper
Dotting Tool
Posca Paint Pens (White & Black)
Twine
First things first, start by painting up your pieces with Americana Decor Chalky Finish paint in shade 'Relic' - there's no need for a primer here as this paint gives an instant overall opaque finish. Go ahead and let that dry then we'll move onto decorating each pieces individually, starting with the plate (or soon to be…candle holder!)
PLASTIC PLATE | CANDLE HOLDER
1. Take your dotting tool and using the chalky finish paint you originally used to paint the plate with (we've used white paint in this tutorial just to show you how we paint the design) go around the outer edge creating dot hearts or flowers.
2. Leave this to dry fully, the design shouldn't be obvious at this point but more like a raised pattern on the surface.
3. Take a dry brush and dip gently in white paint, using a piece of tissue wipe off the majority of the paint leaving as little as possible on the bristles.
4. Lightly sweep the bristles of the dry brush across the surface of your painted design, the raised areas should pick up the limited paint on the brush revealing your design with a rough, rustic finish. Keep brushing your design until your get your desired finish.
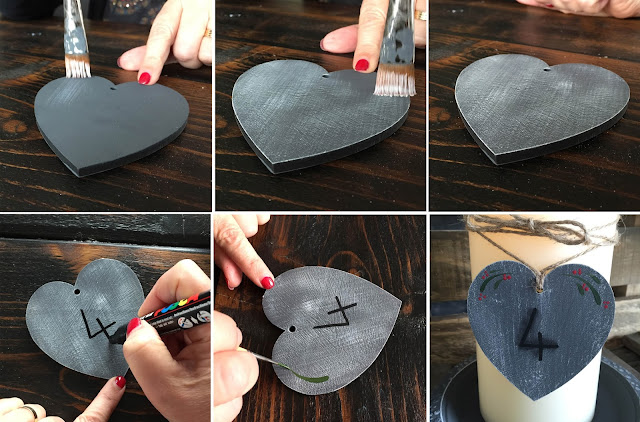
MDF HEART | TABLE NUMBER PLAQUE
1. Take a dry brush just as before for the plate, apply a small amount of paint and wipe the majority off on a tissue.
2. Using repeat motions, sweep your brush in multiple directions across the surface of the heart, this transforms the look from a completely smooth and consistent colour to a rustic and textured look.
3. Once fully dry again, using a paint marker, write the required number.
4. This is where you get to add a little decoration, using our favourite paints from Americana Decor with our Folk It! comma strokes and dot details using the Folk It! dotting tool and medium liner brush.
5. Finally, thread some twine through the predrilled hole and it's ready to be tied around anything from a vase to a plant pot or in our case…a candle.
TIN BUCKET | LABELLED FLOWER POT
1. Using a piece of tracing paper, draw up the design you wish to transfer onto your tin, we're going to paint a heart to use as a name plaque.
2. With a sheet of carbon paper, you can easily transfer the design without any hassle.
3. Paint up the heart with Americana's 'Carbon' and leave this to fully dry before attempting to write on it, this time we used a white Posca paint pen.
4. Pop in some flowers, we've used this lovely faux roses and it's all good to go.
Folky Tip: Why not try the same dry brush process that we used on the heart and plate to add some texture to the outside of the tin?
So that's a quick and easy way to create your very own budget friendly decorations. Here at Folk It! we love to see your creations so if you give this tutorial a go be sure to share it and tag us using the hashtag #youcanfolkit
Have a folky week,
Carol x


