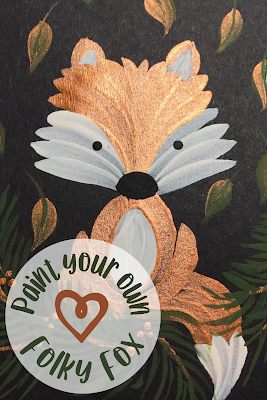
October is all about Autumn for our #funwithfolkit challenge, from leaves to pumpkins, this theme seems to have inspired so much creativity. When we shared our cute folky fox recently, the response was amazing and so we put together a tutorial for you. This quick and fun little tutorial is perfect practice for your comma strokes, plus you can create a cute furry friend at the same time!
You will need:
Black practice paper*
Tracing paper*
Transfer paper*
No 3 Round Brush*
Dotting tool*
Rubber
Pencil
DecoArt Americana Acrylic in Lamp Black* and Warm White*
DecoArt Dazzling metallics in Bright Copper
*included in our Round Brush Starter Kit
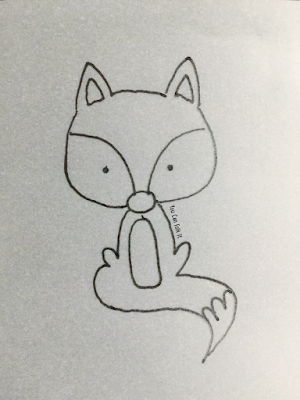
To begin, print off our Folky Fox pattern to the desired size and trace the pattern.
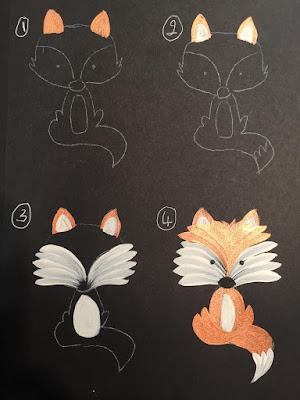
Next, using your transfer paper, transfer the design onto your black paper. Do this four times (as above) on to your practice paper as this will allow you to practice painting each part of the fox individually.
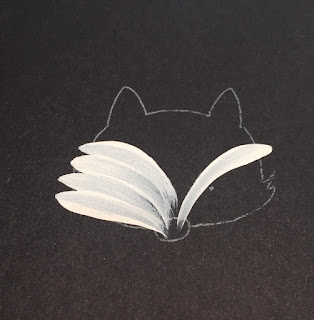
First, begin practicing the face.
Load your Round Brush with Warm White. Begin the comma stroke at the top of the line and follow the line, aiming your comma stroke down to his nose. Repeat this comma stroke until you have filled his cheeks, each time beginning from his cheek and ending at his nose. Try to make each comma stroke overlap slightly so that you cover his cheeks. This is great practice for painting those comma strokes in both directions!
Next, practice the top part of his head. Using the Round Brush again, load it with Bright Copper. Place your brush one the line (the same one you began with for this cheeks) and again, paint your comma stroke, following the line down to his nose.
Move to the other side of his head and following the line, repeat the comma stroke on the other side. Continue to alternate your comma strokes on one side then the other until you reach the middle. By alternating this way you will build up his layers - again making sure your comma strokes overlap so no black is showing through.
As you work your way towards the centre, you will notice that you will need to paint smaller comma strokes to cover the area, this is ok.
The body:
Using your round brush loaded with Bright Copper, paint a long comma stroke down one side of the body so that the tail of the comma stroke wraps around the tummy area a little. Add two more comma strokes to fill the line that again, tuck under the foxes tummy. Repeat this on the opposite side (you will only need two comma strokes on this side to fill the lines) making sure that the comma stroke finishes under the tummy.
For the tail:
With your Round Brush loaded with Bright Copper, paint four comma strokes ending in a point (left). Next, when these comma strokes are dry, load your round brush with warm white and paint three smaller comma strokes on the end of the tail, again ending in a point. Now you are ready to join the tail on the body.
When you have practiced this and feel confident in your comma strokes, it's time to create your first folky fox.
Starting with the ears, use your round brush to fill in the triangles, first with Bright Copper then (once dry) add two smaller triangles with the Warm white.
Add his cheeks as you practiced, then fill his tummy with Warm White.
Next, using the Copper, paint the other half of his head before adding his body and then his tail as you practiced.
When your Folky Fox is dry, add his nose using your round brush and a little Lamp Black before adding his eyes with the larger end of your dotting tool.
And that's it...your Folky Fox is complete!
UPDATE: With winter fast approaching, we changed our Copper paint for Zinc and painted our very own Arctic Fox plaque - what do you think?
If you have a go at painting your own, please do tag us in your posts to let us know you have had #funwithfolkit
UPDATE: we are just LOVING the way you have made this little guy your own.
Nazlie has brightened up a plain notebook with our Folky Fox to add a little interest.
Vanessa gave Mr Fox a friend - adding a little blush to her coat to make her different.
Helen gave our Fox a winter makeover with this gorgeous blue background and twinkly snowflakes.
Karen had been asked to create a plaque for the Fox family and was going to use a stamp....until our tutorial popped into her news feed!


thank you!!
ReplyDeleteso wonderful. we will try it!
Bibiana
Fantastic, please do let us know how you get on x
Delete