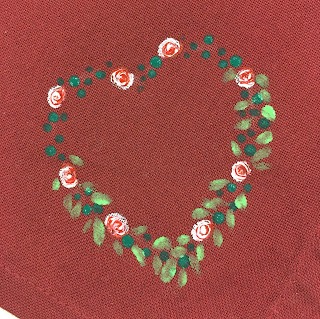
For this project, you will need:
A set of napkins
Round brush Starter kit and any extra
DecoArt Americana Acrylic paints you may want.
Fabric chalk/crayon
Cardboard template
Scrap cardboard
Before we even got started painting our napkins, we washed them using washing powder containing no softeners as this would prevent the paint from adhering properly to the fabric. Once we had ironed them, we were ready to begin.
Step 1: Create your template. The heart template in our Round Brush starter kit was too large for what we wanted so we created our own. We chose a heart but this would look lovely as a wreath shape too.
 |
Step 2: Using the fabric chalk, draw your template where you want to paint them. We chose to paint one heart in the corner of each napkin.
Step 3: Squeeze out your paint onto your palette and add DecoArt Fabric medium to each colour in equal amounts (1:1) Adding this medium not only makes your design permanent and washable, it makes the paints softer so they move with the fabric instead of peeling and cracking.
Step 4: Before you begin, slip your piece of scrap cardboard under your napkin to prevent the paint soaking through to the layers or table underneath. Using the dotting tool, add your dot roses around the heart as we teach you in the Round Brush Starter kit.
Step 5: Still using the dotting tool, add dots to fill the space between the roses. We used Hauser Dark Green but you could use the Avocado from our Flat Brush Starter kit (or any other darker green you wish).
Step 6: Using the Hauser Light Green from the Starter kit and the Round Brush, start adding 'leaves' to your heart around (and sometimes over) the dots you've just created to fill out your wreath shape. Remember to leave a few gaps for the next layer of colour too.
There is no technique to this, we just used the tip of the brush to dab on small leaf shapes. This is a fantastic project for anyone starting out with fabric painting as you will quickly realise that painting on to fabric is completely different to painting on to a smoother surface and it creates a beautiful, almost worn look. You may find you wish to go over a few of the leaves as they do dry darker.
Step 7: (Optional) Using your round brush and Warm white from the Starter kit, as you did with the Light Green, add 'leaves' of white to create a snowy effect. This is down to personal preference as you may find you would prefer to stick with different shades of green to fill out your heart.
Step 8: Repeat all the above steps to complete the design on each napkin you need.
Step 9: Leave to dry for 24-48 hours to allow the paint to fully bond with the fabric. When they are dry, heat set them using an iron for 30 seconds.
Step 10: Pop them in the washing machine once again with washing powder (and no softener) and wash on 30 degrees. Once dry, iron and fold ready for your dinner table. If these gorgeous painted napkins are a gift for a loved one, why not tie them with a gorgeous co-ordinating ribbon?


No comments
Post a Comment