Wednesday, 11 November 2020

Our blog has a new home


With the release of our new Folk Art Masterclass for beginner painters and website revamp, our blog has now moved! 


Please head over to its brand new home to continue enjoying lots of Folk Art inspiration and ideas. 

SHARE:

Wednesday, 10 June 2020

Learn to paint with You Can Folk It: Twin hearts tutorial

With so much going on in the world at the moment, we don't know where we would be without our favourite escape.  Picking up our paintbrushes, even just sitting in our creative space is a welcome solace.  Last week, we talked about the need to spread a little love and joy to others and this week, we have created a little project for you. 

You can Folk It painting instruction booklets


For this project you will need: 
Transfer paper 
Dotting tool 
DecoArt Americana paints - we chose Frosted Plum, French Mauve, Warm White, Blue mist & Lamp Black. 


Begin by transferring the pattern to your project.  We painted ours onto A4 black card.  

You Can Folk It tutorial, hearts template

To create this original project we drew around an MDF heart we had so if you didn't want to transfer it, feel free to draw around an MDF heart or one of our mountboard hearts. 

Begin by painting the roses and the blossom flowers. When painting the blossom flowers, we twisted our brush so unlike the outer two flowers, the centre flower had darker edges and a lighter centre.  

 NOTE: If you do not have either of these kits, why not try substituting them for daisies, hindeloopen flowers or a cluster of rosebuds?  

Paint the leaves and then add a little white to your green to add the stems.  Work with the heart shape when you are doing this.  If you want to add more than we have, make sure they are positioned within our close to the heart outline. You will notice we added s stroke leaves to the Oriental Blossom but you don't have to if you haven't learnt them.  The great thing about these patterns is that you can mix and match the techniques you have learnt and create something that's your own.  


You Can Folk It Vintage Roses and dots in pink and green

Add a line of dots on either side of each flower/flower cluster using the large end of the dotting tool.  


Next, using the large end of the dotting tool, create alternate dots of green and the darker shade you've chosen (in our case Frosted Plum).  

When these dots are dry, using the smaller end of the dotting tool, add the lighter shade (we used French Mauve) to each Frosted Plum.  If you have our Sweethearts kit, this is explained in the pattern from our Candy Cane heart.  

OPTIONAL: Add a few triangles of dots around your design to fill any spaces as you wish. 

Vintage Rose and Oriental Blossom twin hearts. Folk art painting from You Can Folk It


SHARE:

Thursday, 30 April 2020

Rainbows - a symbol of hope during lockdown

From a scientific perspective, the rainbow is the product of light hitting water droplets at just the right angle, of refraction and reflection.  Their full beauty, their entire form (a full circle) can only be admired by flyers as the horizon obstructs our view on the ground.  These facts do not detract from their beauty and each time we see a rainbow, whether young or old, we are reminded of the beauty of nature as we often stop and announce to anyone who will listen that we can see a rainbow in the sky.  

Handpainted card - designed and created by Carol Sykes from You Can Folk It

Despite our knowledge of rainbow formation, regardless of the logic, since the beginning of time, there has been magic in rainbows.  They are seen as a symbol of hope, of better times after a storm and encouragement to endure through the dark times we may face.

There have been many myths and stories written about the rainbow and told through the generations. For some Aboriginal communities, the rainbow is often thought of and depicted as a serpent arriving to halt the rain sent by their enemies.  In Norse mythology, the rainbow (Bïfrost - rainbow bridge) appeared to connect Earth with the Gods and allows them to travel to Earth.   For Native American cultures, the rainbow is a sign that we are all one big family and that one day, Warriors of the Rainbow will show the way to heal the Earth and bring people together once again.

Handprinted wooden plaque - "There is always something to be thankful for"


Whatever myth, story or idea is attached to it, for many cultures, it symbolises new beginnings, of transition and unity.  In these uncertain times of lockdown, the rainbow has lifted the spirits of so many.  From showing our support for the NHS and other key workers to bringing a smile to the faces of children (and adults) as they search for rainbows in windows during their daily exercise, it has become a daily sign of better things to come.


Vintage rose heart - folk art painting from You Can Folk It


So...to lift our spirits throughout May, as we look forward to a time after lockdown, our #funwithfolkit painting challenge is revisiting the rainbow theme.  After April's Monochrome challenge, we certainly welcome a splash of colour.  The more shades of the rainbow we use, the better! We'd love for you to join us, just use the hashtag #funwithfolkit in your rainbow creations.

Stay home, stay safe, stay creative xx


SHARE:

Tuesday, 24 March 2020

Projects to practice with: Flower frames

Things are a little uncertain at the moment and as many of us find ourselves inside, working from home or self-isolating, the need to create, to distract ourselves is strong.  Practising the comma stroke is so achievable but more importantly, mindful. Sometimes though, lines of comma strokes fail to inspire.

Whether you are wanting to practice or just create a fun project, these frames are lovely.


Our Level 2 Daisy details is the next step after our Round Brush Starter kit.  These pretty flowers are made up of comma strokes and can be painted in a variety of formations.  If you have learnt to paint these flowers and would like to learn to paint them from different angles, check out our blog here. 

To have a go at painting this Daisy frame, print off our pattern sheet from our Pattern Board on Pinterest.


Our Level 3 Vintage Rose kit takes Folk Art painting to the next level. This kit does not introduce you lots more techniques (though it does introduce you to side-loading) but it does take more practice as you learn how to fit the petals together to form a beautiful rose.

To paint this floral frame, download the frame here. 

We do hope you find enjoyment in these projects during lockdown.  Feel free to share your projects with us when they are completed.

Happy Folking,

You Can Folk It x
SHARE:

Friday, 31 January 2020

What is Folk Art painting?

You may have seen the canal boats of England, the romantic, shabby chic style of Tole painting and the beautiful swirling brushstrokes of Norweigan Rosemaling.  Although it may take many forms around the world, adopting its own style and colour schemes, we use the term Folk Art to describe art created for decorative purposes.  More specifically, Folk Art painting as it commonly became known in the 1700’s, was developed by ordinary people for ordinary people. 

Years ago, art was seen as the privilege of the rich and only those who could afford art training were allowed to access the knowledge and skills of painting, drawing and sculpture.  It was these skilled artists and painters that were commissioned to decorate the furniture and homes of the wealthy.  Decorated wedding chests, beautifully painted walls and decorated furniture all became symbols of wealth and success and it wasn’t long before peasants wished they could do the same and as a result, they created a beautiful style all of their own.  Often known as naive art, this Folk Art painting lacks perspective, shading, dimension and proportion.  In short, it ignores the rules often found in traditional art forms.  
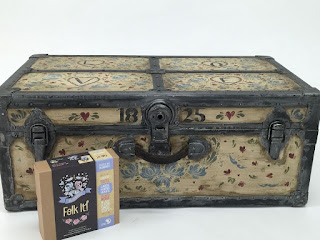
Traditional Folk Art painted chest photographed in Hungary.
Painted chest from the Hungarian Applied Folk Art Museum
The Folk Art that we know and love at You Can Folk It! is made up of a limited number of brushstrokes that combine in a multitude of ways to create a variety of designs and beautiful patterns.  It is quite simply, a skill-based art: this means that with practice, anyone can learn to move the brush to create the brushstrokes they want to.  When we learn to write, we learn the alphabet and then move on to learning how to combine the letters into words.  The same principle applies to Folk Art - the painter learns the brushstrokes and once they feel confident creating those, the learn how to combine them to create different patterns and flowers. 

Folk Art was never about trying to create perfect pieces of art, it was created to allow ordinary people to express themselves and to help them put their creative stamp on the world.  It was never interested in following rules but encouraged people to paint in a way that they never thought they could before.  For these reasons, it became a pastime that families enjoyed together with older generations passing on the skills they had learnt to younger members of the family.  

With this teaching, it became very popular and began to spread around the world with different countries developing its own style from the bright and bold canal art of England to the sweeping beauty of Bauernmaleri.  

Folk Art can be used to decorate a number of household items - it became a way for people to create a home they were proud of and give meaningful gifts. 
However, as the years passed and technology developed, these skills were not passed on as they once were and it wasn’t until the 60’s and 70’s that Folk Art stepped into the spotlight once again.  Known as the pioneers of this revival, Jo Sonja Jansen, Priscilla Hauser and others rediscovered the art of their ancestors and with a desire to recreate family heirlooms, they began learning the skills of their ancestors influenced by Norwegian and Pennsylvanian Dutch Folk Art.  

Their actions created a buzz in their communities and soon, Folk Art began to spread again becoming popular in America and Australia.  It was during this revival in the 90's that Carol, the Founder of You Can Folk It discovered Folk Art for herself.  Wanting to carve out a bit of time for herself after her boys started school, she wanted to do something creative but didn’t feel artistic.  When she tried to complete traditional art classes, she didn’t ‘click’ with the rules of shading and perspective.  However, after walking through the door to her first Folk Art workshop she felt excited by the potential. Finally, she felt confident that she’d found something achievable and something loved to do.  

Just one of the kits from You Can Folk It - this one teaches you how to paint Hindeloopen style flowers and birds 

Fast forward 20 years and Carol has taught this beautiful art form around the world.  After learning a wide range of Folk Art and teaching many different classes, she has experienced the physical and emotional benefits of Folk Art for herself and those experienced by her students.  Just as the original creators of Folk Art, she passionately believes that anyone can learn to paint, whether they are artistic or not.  Wanting to reach more people, she has packaged her knowledge into a series of lessons which can be enjoyed in the comfort of your own home (they can also now be enjoyed in a workshop with one of our Ambassadors) with the aim of bringing the wonder Folk It to you.  This comprehensive education system means that anyone can learn to paint. 


For a skill that has been around for hundreds of years, its popularity may have waned throughout certain eras but it shows no signs of disappearing.  We only hope that it continues to spread around the world and once again gets passed down the generations to be enjoyed by all.  If you would like to share your story of how Folk Art has helped you, we'd love to hear from you.  

Happy Folking! 
SHARE:

Tuesday, 14 January 2020

Upcycling ideas for your Christmas rubbish


Our first blog post of 2020 and no sooner did we ring in the new decade, we are already almost halfway through January.  This month, with everyone receiving lots of packaging along with their presents and many a box of Ferrero Rochers consumed (hands up, surely we aren't the only guilty party(?!) January is a great time to upcycle.

In the days when there are more and more calls to reduce the number of things we buy, we strive to buy less and less each week BUT what can we do to save items from landfill and reuse?  For us, upcycling is linked to slowing down - slowing down before we automatically throw something away, slowing down to consider whether we really NEED that new item or whether we can make something similar with what we have and also taking the time to upcycle something and devote the time it deserves.  If we do a half-hearted job, chances are we won't be happy with it and we will end up buying new anyway.

So you're at a point where you have a project to upcycle but have no idea where to start? Well first off we should mention that we are always here and always happy to help so if you have a question about a surface or project you're not sure how to paint and you would like advice, drop us an email at toni@folkit.co

However, we have put together a little blog for you to help guide you to find some answers when it comes to saving those boxes and tins from landfill so take a look and see if the answer you're looking for is here:

1) Ferrero Rocher boxes - these help to make wonderful wet palettes.  If we want to save money, we've got to look at our supplies first.  The first rules we teach students is a) take care of your brushes and they will take care of you and b) save your paints.  We often overestimate how much paint we need and don't use all of it in one sitting. Rather than throw it away, pop the lid on and come back to it another day.  Just make sure that you do change your greaseproof paper and refresh your sponge every 4-5 days to prevent mould. 

Handpainted chocolate box using folk art painting techniques by You Can Folk It

2) Chocolate boxes and gift boxes

These are the perfect projects because they are often small and contain flat surfaces to paint on as you gain confidence learning to paint 3D objects (which if you are just moving from 2D surfaces can take a bit of getting used to).  These items can be porous or may have a shiny surface.  If this is the case, chalky finish paint is great because you do not need to prep the surface or add primer.  If you do choose to use acrylic paint, we recommend adding Multi-Purpose Sealer to your paint to help it adhere to your project.  You can find out more about how to use this wonderful medium in this tutorial

Painted coffee tin using Chalky Finish paint and our You Can Folk It Vintage Rose kit.

3) Coffee tins, cans and tubs

We love saving our tins to decorate and use for storage around the office. Nut tins, coffee jars, you name it they're perfect for storage.   Whether it is paintbrushes, pens and rulers or things that are just cluttering up the place but don't have a home, they are our go-to projects.  Similarly, chocolate tubs can help store lots of bulkier items in the home and kitchen.

We ask friends and family to save cans and tubs too so we can create a matching collection of storage in different heights and sizes to create a bit of a centrepiece - we might as well make a feature out of them.  If you have no need for extra storage, why not use them as packaging for next Christmas? They are perfect for housing gift cards or money, sweets or handmade baked goods for a loved one...and it gets rid of the need for unrecyclable wrapping paper. 

Find out more about how to prep items like these tins and tubs here.

Pringles and coffee tubs up cycled using You Can Folk It and DecoArt chalky finish paint

Another idea (if you remembered to save the lids!) is to cut a slit into the lid and create your very own money box.  Yes, money boxes are readily available but why not consume less, save that money and make your own? This is a fantastic project for kids too!

Old jars decorated with paint and folk art roses and designs

4) Glass

Once you have mastered the 3D surface, you can expand your skills and move on to glass. With so many beautiful bottles out there, you can create something really special.  I once went to a wedding where the centrepieces were all painted bottles filled with fairy lights.  They can make beautiful home decor but painting on glass requires a little work as you will read here. 

Old jam jars, glasses, vases are great projects but be aware, unless you use Glass paint, these will be for decorative purposes only and are not food or dishwasher safe.  

Handpainted wine bottle, decorated with You Can Folk It's rosebuds folk art design

...who says you need to wait for an empty bottle to paint? Why not co-ordinate the gift with the card and add a painted design on to the bottle before gifting instead of wrapping it?

We hope we have given you a few ideas to make the most of your Christmas packaging and given you the advice you need to complete up-cycling projects of your own.  At Folk It! we passionately feel that with a little time and effort, painting is a great way to help us to reduce, re-use and up-cycle, it can help us save money, do our bit for the planet all the while giving us a creative escape that we crave.

Happy Folking x


SHARE:

Tuesday, 10 December 2019

How to paint holly

What's Christmas without a little holly? This week, we have created a step by step tutorial to help you have a go at painting your own corner arrangement, perfect for our square mountboards.  


For this project, you will need: 

General Supplies 
Paper Towel,
Wet Palette and water pot
White/Black Transfer paper
Tracing Paper
Black practice paper
A4 Black Mount practice board (or similar)
Pen/pencil
Dotting tool (optional) 
Brushes 
No 8 flat or angle luxe label brush for floating colour (you may find the angle brush easier to use) 
Liner brush 

DecoArt Americana Paints and Mediums…. 
I worked with this months colour palette with the exception of Lamp Black. 
Tomato Red (but any bright red will work)
Titanium (Snow) White (again any white will work)
Avocado 
Honey Brown 
Light Buttermilk 
Emperors Gold 

Skills 
First, you will need to transfer your design onto your practice board.  Once you have done that, follow these steps... 


Some DecoArt colours are more transparent than others so, if you are painting on to a dark surface, basecoat your design with white first to create a solid block of colour.  


Depending on the colour of your background and the final look you prefer, you may wish to float a darker colour around the leaves.  Play around with these ideas and discover for yourself which ones you prefer.   If you aren't confident in how to dry brush, check out Carol's video here. To dry brush the Gold, we used a small old round brush so I did not ruin one of my 'good' brushes. 

Now for the berries....


Basecoat your berries using a series of C strokes with the Flat or Angle brush.  Again, you will probably find that you need to give them two coats of red before adding the comma strokes.  If you do not feel confident to use the liner brush, create a comma stroke using the small end of the dotting tool.  


Using different techniques creates a range of different looks.  Floating colour around each berry can be tricky but creates a lovely soft shade to the berries.  You can get a similar look by dry brushing with an old round brush (which also gives you a little more control).  

We hope you have as much fun playing with these designs as we have designing this festive bunch of holly. 

Happy Folking xx  


SHARE:
© You Can Folk It!. All rights reserved.
designed by pipdig