Wednesday 21 November 2018

The beauty of Bauernmalerai

November is about all things vintage at Folky HQ as part of our #funwithfolkit painting challenge.  This week, we thought we would indulge in a little Bauernmalerai painting - a version of folk art originating from Germany, Austria and Switzerland.  Using the round brush, it uses our beloved comma strokes as well as the c and s strokes.  If you have some of our Flat Brush kits you may have learnt these brushstrokes, the only difference is that in this project you paint them using the round brush.  If you are up for the challenge, it certainly is a lovely design to paint. 

For this project, you will need:

Liner brush 
No 3 Round Brush 
True Ochre, 
Tomato or Country Red, 
Warm White, 
Antique Green,
French Grey Blue, 
Burnt Umber
To Antique and complete the tray you will need:
DecoArt Metallic lustre in Copper Kettle 
Soft, lint free cloth
Your chosen varnish
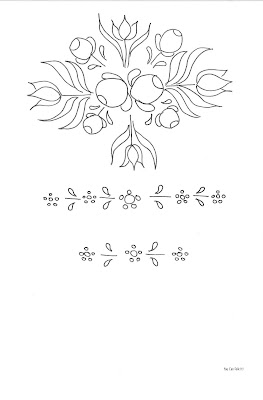
Traditional decorative painting - Bauernmalerai pattern outline


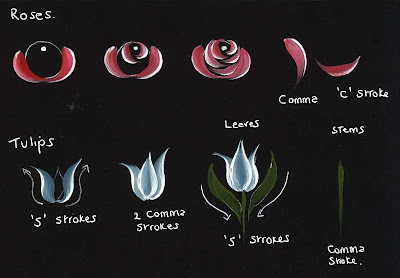
Once you have transferred your design, begin by base coating your roses in Red and Ochre.  

Step by step images of how to paint Bauernmalerai inspired roses and tulips using Folk Art brushstrokes.

To paint the roses load your brush with Red/Ochre and side load with warm white. 
First, paint 2 comma strokes to the bottom of your rose then fill your circle using C strokes to create the rose as shown above. 

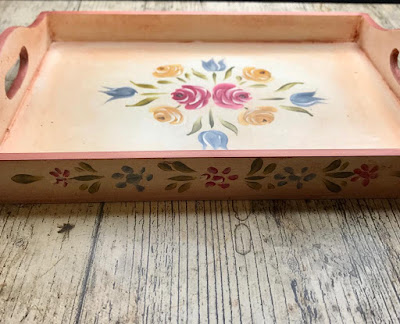
An image of a plain tea tray and the painted design that will be added to it. The design consists of red and yellow roses and blue tulips with a decorative border


To paint the Tulip, load your brush with French Blue Grey and side load with Warm White. 
Using s strokes, paint the outer petals before using comma strokes to paint the centre.  

Using your liner brush (loaded with Antique Green) apply the stems. 

Painted white tray decorated with a traditional Bauernmalerai design featuring red and yellow roses and blue tulips

To paint your leaves, load your brush with Green and side load with the True Ochre.  Paint your S strokes to the tulips.  

Next, using the same colours, paint the comma strokes around the centre and edge of the design. 

A photo of the completed Bauernmalerai pattern featuring red and yellow roses and blue tulips on a plain white tray next to the pattern/design sheet


Next, paint the edge pattern around your tray. (If you are choosing to do this on a different project, you could use this design as a border or leave it out).

A photo of the sides of the tea tray decorated with hand painted daisies and leaves in the Bauernmalerai style

We have painted our flowers with the blue/red side loaded with white. Finish by painting the comma strokes with green side loaded with white. 

Once we were certain the tray was completely dry, we decided to complete the Vintage inspired project by Antiquing the tray.  To do this we mixed 3 parts Drying Time extender and 1 part Burnt Sienna before applying this to the tray.  You can check out our video tutorial here

Next, apply a little metallic lustre to the edges and handles of your tray.  Leave to dry before varnishing. 
A photo of a wooden tray that has been painted white and hand painted with a Bauernmalerai inspired design of yellow and red roses and blue tulips. A wash of brown has been applied over the top of the tray to tone down the colours and give the tray an antique look


SHARE:

Thursday 8 November 2018

Paint your own folky Polar Bear

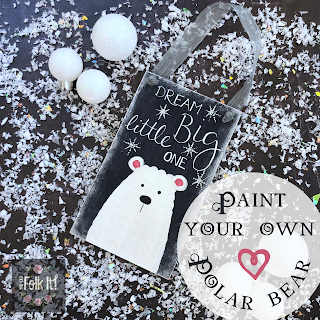
A dark hand painted plaque painted with a polar bear and snowflakes. The handwritten quote on the plaque says 'Dream Big little one' and is threaded with silver ribbon to hang on a door.


Following the success of our Folky Fox recently, we have gone from Autumn to Winter with this brand new tutorial.  

To complete this level 2 tutorial, you will need: 

DecoArt Chalky Finish paint in Honor 
Sandpaper, tracing paper* and transfer paper* 
Sponge*
Dotting tool*, Flat Brush* & Liner brush*
DecoArt Titanium (Snow) white* (or any white you have), Lamp Black and Antique Rose* 
DecoArt Dazzling Metallics in Shimmering Silver 
Sakura Gelly Roll pen in White 
DecoArt Metallic lustre in Silver Spark

*All included in our Flat Brush Starter kit 

Practice paper, paintbrushes, DecoArt Metallic Lustre and the polar bear traced pattern from You Can Folk It

 Preparing your plaque: 

 Using the sponge, base coat the plaque using the Honor chalky finish paint.  You can speed this process up with a hair dryer if you like. 
After applying a couple of coats, lightly sand the MDF plaque before transferring your design on to the surface.  

A photo showing DecoArt Americana Acrylic in Warm white and practice rows of C strokes painted using the Flat brush in the picture


Practicing your brushstrokes: 

For the Polar Bear you will need to practice the C stroke taught in the Rosebuds kit.  When you are confident painting single ones, practice painting each one side by side in rows.  


Painting your polar bear:

Using the warm white and flat brush, base coat the whole of the polar bear.  Using the Antique Rose, paint the inner part of the bears ears.  When this is dry, paint rows of c strokes over the whole of the bears body starting at the top and working down, leave to dry. Take care to try to overlap the rows a little to create your fur pattern.  

Next, using your liner brush and the black paint, add his eyes and nose. 

A photo of the completed dark blue rectangular wooden plaque painted with a polar bear and decorated with snowflakes. The phrase 'Dream Big Little One' is hand written across the top

Final touches: 

Using the silver paint and Dotting tool, add dotty snowflakes on the plaque. Leave to dry.  If you wish to add the lettering, use the Gelly Roll pen (or a fine Uni Posca paint pen) to copy over the transferred lettering.  You may need to keep wiping the tip of the pen with a tissue to make sure the tip does not get clogged with paint.  Finally, using the sponge, add the Metallic lustre around the edges of the plaque and add some ribbon to hang.  

If you did not wish to add the writing we have provided why not stamp a name on to personalise or just add more dotty snowflakes.  

Happy Folking x 

SHARE:
© You Can Folk It!. All rights reserved.
designed by pipdig