Monday 29 October 2018

Paint your own Autumnal wreath in 5 simple steps

Handpainted wreath painted in Autumn colours of greens, browns and golds with red berries

The days are getting shorter and the air is adopting a chill, Autumn is certainly taking a hold both inside and outside of Folky HQ.  

Handpainted folk art design in Autumn colours of reds, browns and oranges surrounded by pots of DecoArt Americana paint

Over the last couple of weeks we have been cracking open those warm orange and golds, deep, rich browns and earthy greens to create a few Autumnal projects to fit with this months #funwithfolkit theme.  After sharing this on social media, so many of you asked for the pattern so here is a quick tutorial.  

You will need: 

Practice paper, transfer and tracing paper*
pencil
A brown, green, gold and red paint 
(Sandra used Asphaltum and Autumn Red but you could use Traditional Burnt Sienna and Country Red)
We also used Emperors Gold and Avocado
No 3 Round Brush & Dotting tool*

*Available in our Round Brush Starter Kit 

Pattern outline of a wreath made up of comma strokes

Step 1: Take your pattern and transfer it onto your practice paper or project 

Practice boards from You Can Folk It featuring an outline of a wreath and a painted version using red, green, brown and gold

Step 2: To paint your comma strokes, fill your round brush with Avocado or Raw Umber and tip your brush with the Emperors Gold (a technique taught in our Daisy Details kit

Step 3: Paint alternating bunches of green and brown comma strokes to add variety to your wreath. 

Folk It autumnal wreath painted in browns, golds and greens and decorated with red berries

Step 4: Using the red, add berries around the wreath and leave to dry. 

Step 5: Add a little gold to your brush and on a paper towel, gently rub off the excess. Dry brush a little gold over each of the berries and dot a little brown in each one. 

Your wreath is now complete! If you fancy a more festive look, why not try using two shades of green and red and gold or use a paler green and grey tipped with silver - this would look great finished with white and silver mistletoe berries! 

Happy Folking everyone x   


SHARE:

Monday 22 October 2018

Paint your own pumpkin tray - perfect for Halloween


You will need:
You Can Folk It! Brushes & Tools
Medium Liner, Flat Brush, Dotting Tool
DecoArt Americana: Tangelo Orange, Burnt Umber, Warm White, 
Avocado, Bright Yellow
Other: Practice paper, tracing paper, transfer paper

Before painting your project, practice all the elements on the practice paper. (You can find the patterns on our Folk It patterns Pinterest board.)  It's always a good idea to try painting the larger Pumpkin from the practice sheet first before moving onto the smaller ones.


1. Add a touch of Burnt Umber to Tangelo Orange and paint around the stem

2. Add a touch of Burnt Umber to Warm White and paint the stem

3. Add water to Burnt Umber and with this watery mix & your liner brush apply uneven diagonal lines to the stem

4. Add a touch of Tangelo Orange to Warm White and starting at the back paint each section of the Pumpkin using a 'C' stoke. 

5. Apply a second coat of this mix if necessary.  Tangelo Orange is a transparent colour, therefore we are creating a base so that the colour stays vibrant.  If you are painting onto a light coloured surface you can omit this step.

6. Next apply a coat of Tangelo Orange to the front sections.

7. Float Burnt Umber. (This is a technique we teach in our Flat Brush Cupcakes and Babushka kit) Before beginning this step, study the pumpkin below for a moment, bearing the following in mind... The Burnt Umber is going to create a shade, so we are floating the darker colour to any section that is behind another.  

8. Float Warm White on the edges of the Pumpkin that sit in front of another.  By using this technique, we help flat objects take shape. To the eye, dark colours recede so look further away and light colours advance and so appear closer. 


9. Make a wash with your flat brush using plenty of water and Bright Yellow and apply over the whole Pumpkin, see how this has reduced the whiteness of the floated highlights, this is a great way to dull your floated colours if you have just started learning...it also gives the Pumpkin a lovely warm glow.


10. The leaves are created using the wiggle stroke as taught in the Butterflies lesson, a comma stroke using the flat brush and combining the 2 together.  If you have not yet progressed to this level, then use your favourite leaf. 


11. The blossoms are as taught in the Oriental Blossom Lesson.  Use Warm White to paint each of the Petals and apply dots using Burnt Umber & Tangelo Orange.  


Once you are happy with your skills, you can create your final design.  If you wanted to create your own wreath design, you can learn more about how to do that here. To create your wreath, begin by painting the pumpkins.  When painting the stalks, try to paint them in different directions to add variety. 

Next, add your leaves.  Using single leaves and clusters, aim to fill the majority of your circle.  If you do not feel comfortable using the ruffled technique, use whichever technique you do feel comfortable with.  We painted leaves in a few sizes, again to add interest to the design.  

Next, add single blossom flowers around the wreath - don't worry if they overlap areas you have already painted.  Finally, identify any areas that look empty and add dots (using the small end of your dotting tool) and small comma strokes using your liner brush.  

To seal your work, you could use DecoArt wax however, if you have painted a tray as we have done, it is better to opt for a couple of coats of varnish to protect your project.  
SHARE:

Friday 12 October 2018

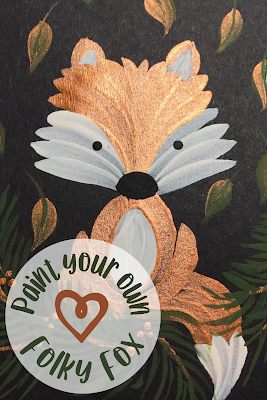
How to paint your very own Folky Fox


October is all about Autumn for our #funwithfolkit challenge, from leaves to pumpkins, this theme seems to have inspired so much creativity.  When we shared our cute folky fox recently, the response was amazing and so we put together a tutorial for you.  This quick and fun little tutorial is perfect practice for your comma strokes, plus you can create a cute furry friend at the same time! 

You will need: 

Black practice paper*
Tracing paper*
Transfer paper*
No 3 Round Brush* 
Dotting tool*
Rubber
Pencil 
DecoArt Americana Acrylic in Lamp Black* and Warm White*
DecoArt Dazzling metallics in Bright Copper

*included in our Round Brush Starter Kit 


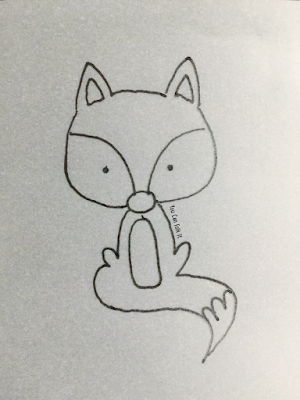
To begin, print off our Folky Fox pattern to the desired size and trace the pattern.  


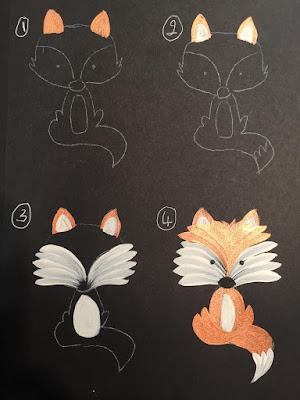
Next, using your transfer paper, transfer the design onto your black paper. Do this four times (as above) on to your practice paper as this will allow you to practice painting each part of the fox individually.  

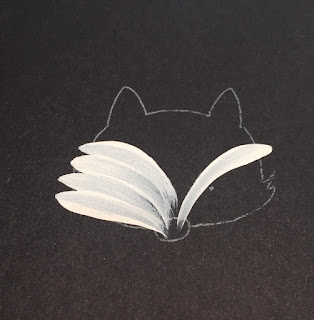
First, begin practicing the face. 


Load your Round Brush with Warm White.  Begin the comma stroke at the top of the line and follow the line, aiming your comma stroke down to his nose.  Repeat this comma stroke until you have filled his cheeks, each time beginning from his cheek and ending at his nose.  Try to make each comma stroke overlap slightly so that you cover his cheeks.  This is great practice for painting those comma strokes in both directions! 


Next, practice the top part of his head.  Using the Round Brush again, load it with Bright Copper.  Place your brush one the line (the same one you began with for this cheeks) and again, paint your comma stroke, following the line down to his nose. 

Move to the other side of his head and following the line, repeat the comma stroke on the other side. Continue to alternate your comma strokes on one side then the other until you reach the middle.  By alternating this way you will build up his layers - again making sure your comma strokes overlap so no black is showing through. 

As you work your way towards the centre, you will notice that you will need to paint smaller comma strokes to cover the area, this is ok. 


The body: 

Using your round brush loaded with Bright Copper, paint a long comma stroke down one side of the body so that the tail of the comma stroke wraps around the tummy area a little.  Add two more comma strokes to fill the line that again, tuck under the foxes tummy. Repeat this on the opposite side  (you will only need two comma strokes on this side to fill the lines) making sure that the comma stroke finishes under the tummy.  

For the tail: 
With your Round Brush loaded with Bright Copper, paint four comma strokes ending in a point (left). Next, when these comma strokes are dry, load your round brush with warm white and paint three smaller comma strokes on the end of the tail, again ending in a point.  Now you are ready to join the tail on the body. 

When you have practiced this and feel confident in your comma strokes, it's time to create your first folky fox. 


Starting with the ears, use your round brush to fill in the triangles, first with Bright Copper then (once dry) add two smaller triangles with the Warm white. 


Add his cheeks as you practiced, then fill his tummy with Warm White.  


Next, using the Copper, paint the other half of his head before adding his body and then his tail as you practiced.  

When your Folky Fox is dry, add his nose using your round brush and a little Lamp Black before adding his eyes with the larger end of your dotting tool.  

And that's it...your Folky Fox is complete! 

UPDATE: With winter fast approaching, we changed our Copper paint for Zinc and painted our very own Arctic Fox plaque - what do you think? 


If you have a go at painting your own, please do tag us in your posts to let us know you have had #funwithfolkit 

UPDATE: we are just LOVING the way you have made this little guy your own.  

A cute Folky Fox helps decorate this plain notebook

Nazlie has brightened up a plain notebook with our Folky Fox to add a little interest.  


Vanessa gave Mr Fox a friend - adding a little blush to her coat to make her different. 


Helen gave our Fox a winter makeover with this gorgeous blue background and twinkly snowflakes.  


Karen had been asked to create a plaque for the Fox family and was going to use a stamp....until our tutorial popped into her news feed! 



SHARE:
© You Can Folk It!. All rights reserved.
designed by pipdig