Monday 26 March 2018

How to paint Snowdrops


For this project you will need: 

DecoArt Americana Acrylic in Green Tree and Snow White (also known as Titanium White)
Medium Brush liner, No 3 Round Brush and Dotting tool (available separately or as part of our Round Brush Starter kit
Comma stroke lesson (available within our Round brush add on kits) 
Chalk pen (optional) 

Using the medium liner brush and DecoArt Americana Acrylic in Green Tree, add a little water to your paint to make your strokes go further and start by practicing the stems.  Imagine you are painting walking sticks and paint the hook to the left and right, trying to keep the stems as straight as possible.  Don't worry if your paint runs out a little at the end, you can always mask this when you add the comma stroke leaves


Next practice adding the petals using the No. 3 Round Brush and comma stroke leaves using the liner brush as shown above.  Play around with using just white and try using Green Tree tipped with white.


Paint your Terracotta pot using the Relic Chalky Finish.  (If you wish to use this pot outdoors once it is completed, make sure you cover every inch of the pot including the hole at the bottom to prevent the pot absorbing water).  The Snowdrops are placed approximately 3cm apart, alternating 1 long and 1 short.  The Daisies are 2cm apart 1 high and 1 low.  You can use a chalk pencil to mark the design, but you may find it easier to paint the design straight onto the pot without the constraints of having to follow a line.


Paint the stems.  Working on surfaces that are not flat is always going to be more challenging, so try practicing on inexpensive items like recycled packaging first, the more practice you do, the easier it becomes.


Complete the rest of the Snowdrops


Next, add the daisies along the top lip of the pot.  


Finish with a coat of wax or varnish to preserve the design.

As we mentioned earlier, it is possible to use hand painted terracotta pots outside, but if they are going to come in to contact with water it is very important that you prepare the pot correctly.  There are two ways to do this

1. Make sure every inch of the pot is completely sealed with the Relic chalky finish paint (including the hole in the bottom) so that the terracotta cannot absorb any water.  Once you have completed the pot, finish it with a couple of coats of weatherproof varnish.

2. Add equal amounts of DecoArt Multi Purpose Sealer to your Chalky Finish and Acrylic paint.  By doing this, it means that no varnishing is necessary but as before, ensure that every inch of the surface is coated with the paint and sealer.

Once you have completed your project, remember to wash your brushes ready for next time - look after your brushes and they will look after you.


SHARE:

Monday 19 March 2018

How to paint on to soap


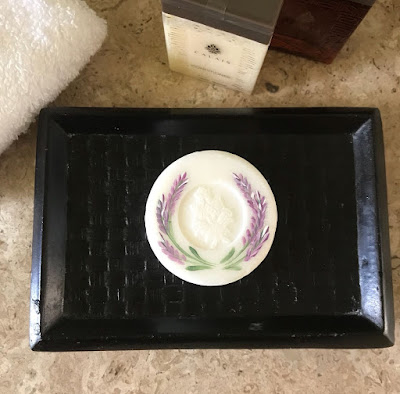
Painting on to soap, decorative painting, folk art, painting project. butterfly, lavender

I first learned to paint onto soap years ago when I first discovered Folk Art. I had seen decorated soap before but always thought it was something other people did, not something as easily achievable as it is.  

Sometimes, when you are learning to paint, you want to try something different, sometimes you wish to give a unique gift...the great thing is this project ticks both boxes.  I was recently on holiday in Mexico and their complimentary soaps were so lovely, I just couldn't resist painting them! 

For this project you will need: 

A bar of soap of your choice 
Paint Adhesion Medium or Multi Purpose Sealer 
The design of your choice (I chose Butterflies and the Lavender design taught in our Round Brush Course
For these designs I used the No3 Round Brush, Liner brush and Flat brush from both of our Starter Kits 
DecoArt Americana Acrylic (I used Blue Violet, Warm White, Plum, Lamp Black and Hauser light Green)

Painting on to soap, decorative painting, folk art, painting project. butterfly

Step 1: Begin by applying a coat of Sealer (or Paint Adhesion Medium) to the area you wish to add your design to.

Step 2: Once the sealer is dry (you can speed the process with a hair dryer if you wish), paint your chosen design. With both of the soaps, I tried to choose designs that worked with the shape/detail already on the soaps. Leave the design to dry.

Step 3: Finish by painting 3 more thin layers over your design, drying with a hairdryer each time to help the drying process along and dry each layer.

Step 4: Leave to dry for a couple of days for the paint and sealer to cure (dry and harden completely).  The layers of sealer creates something similar to a transfer on the soap.  Once it has been allowed to cure, this means you can use the soap as you would a normal bar of soap and the design will remain firmly in place.

Painting on to soap, decorative painting, folk art, painting project. lavender


I hope you have fun with this project.

Happy Folking,

Carol x
SHARE:

Thursday 1 March 2018

Our time at #SBSevent2018


You Can Folk It meets Theo Paphitis Birmingham ICC, small business


What a week! Our social media has been going crazy once again following our recent attendance at Theo Paphitis' SBS event at the Birmingham ICC last week.  If you haven't heard of Theo's SBS Sunday, it is a fantastic initiative he created back in October 2010.  With the idea of supporting small businesses around the UK, he invites business owners to send him a tweet describing their business every Sunday between 5-7.30pm.  Each Monday, he chooses his favourite six and retweets them to his 500,000+ followers.

You Can Folk It SBS winners


Fast forward 6 years to Oct 2016 and we were chosen as one of his favourite...our Twitter account went crazy.  From congratulations tweets to new followers, RT's to questions, we wondered what on earth was happening as our phones were pinging like crazy.  


The highlight of an SBS winners year is the free yearly networking event hosted by Ryman Stationary (one of Theo's successful businesses).  As we couldn't make it last year, we were excited to see what all the fuss was about and to have our photo taken with Theo himself.  

After a long journey from Sheffield and an interesting hour arguing with the Sat Nav (Birmingham road works are interesting to say the least!) we arrived.  There were lots of talks and presentations and many lovely people to chat to.

One of the highlights of the day for us was getting the opportunity to meet lots of lovely SBS winners in person, people we had been chatting to via Twitter for a while including the lovely Carmen from Joyful and Mellow who makes delicious alcoholic spreads.  Placed within the 'Creative' category, we also had the pleasure to chat to Kirsty from KA Graphic Design who makes fantastic cards, Sophie from the gorgeous Pip Box and Sarah (Charlotte Designs) who specialises in painting such a wide variety of stunning wall murals. Honestly, there was so much talent in one room our heads were buzzing, we wanted to talk to everyone! 

Joyful and Mellow, You Can Folk It, SBS winners, #SBSevent2018
I found myself sitting next to the lovely Carmen from Joyful & Mellow, a fellow #SBS winner and #womaninbiz over on Twitter
Theo Paphitis SBS event

Waiting for the event to begin, we collected our notebooks got our pens ready.  It's safe to say, listening to Theo that he has a passion for small business and helping them flourish.  The event is totally free for SBS winners and their guests thanks to sponsorship from companies like Square Up, Ryman, HP and DHL to name a few which is fantastic for small businesses. 

SBSevent2018, Theo Paphitis, John Roberts

The main event was the fireside chat with John Roberts from ao.com. John started his business following a £1 bet that he wouldn't be able to succeed with a white goods business on the then newly introduced thing called the internet.  It was nothing short of inspiring to listen to his journey that's taken him from a small company consisting of a group of friends playing at their business to a multi million pound company thriving in an area where large brands such as Currys have dominated for so long.  

To listen to 'just a guy from Bolton' as he puts it, sit in front of the audience and be so humble and so honest about the successes but also the failures (large and small) he has faced since he began was so refreshing and inspiring.  He started where many of us did, with an idea and a bit of money and has built his company on honesty, integrity and what some in business may call 'old fashioned values'.   

As small business owners, it can sometimes be difficult not to compare yourself to other businesses; at their social media following, their success, their journey and think they have it made, that they are flourishing while you are taking one step forward and three back.  Listening to John it reinforced that you never know where another company is unless you own it.  As small businesses, we need to be proud of where we are, nurturing our company and moving forward.  Take time to enjoy being a small company and to build those relationships not only with your customers but with everyone.  John relayed how he still takes time to sign letters himself to customers he's replying to, how he takes time to do market research while he is socialising, and touches base with his employees.  Now I know it won't all be sunshine and roses at AO but what struck me was the commitment John still had to his customers, the commitment to stay at the grass roots level to ensure that he still understands what his customers want.  It reinforced in us that you don't need to think big to be big.  Strengthen your foundations, nurture your fan base and never forget where you came from.

Needless to say, we left the event with plenty of food for thought, new contacts and lots of ideas running through our heads.  Will we be attending next year? Absolutely.  

So if you are a small business owner and are on Twitter, do tweet about your business each Sunday.  The SBS community is supportive, fun and such a great group to be a part of.  Good luck and you never know, we might see you there in 2019.  

SaveSave
SHARE:
© You Can Folk It!. All rights reserved.
designed by pipdig