Monday 30 November 2015

Tutorial: How to design a delicate lace pattern


Our Delicate Lace pattern is a fantastic design to add borders and edging to your project. Use it on its own or combine it with one of our other kits, it is so versatile and looks lovely wherever you paint it. Today, we will be teaching you how to get the most out of your kit and showing you how to design your own delicate lace patterns. 

The equipment you will need for this is...
  • tracing paper 
  • a marker pen 
  • a pencil and eraser 
  • light or dark transfer paper depending on your project 
  • different sized coins 
  • low tack masking tape
  • paints and paintbrushes of course!
Before you add your delicate lace, first basecoat your gift box in DecoArt's Chalky Finish paint in 'Relic', a gorgeous dark grey. (No primer needed)
DecoArt Americana paints needed: 
Carol used DecoArt's American acrylic in warm white from our Series 1 kits to paint the delicate lace .
The vintage roses (our Series 1 add on kit) were painted using DecoArt's Americana acrylic in: Plum (from our Series 2 Starter kit) and warm white.  The leaves were painted using Avocado from of Series 2 Starter kit. 
How to design your Delicate Lace:
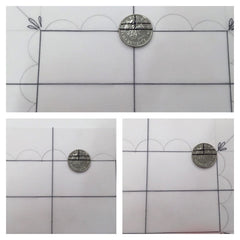
 Step 1: on your tracing paper, draw out the rectangle/square you wish to edge in a size you need. Then mark it into quarters.

Use a marker pen to draw the square/rectangle so you can rub pencil marks out later - designing lace is a process of trial and error (as all the best things are!)
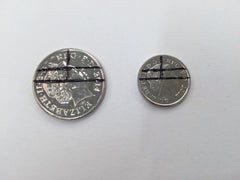
Step 2: make lines as shown here onto your chosen coins - you can choose whichever size you like but we like 10p and 5p coins :)
Step 3: using the lines you've drawn as a guide, start drawing your scallops. Begin in the centre and work outwards.
The scallops will either fit nicely or need spacing out slightly - this is where you will need your eraser.
INSPIRATION: before you paint your scallops, play with designs - try diagonal, horizontal and vertical lines. Edges can be finished with dots and comma strokes. You can also add dot hearts, dot roses or daisies into the scallops themselves! This is another excellent addition to a painting journal.


Step 4: before painting your lace design onto your object, use your transfer paper to draw your scallops out and mark off your rectangle.  Depending on the design you wish to paint in the centre, you might want to use low tack masking tape to mark it out.
Mask the area you wish to paint to give you a crisp shape.
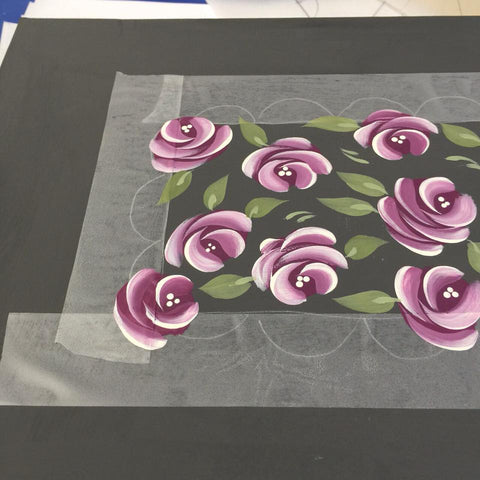
Step 5: Add your lace design to frame your design.

When the low tack masking tape is removed, your design will look as though it has been cut out giving it a completely different look to a more structured design that would simply sit in the centre. Draw out your semi circles and fill them with your chosen lace design. 

Before you sit back and enjoy your creation, take a look to see if you have overlooked any details.  Why not add patterns to the rim of the lid to complete your project.
Use your completed box as an alternative to gift wrap or keep it for yourself.
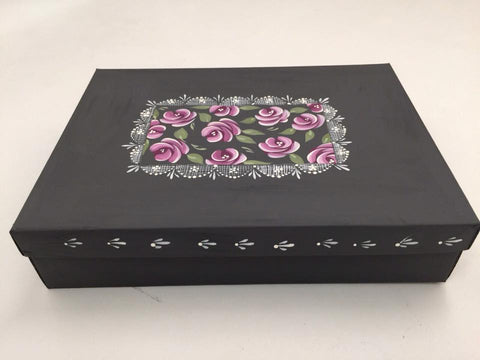
All that is left to do now is enjoy your box. Whether you choose to use it an alternative to gift wrapping or keep it for yourself, it will be admired by anyone who sees it :) 
I hope you enjoy this tutorial and as always, we would love to see your designs on our Facebook page. If our Delicate Lace kit is not in your collection already, you can find it here.
Happy Folking, 
Carol x 
SHARE:

Monday 16 November 2015

Abandoning Art in 5 easy steps with You Can Folk It


We hear everywhere don't we that our lives are getting busier, more stressful and that we are forgetting how to slow down and enjoy the moment. In a world where we hear so much bad news, and where many are so quick to criticise others; positive images, news and stories are treasured, shared and enjoyed so much more. A while ago we shared this video from another Facebook page and it brightened our day and judging by the shares it received it brightened many others too. 


Seeing this video made us think.  For some, it may be dismissed as a silly, simple act but it has such a powerful effect. As we watched it again, we realised that it is something we would like to aspire to. Many of us are familiar with yarn bombing, where people will cover objects in crochet or knitting to spread a little cheer. The fun doesn't stop at wool though! Some of you may have heard of a movement called "Art Abandonment" - where artists all over the world create pieces of art for the purpose of leaving them in public places for others to find. From sketches to jewellery and sculpture, artists are making others smile through their kind gifts that are often accompanied by kind sentiments and words of encouragement.  

When we heard about it we immediately thought it was a great idea! As Folkers, we love creating but we may not always have a reason to create or a recipient for our projects. To create small items and leave them for others to find, not knowing who that may be, sounds like the perfect way to create a little happiness in ourselves and others. If you would like to get involved in this idea, we have created  some resources and a little how to for you. 


1. Get out your Folk It kits and start creating. Sometimes when we create for others, we put pressure on ourselves to be perfect. We think about what they would like or restrict ourselves to colour schemes to suit tastes or events like weddings.  The beauty of creating for the purpose of abandoning it is that you, the painter, can remain anonymous! Try ideas you have been thinking of, play with new techniques, the world is your oyster! 

2. Paint on anything you like; paper, jewellery, hanging hearts, whatever you wish. Mix it with sketching, stamping or any other technique that takes your fancy to create something beautiful. (This is also a great way to pass on the projects we create while we are practicing Folk Art painting).  

3. Select your location. According to Michael deMeng, founder of the Art Abandonment project some places are better than others. Most popular places for art abandoners are: cafes, bars, out in nature (weather permitting and of course, the project should not pose a threat to wildlife), hospitals and waiting rooms.  You can be as creative as you like and many artists leave them on windscreens, in lifts and on public transport to name a few.

4. Add a note for the recipient. This of course is optional but the exciting part of abandonment for many is to receive responses from the person who has found your piece of art.  We have set up an email address that is included on the note we have created (though of course you can always create your own personal note!) We created this email so that for you the abandoner, it is anonymous and we will be able to share the responses on our Facebook page for everyone to enjoy. 


5. Take a picture - if you want to share the project your are abandoning, feel free to take a picture and share it with us. We always love to see Folkers' projects and would love to hear where you are leaving it to be found. 

So there you have it, it really is that simple. We don't know about you but we are feeling excited at the thought that we will be leaving a little bit of art out and about in the future, not knowing who will find it and hearing about how they did stumble upon it. 

Just like the video, we hope that this will create a few more smiles around the world. It's always nice to create with a purpose and what better purpose than to leave a gift and make someone's day a little bit better! 

If you wish to become an abandoner, we have created the note and email to help but do not feel that you HAVE to use them. Feel free to create your own or choose not to leave a note/method of contact at all. The choice is yours.

If you wish to learn more about the original Art Abandonment project, you can read about it here


SHARE:
© You Can Folk It!. All rights reserved.
designed by pipdig