Tuesday 10 December 2019

How to paint holly

What's Christmas without a little holly? This week, we have created a step by step tutorial to help you have a go at painting your own corner arrangement, perfect for our square mountboards.  


For this project, you will need: 

General Supplies 
Paper Towel,
Wet Palette and water pot
White/Black Transfer paper
Tracing Paper
Black practice paper
A4 Black Mount practice board (or similar)
Pen/pencil
Dotting tool (optional) 
Brushes 
No 8 flat or angle luxe label brush for floating colour (you may find the angle brush easier to use) 
Liner brush 

DecoArt Americana Paints and Mediums…. 
I worked with this months colour palette with the exception of Lamp Black. 
Tomato Red (but any bright red will work)
Titanium (Snow) White (again any white will work)
Avocado 
Honey Brown 
Light Buttermilk 
Emperors Gold 

Skills 
First, you will need to transfer your design onto your practice board.  Once you have done that, follow these steps... 


Some DecoArt colours are more transparent than others so, if you are painting on to a dark surface, basecoat your design with white first to create a solid block of colour.  


Depending on the colour of your background and the final look you prefer, you may wish to float a darker colour around the leaves.  Play around with these ideas and discover for yourself which ones you prefer.   If you aren't confident in how to dry brush, check out Carol's video here. To dry brush the Gold, we used a small old round brush so I did not ruin one of my 'good' brushes. 

Now for the berries....


Basecoat your berries using a series of C strokes with the Flat or Angle brush.  Again, you will probably find that you need to give them two coats of red before adding the comma strokes.  If you do not feel confident to use the liner brush, create a comma stroke using the small end of the dotting tool.  


Using different techniques creates a range of different looks.  Floating colour around each berry can be tricky but creates a lovely soft shade to the berries.  You can get a similar look by dry brushing with an old round brush (which also gives you a little more control).  

We hope you have as much fun playing with these designs as we have designing this festive bunch of holly. 

Happy Folking xx  


SHARE:

Tuesday 19 November 2019

How to paint a reindeer in ten steps

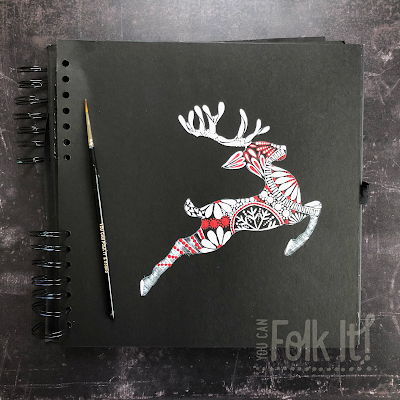
Folk Art brushstrokes painted to create a delicate pattern in the shape of a flying reindeer. Designed and painted by You Can Folk It

We always love to try something a bit different at Folky HQ and over the past couple of years we have been challenging ourselves to have fun with our skills.  Every month, we set a different theme and play with different ideas.  A few months ago, inspired by the popularity of our mandala month, we began playing with patterns and silhouettes - creating doodles within different shapes.

This month, we revisited this idea after a customer challenged us to create a reindeer doodle.  We have had so many requests and emails about this one, we've put a tutorial together just for you.  Please note: although we have created this Level 3 guide, please do not feel that you have to stick to it.  Take what you want from it and leave the rest; if there is a part of the design you don't feel comfortable painting or if it involves a technique you haven't learnt yet, replace it with something else. The great thing about these doodle practice pages is that they are fun, they are flexible and they are entirely yours to paint how you will.

What we used: 

Dark paper (we love a bit of black paper to paint on!) 
DecoArt Americana in Tomato Red and Snow (Titanium) White
(or something similar)
Luxe label brushes 
No 4 Round Brush
No 2 Round Brush
Liner Brush
No 8 Rake Brush
Dotting tool
Pen
Tracing and transfer paper 

When completing these doodle animals, we always begin adding a few larger patterns to the piece.  These are what draws the eye to various parts of the shape and adds interest.  We add our dots towards the end as they act as fillers.

Step 1: Transfer your design to your paper.

Step 2: Begin by painting the larger designs using the Titanium white. Using your liner brush, paint the snowflake, surrounding lines and flowers (those marked in blue).

Step 3: Using your No 4 brush, paint the comma stroke petals in white (shown in pink).

If you haven't got the brushes we are using here, feel free to use the brushes you have and adapt the design - a thicker No 3/4 brush will need fewer petals, whereas using a liner or No 2 brush, you will need to add more petals.  

Step 4: Using the Rake brush, fill each leg with white lines.  Once this is dry, do the same again but in a different direction to create a crosshatched effect. (the yellow areas).
Again, if you don't feel confident using the Rake Brush or haven't got one, why not try using your liner brush to create this lace-like crosshatched design? 

Step 5: Next, using your liner brush, paint the lines marked in orange.
Don't worry if these aren't perfect as you will be adding detail to them - dots and lines.  This design isn't about being perfect but about having fun.  The great thing is, there may be areas in these paintings that you aren't happy with as you are creating them but they fade into the background when you look at the project as a whole.  

Step 6: Using your No 2 round brush, or a liner brush, paint two comma strokes for the hooves. Paint the comma strokes around the head and antlers (those colour coded in purple).
Here, we have painted some in Tomato Red and some in white.  You can follow our original design or make it your own. 

Step 7: Next, add the larger dots to your reindeer (marked green) You can use large dotting tools for this like the ones here or like us, you can use the end of a pen or pencil!

Step 8: Grab your dotting tool and create hearts across his tail using the small end (marked in red).

Step 9: Add dots across the lines and around the large dots (marked in grey)
Take a step back from your design and add dots of paint around your design where you have gaps.  You will see we have done this around the antlers, and around the snowflake.
These dots help to bring your pattern together.  While you want to have some black space on your reindeer, having too much will stop your eyes seeing the 'bigger picture' as it focuses on each pattern. Adding dots helps fill the shape creating an outline without the need for painting one.

Step 10: Add any contrasting brushstrokes/dots you wish.  You will see around the head, we layered smaller brushstrokes on top of the larger ones to add detail and bring the two colours together.

Painted reindeer created using Folk Art brushstrokes in a red and white festive palette.


If you do have a go at painting this fun project, we would love to see it.

Happy Folking x

SHARE:

Sunday 20 October 2019

DIY Trick or Treat bag for Halloween

Handpainted and hand lettered DIY Trick or Treat bag


Our colour palettes, just like out wardrobe has just got a whole lot more Autumnal.  As we come up to the scariest month of the year, we decided to transform our popular Pumpkin tutorial from pretty to  scary and made our own bag for a little Trick or Treating fun this Halloween.

Materials we used: 

Black gift bag from Paperchase 
Tangelo Orange, Titanium White, Primary Yellow, 
Avocado, Burnt Umber, Lamp Black.  
(If you don't have the exact colours listed above but have something similar, use that). 
No 8 Angle Brush
No 8 Flat Brush 
Luxe Liner Brush 
Lettering - Uni Posca Paint Pen (fine) in White
Tracing and Transfer Paper 
Pen or Pencil to transfer the design

For this tutorial, you can find our pattern here

Once you have transferred your design onto your chosen project, because they will sit behind the pumpkins, paint the leaves and add the vines with your liner brush (optional).   
We have used the flat brush ruffle stroke to create these but you can paint your leaves however you wish so if you feel more comfortable with comma stroke leaves choose those.  

Next, base coat your pumpkin with the flat brush and add light and shade the two side pumpkins as shown in last years tutorial. Again, as these will sit behind the larger centre pumpkin, you only need to paint up to the centre pumpkin.   

Note: When adding light and shade, we swapped the flat brush for the Angled Shader as it allows you to be more precise when adding colour.  However, feel free to try both and find your preference.  

Once dry, base coat and shade the centre pumpkin as shown in the tutorial.  When this is dry, looking at the design, you need to bring the centre pumpkin to the front of the design. To do this, float a little Burnt Umber around the outer edges of the larger pumpkin where the centre pumpkin meets the smaller pumpkins as indicated below.  


Once the centre pumpkin is dry, transfer the face to the large pumpkin and using your liner brush, fill it using Lamp Black.  

Finally, fill in the lettering using the white paint pen.  

Once dry, fill your bag with treats ready for Trick or Treaters to pick from or take it out to fill with candy yourself ;)  

Bright pumpkin trio perfect for a unique trick or treating bag


SHARE:

Monday 16 September 2019

How to blend colours with DecoArt Drying Time Extender


We've been having a great time playing with ocean inspired colour palettes this month as part of our #funwithfolkit "Under the Sea" painting challenge but that doesn't mean the fun has to stop there! We also wanted to spread our wings and create a tutorial that would help you get to know DecoArt's Drying Time Extender a little better and take your decorative painting skills a little further.  


DecoArt paints and Drying Time Extender and Folk It luxe brush

Materials required: 

DecoArt Americana in: Sand, Desert Turquoise and True Blue.  
Picture Frame (ours was from Ikea)


Step 1: Use the back of the frame to mark out and cut your mountboard to size (if required).


Step 2: Basecoat the entire area of the board with DecoArt Americana in Sand. 


Step 3: Keeping your board horizontal, mark out the middle point on both of the shortest sides.  


Step 4: Using the two marks as a guide, apply Drying Time Extender to one half of the board.  


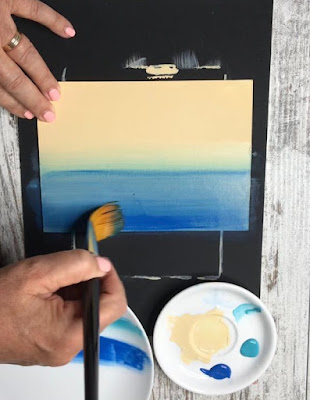
Step 5: Using the Desert Turquoise, dip the corner of your brush into the paint.  With the Drying Time Extender to the centre line, create a band of blended colour approximately 1.5 inches wide.  The Drying Time Extender will keep the paint wet and allow you to keep blending until you are happy with it.  

When you are working with Drying Time Extender, remember it is better to build the colour slowly using layers. 

Blending colour with DecoArt Drying Time Extender

Step 6: Next, pick up the True Blue on the same corner of the brush.  Blend the True Blue slightly over the top of the Dessert Turquoise (the clean side of your brush will be towards the clean edge of your board)  slowly blend the Blue out towards the edge of the board.

Blending colours with DecoArt Drying Time Extender


Step 7: Keep picking up more of the True Blue to blend a darker band down towards the edge of the mountboard.  

Step 8: Once you have painted one half of the board, step back and look at the colour. If you feel it requires more blending, wash and dry the brush before drawing the brush over the blue and blending the colours further.  Keep working with it until you are happy with it. 

Ombre effect - sand and sea created using DecoArt paints and mediums

Here are the boards I created during this tutorial.  You can see that I attempted this project several times before I was happy, these are the good ones as I painted on both sides of the boards! 

Acrylic colour blended with DecoArt Drying Time Extender

Once you have picked up the skills, you can play with technique and colours. 
I experimented with using tape to help me create a darker line but when I removed it, it removed some of the paint.  It was one of those happy accidents where it created a nice effect though so I wasn't too upset.  I also tried leaving out the turquoise and just blending the True Blue.  

I obviously chose this palette for a little ocean inspired #funwithfolkit this month but this can be used to create ombre effects with so many other gorgeous colours - the effects look good Don't be afraid to play and have fun with this technique! 

Happy Folking x 


SHARE:

Friday 6 September 2019

Find the beauty in the old, the worn and the weathered

When my youngest son announced that he would like to relocate to Barcelona with his girlfriend, I didn't know how to feel.  Part of me was happy that he would begin this amazing new adventure, part of me knew that I would miss having him around.  When he was deciding on the logistics of getting there and suggested he should drive down in our car, for us to get it back to Sheffield, I was not jumping for joy.  Then I thought about it...leisurely travelling back through Europe, visiting a few places that have been on my wish list....maybe it wasn't such a bad idea at all.

The plan was to arrive in Barcelona and spend a couple of days with Tom and Darcie before saying our farewells and heading back to Sheffield over the next week or so.  Just like so many of you who have spotted Folk Art on your travels this summer and sent us some wonderful photos, I was thrilled to spot this gorgeous handpainted fan in a shop in Barcelona.


After saying our farewells, we headed to Andorra (pictured above) and most recently we have just stayed in a little village called Bourg near Bordeaux.  After a busy few months renovating the offices, I have to say I am in love with the slower pace of life here.  I was not able to seek out any Folk Art but what struck me as we enjoyed life in the village was the beautifully worn appearance it had.  


From faded colours to peeling layers and years of use, I was surrounded by the beauty of the worn and weathered.  It struck me that I have spent hours during my life striving to achieve this look on chairs and other pieces of furniture but there is something so humbling about seeing it in all its glory when it has happened naturally.  


I can create a distressed finish with a wet rag, Weathered Wood or candle wax but walking around this village thinking about the stories these doors and windows must be able to tell was fascinating.  In a world where so many have a desire to fill their world with the new, the bright, the shiny, this was a lovely reminder that old is so, so beautiful.  

Layers of paint, years of wear, plenty of character. 

I did spot this shop that I would have loved to have visited but it wasn't meant to be. Maybe it will be open next time I'm on my travels....

Love, Carol x


SHARE:

Friday 23 August 2019

Reduce, Reuse and upcycle

Sometimes you want something to solve a problem and it can be so easy to nip to the shop and buy something that will suit.  Sometimes you get exactly what you want, other times you have to compromise.  Today however, with the landfills of the world bursting at the seams, we have a responsibility to think outside of the box, to reuse what we already have, to make do and to upcycle.   

For a while now, I have been buying nuts and other snacks for when I'm in the office. I love these for keeping hunger at bay but felt increasingly uncomfortable with the single use plastic they came in.  I wanted to buy a small pot to house my snacks so I could bulk buy or refill my stash at our local zero waste shop so, instead of buying one, I got creative. 


Recently trying these John West snacks, I had washed them and was going to recycle them but I suddenly thought that these were a perfect solution.  True, I could have just used them as they were but where's the fun in that?! 

John West Salmon tin up cycled using You Can Folk It painting kits

Here's how I upcycled them... 

Materials used: 

DecoArt Matte Varnish
DecoArt Americana - Antique Rose, Desert Turquoise, Titanium white, Avocado, Coral Shell 

I first mixed equal parts Multi Purpose Sealer with the Americana paint.  I could have chosen to basecoat the pots with Chalky Finish paint which does not require any preparation but after using Americana Acrylic to paint items in our office kitchen, I was reminded just how creamy and wonderful this paint is on large surfaces.  

I painted the sides and lid (excluding the plastic rim as painting this would make the pot less durable. I chose the colours to match the rim and they worked perfectly! 

John West Salmon tin up cycled using You Can Folk It painting kits

Once dry, I added the design - I opted for Oriental Blossom and Rosebuds but any of our designs would look great on them :) 

Once these were dry, although the Multi Purpose Sealer makes the paint weatherproof and waterproof, I added a couple of coats of Matte varnish as these will spend a lot of time travelling in my handbag.  

I have now left the pots to cure for a week or so before I put them to good use.  It feels amazing to have been able to create something from nothing, to save useable items from landfill and get creative.  

What have you saved from landfill recently? 

Love Carol x 


SHARE:

Wednesday 31 July 2019

Mandalas are back for some #funwithfolkit!

'Mandalas' was undeniably the most inspiring theme for a lot of our Folkers last year so this year, it's back but with a little twist.  Throughout August, we are incorporating it with silhouettes.  What on earth do we mean by that? Well, there are (at least) two ways you can interpret this theme...

1. You can create a Mandala using a single paint colour, creating a 'silhouette' of a mandala.  If you would like to work with our mandala from last year, you can find it here.  So experiment with black on colour, metallics on black or add tone on tone, it doesn't matter.  Just relax, let go of the outcome and enjoy the process. 

All white mandala created using floated colour and dots of paint

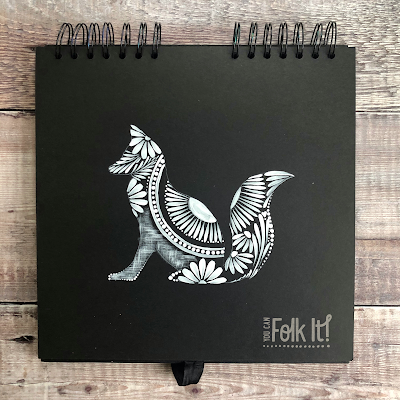
2. This is our personal favourite for this month...find a silhouette of something you wish to paint and fill it with dots and doodles.  So whether its a letter of the alphabet, an animal or word, this project can be as simple or as challenging as you like. 

Fox silhouette filled with painted details in white.

Not sure where to start? Don't worry, we have created a few silhouettes (including the one we used above) for you to try and popped them on to the 'Silhouettes' section to our Folk it Patterns Pinterest board.  Of course, if you fancy something different, there are lots of shapes to try out there and we will be adding extras throughout the month that catches our eye.

We hope you feel inspired by the theme this August. Remember, this painting challenge is so flexible so if you feel inspired to create a project in the month or one a week, it's entirely up to you.  All we ask is that you tag us in your creations on social media or email photos to toni@folkit.co because we love to see what you've all been creating.

Happy Folking xx 

Hand painted mandala in Rose Gold Dazzling Metallic paint on black painting journal


SHARE:

Wednesday 10 July 2019

How to paint pansies with You Can Folk It

Introducing our luxe label Angle shaders... 

Angle Shaders are used for many of the same brush strokes that can be created with the flat brush and in many cases, it makes the strokes a little easier.  One of the techniques the Angle Shader is useful for is 'floating' colour (the technique taught in our Cupcakes and Babushka kits) as the angle of the brush allows you to blend the paint on the brush nicely and the nice sharp point allows you to get into the awkward areas more easily. 


DecoArt Americana Pansy Lavender
DecoArt Americana Titanium White
DecoArt Americana Lamp Black
DecoArt Americana French Mauve
DecoArt Americana Teal Green 
DecoArt Drying Time Extender 

Brushes & Equipment used:

Pen/Pencil


1. Transfer the design (if you are completing a practice board, transfer 3 pansies to create a step by step reference as above) and use the No 8 Lux Angle Brush to base coat the larger leaves with Teal Green and use the No. 3 round brush. Mix Teal Green with a touch of Titanium White and basecoat the smaller leaves.


2. Add a touch of Lamp Black to the Teal Green and use the liner brush to apply a comma stroke vein on each leaf

3. Next, basecoat the ribbon using French Mauve.

Tip: for each of the above, paint the colours over the outline of the pansy slightly as we want these to look like they are behind the pansy in the finished piece. 


4. Use the No. 10 Lux Angle Shader to 'float' Titanium White around the edged of the larger leaves and the No 8 Angle Shader for the smaller leaves

5. Look at the pattern sheet and note that the floating on the ribbon is where the marks appear.  Float Titanium White along the marked edges (note this is the opposite edges)  Take care to join up where the 'float' meets, this will give the illusion of the twist in the ribbon

Tip: When floating colour, apply thin coats and build up with several coats rather than one heavy coat, this will give you a much better end result.

6. Basecoat the back two petals with Pansy Lavender. Next, add a little white to the lavender and basecoat the next two petals.  Finally, add a touch more white and basecoat the front bottom petal.  Apply a float of Titanium White around each petal on the pansy


7. Use the liner brush & Lamp Black to apply the centre of the pansy - add water to the brush to achieve some nice fine strokes.  Make sure you note the direction of the strokes and make sure you are putting a slight bend in them and they are not straight.  Finish with 2 comma strokes using the liner brush & Yellow Ochre.

8.  Apply dot daisies using Titanium White & French Mauve.

9. To complete the flowers, load the liner brush with Teal Green and 'tip' with Titanium White, 'tap' the end of the brush around the daisies to create filler foliage. 


If you have a go at this tutorial, we would love to see your pansies. Please tag us in social media or email your photos to toni@folkit.co 

Happy Folking! 


SHARE:

Tuesday 2 July 2019

Have #funwithfolkit and go tropical!

This July it is all about those tropical vibes.  As the sun is a little sporadic up here in Yorkshire, we are creating our own sunshine this month.  We are ready to bring a few tropical vibes to our painting this month!

Every month, as well as challenging our Folkers, we also challenge ourselves to get involved with our themes at Folky HQ - often creating a cheeky tutorial and inspirational project along the way. 

That does not mean that it is always easy and to be honest, some themes including this one is probably as much of a challenge for us as it is for the new folkers out there, if not more. Read on to find out more about how Carol got on with this challenge...

When I first saw this theme, my mind freaked out a little.  My background is in decorative painting, traditional designs and colours - all the things that don't scream 'tropical'.  My first step was to sit down and think about what tropical colours were for me.  In my personal life alone I'm not drawn to bright colours so my first stop was good old Google.  Looking for colour palettes that appealed to me, I began to feel inspired and choose some DecoArt colours that matched.

DecoArt Banana Cream, Bright Blue, Desert Turquiose, Orange Flame, Bright Green, Razzle Berry and Indian Turquoise. I used these to mix a brown for the finer details.  
I knew I wanted to try to create something with brushstrokes, they are my favourite go to when I want to relax and switch off.  All I had to do now was try and work out how to create a suitable design using a few brush strokes! 

Card designed by Carol Sykes for the #funwithfolkit tropical theme this July

I soon realised that the hardest part of this challenge was sitting down and committing to painting.  Once I started painting, ideas started popping into my head.  My first idea was bananas and tropical plants and leaves.  This was a great project to use the different sized round brushes in our brand new luxe label brush collection.  Creating a mix of brushstroke leaves and layered ones created a wild jungle feel and a few (lazy) comma strokes were perfect for the bananas! The bonus of this design and traditional Folk Art painting is that it doesn't have to be perfect. In fact, this art form became so popular in the past because it is imperfect and achievable.  When I had finished it, I had really surprised myself as I really loved the final effect this created. What do you think? 

Isn't it funny how our minds discourage us from starting something worthwhile before we have even begun?  Here I was, convincing myself that it was a waste of time and yet I really enjoyed painting and fell in love with the colours as I painted with them.  

Using our Oriental Blossom kit, Carol has adapted the flower to create a more 'tropical' look and feel


Next, I wanted to add more colour so I adapted the techniques from our Oriental Blossom kit to paint a very loose version that to me resembled a more tropical flower.  Just knowing that I was painting on a greetings card and nothing more important took away the worry of failure as I wasn't going to ruin anything 'important'.   Here, I experimented with my liner brush too, adding a few loose outlines to help the delicate yellow flowers stand out.  I can say with complete confidence that this is something I would never have created on my own without the nudge of our #funwithfolkit theme.   So, with that in mind, I'm going to continue to challenge myself to create projects using some bright tropical colours and see what I can come up with that appeals to me, because I'd have never, ever chosen such bright colours without the challenge.


Whether you share just one project or many (or none at all) I do hope you will be inspired to create something new and have fun with Folk It.  Our painting kits are just the beginning of your creative journey and whether you just paint a familiar design in new colours or create something completely unique with the techniques you've learnt from the lessons, you may just surprise yourself. 

If you do have a go and create something tropical you would love to show off, please tag us on social media and include the hashtag #funwithfolkit


SHARE:

Thursday 30 May 2019

You never know where painting will take you!


Sometimes, you learn a skill with a clear intention of what you are going to use it for. Sometimes, however, life likes to throw you a curveball or two.  After realizing, way back when, how important creativity is, I always encouraged my two sons to be creative too and follow their passions and their journeys have provided amazing opportunities and experiences for them - Oli is now the lead singer in a band called Bring Me The Horizon and Tom is a photographer, videographer and Graphic Designer.

As they've developed their work, I often hear "Mum is there any chance you can create/paint/distress...." From wall murals to jackets, video props to dresses, these requests have excited me, challenged me and often encouraged me to think outside of the box.

This weeks request was from Oli who wanted help transforming lots of boxes and frames before they added screens which would light up and display images to make them look like speakers.  So Alissa and I collected some supplies from Folky HQ and headed to the LS Live Production Park.  This place is amazing - filled with so many treasures and creations, there was always something to look at.  These studios have welcomed Hugh Jackman, Elton John, and Shawn Mendes as well as all the very talented people who work behind the scenes creating bespoke, breathtaking props for any set.

Carol Sykes and resident artist  and sculptor Jackie at LS Live Productions Park
Carol (right) and Jackie (left) who works hard sculpting, creating and painting for all the stage sets.  
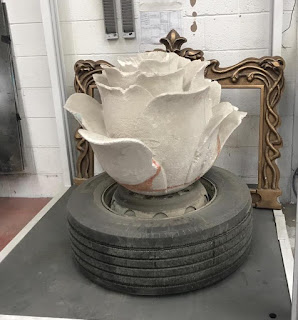
A prop from Shawn Mendes recent tour - a rose sculpture that lights up
Jackie sculpted this beautiful rose for Shawn Mendes an illuminated centerpiece on stage.

Mounted Eagle head and other stage props from LS Live Productions Park
The studio is a treasure trove of sculptures and art. What an amazing place to work. 
Small haunted house prototype for a larger stage set
A prototype of a huge stage project  
After Jackie had shown us around, it was time to get to work creating and painting the set.  Oli & Alissa had a very specific look they wanted to create and were adamant they wanted it to look authentic on stage.  I have to admit, I felt like a big kid again! To know 'the rules' and completely throw them out of the window was such fun. No two frames were the same and it was fantastic to see them all together. 


The process was far from pretty and less than glamorous as you can see but it was great to see Oli and Alissa's vision coming together.  If anyone had told me 20 years ago that this is where my creative journey would take me, I would never have believed them! What an experience.

Love, Carol x


SHARE:
© You Can Folk It!. All rights reserved.
designed by pipdig