Monday 10 December 2018

Christmas Cupcakes in 10 easy steps


What you need: 
Card/envelope/mountboard (or bauble mount board) 
Tracing paper & transfer paper*
Flat Brush, Medium Liner Brush and Dotting tool* 
You Can Folk It Cupcakes painting kit 
DecoArt Americana acrylics in Razzle Berry, Holly Green, Lamp Black and Titanium (Snow) White 
Drying Time extender*

*All included in our Flat Brush Starter Kit


An outline of a cupcake with a snowman sat on the top.

Step 1: transfer our Snowman cupcake pattern to your surface. This will fit perfectly on one of our square mount boards or baubles. 


Painted white silhouette of the a snowman topped cupcake.

Step 2: To help the colours on your final piece pop, base coat the entire area of your design with white using your flat brush.  


White silhouette of a snowman topped cupcake with pencil lines marking out the details


Step 3: Transfer the lines you need back onto the painted area.  


Snowman topped cupcake - with painted areas of red (the cupcake wrapper) and green (for the Snowmans hat and scarf)

 Step 4: Using your flat brush again, base coat the cupcake wrapper in red and the top of the snowman's hat using Green.  Before base coating the rim of the hat and the scarf, add a little white to make it just slightly lighter.


Hand painted snowman topped cupcake with highlighted and shaded areas to make it look 3D

Step 5: Using the Razzle Berry, float colour onto the cupcake to add texture, just as you would in our cupcakes kit.  Don't forget to add rosy cheeks too! 

Step 6: Using white, float colour around the base of his hat to highlight it. 

Handpainted snowman topped cupcake design. The snowman is dressed in a green tartan hat and scarf to compliment the red festive cupcake wrapper.

Step 7: Using your liner brush, add a pattern to his scarf and hat.  Begin with Razzle Berry and Black before adding white lines, edging and tassels. (Don't forget to add a little bobble on his hat too!)   

Step 8: Using the large end of the dotty tool, add his eyes and mouth.  Using the small end, add two dots of white to each eye.  Add his carrot nose using the liner brush (or you can apply it using the dotting tool) 

Handpainted snowman topped cupcake design Christmas card. Thesnowman wears a green tartan hat and scarf and the red cupcake wrapper is decorated with white berries and leaves

Step 9: Float white lines on the cupcake (as shown in our kit) and add berries to the area using the dotting tool. 

Step 10: Apply Crystal Glamour Dust to the design as you paint to create that all important sparkle at winter time.  

Hand painted snowman topped cupcake Christmas card design painted on to a card and mount board bauble shape that can be used as a gift tag

Don't fancy making a card? Why not try adding it to one of our baubles?


SHARE:

Wednesday 21 November 2018

The beauty of Bauernmalerai

November is about all things vintage at Folky HQ as part of our #funwithfolkit painting challenge.  This week, we thought we would indulge in a little Bauernmalerai painting - a version of folk art originating from Germany, Austria and Switzerland.  Using the round brush, it uses our beloved comma strokes as well as the c and s strokes.  If you have some of our Flat Brush kits you may have learnt these brushstrokes, the only difference is that in this project you paint them using the round brush.  If you are up for the challenge, it certainly is a lovely design to paint. 

For this project, you will need:

Liner brush 
No 3 Round Brush 
True Ochre, 
Tomato or Country Red, 
Warm White, 
Antique Green,
French Grey Blue, 
Burnt Umber
To Antique and complete the tray you will need:
DecoArt Metallic lustre in Copper Kettle 
Soft, lint free cloth
Your chosen varnish

Traditional decorative painting - Bauernmalerai pattern outline


Once you have transferred your design, begin by base coating your roses in Red and Ochre.  

Step by step images of how to paint Bauernmalerai inspired roses and tulips using Folk Art brushstrokes.

To paint the roses load your brush with Red/Ochre and side load with warm white. 
First, paint 2 comma strokes to the bottom of your rose then fill your circle using C strokes to create the rose as shown above. 

An image of a plain tea tray and the painted design that will be added to it. The design consists of red and yellow roses and blue tulips with a decorative border


To paint the Tulip, load your brush with French Blue Grey and side load with Warm White. 
Using s strokes, paint the outer petals before using comma strokes to paint the centre.  

Using your liner brush (loaded with Antique Green) apply the stems. 

Painted white tray decorated with a traditional Bauernmalerai design featuring red and yellow roses and blue tulips

To paint your leaves, load your brush with Green and side load with the True Ochre.  Paint your S strokes to the tulips.  

Next, using the same colours, paint the comma strokes around the centre and edge of the design. 

A photo of the completed Bauernmalerai pattern featuring red and yellow roses and blue tulips on a plain white tray next to the pattern/design sheet


Next, paint the edge pattern around your tray. (If you are choosing to do this on a different project, you could use this design as a border or leave it out).

A photo of the sides of the tea tray decorated with hand painted daisies and leaves in the Bauernmalerai style

We have painted our flowers with the blue/red side loaded with white. Finish by painting the comma strokes with green side loaded with white. 

Once we were certain the tray was completely dry, we decided to complete the Vintage inspired project by Antiquing the tray.  To do this we mixed 3 parts Drying Time extender and 1 part Burnt Sienna before applying this to the tray.  You can check out our video tutorial here

Next, apply a little metallic lustre to the edges and handles of your tray.  Leave to dry before varnishing. 

A photo of a wooden tray that has been painted white and hand painted with a Bauernmalerai inspired design of yellow and red roses and blue tulips. A wash of brown has been applied over the top of the tray to tone down the colours and give the tray an antique look


SHARE:

Thursday 8 November 2018

Paint your own folky Polar Bear

A dark hand painted plaque painted with a polar bear and snowflakes. The handwritten quote on the plaque says 'Dream Big little one' and is threaded with silver ribbon to hang on a door.


Following the success of our Folky Fox recently, we have gone from Autumn to Winter with this brand new tutorial.  

To complete this level 2 tutorial, you will need: 

DecoArt Chalky Finish paint in Honor 
Sandpaper, tracing paper* and transfer paper* 
Sponge*
Dotting tool*, Flat Brush* & Liner brush*
DecoArt Titanium (Snow) white* (or any white you have), Lamp Black and Antique Rose* 
DecoArt Dazzling Metallics in Shimmering Silver 
Sakura Gelly Roll pen in White 
DecoArt Metallic lustre in Silver Spark

*All included in our Flat Brush Starter kit 

Practice paper, paintbrushes, DecoArt Metallic Lustre and the polar bear traced pattern from You Can Folk It

 Preparing your plaque: 

 Using the sponge, base coat the plaque using the Honor chalky finish paint.  You can speed this process up with a hair dryer if you like. 
After applying a couple of coats, lightly sand the MDF plaque before transferring your design on to the surface.  

A photo showing DecoArt Americana Acrylic in Warm white and practice rows of C strokes painted using the Flat brush in the picture


Practicing your brushstrokes: 

For the Polar Bear you will need to practice the C stroke taught in the Rosebuds kit.  When you are confident painting single ones, practice painting each one side by side in rows.  


Painting your polar bear:

Using the warm white and flat brush, base coat the whole of the polar bear.  Using the Antique Rose, paint the inner part of the bears ears.  When this is dry, paint rows of c strokes over the whole of the bears body starting at the top and working down, leave to dry. Take care to try to overlap the rows a little to create your fur pattern.  

Next, using your liner brush and the black paint, add his eyes and nose. 

A photo of the completed dark blue rectangular wooden plaque painted with a polar bear and decorated with snowflakes. The phrase 'Dream Big Little One' is hand written across the top

Final touches: 

Using the silver paint and Dotting tool, add dotty snowflakes on the plaque. Leave to dry.  If you wish to add the lettering, use the Gelly Roll pen (or a fine Uni Posca paint pen) to copy over the transferred lettering.  You may need to keep wiping the tip of the pen with a tissue to make sure the tip does not get clogged with paint.  Finally, using the sponge, add the Metallic lustre around the edges of the plaque and add some ribbon to hang.  

If you did not wish to add the writing we have provided why not stamp a name on to personalise or just add more dotty snowflakes.  

Happy Folking x 

SHARE:

Monday 29 October 2018

Paint your own Autumnal wreath in 5 simple steps

Handpainted wreath painted in Autumn colours of greens, browns and golds with red berries

The days are getting shorter and the air is adopting a chill, Autumn is certainly taking a hold both inside and outside of Folky HQ.  

Handpainted folk art design in Autumn colours of reds, browns and oranges surrounded by pots of DecoArt Americana paint

Over the last couple of weeks we have been cracking open those warm orange and golds, deep, rich browns and earthy greens to create a few Autumnal projects to fit with this months #funwithfolkit theme.  After sharing this on social media, so many of you asked for the pattern so here is a quick tutorial.  

You will need: 

Practice paper, transfer and tracing paper*
pencil
A brown, green, gold and red paint 
(Sandra used Asphaltum and Autumn Red but you could use Traditional Burnt Sienna and Country Red)
We also used Emperors Gold and Avocado
No 3 Round Brush & Dotting tool*

*Available in our Round Brush Starter Kit 

Pattern outline of a wreath made up of comma strokes

Step 1: Take your pattern and transfer it onto your practice paper or project 

Practice boards from You Can Folk It featuring an outline of a wreath and a painted version using red, green, brown and gold

Step 2: To paint your comma strokes, fill your round brush with Avocado or Raw Umber and tip your brush with the Emperors Gold (a technique taught in our Daisy Details kit

Step 3: Paint alternating bunches of green and brown comma strokes to add variety to your wreath. 

Folk It autumnal wreath painted in browns, golds and greens and decorated with red berries

Step 4: Using the red, add berries around the wreath and leave to dry. 

Step 5: Add a little gold to your brush and on a paper towel, gently rub off the excess. Dry brush a little gold over each of the berries and dot a little brown in each one. 

Your wreath is now complete! If you fancy a more festive look, why not try using two shades of green and red and gold or use a paler green and grey tipped with silver - this would look great finished with white and silver mistletoe berries! 

Happy Folking everyone x   


SHARE:

Monday 22 October 2018

Paint your own pumpkin tray - perfect for Halloween


You will need:
You Can Folk It! Brushes & Tools
Medium Liner, Flat Brush, Dotting Tool
DecoArt Americana: Tangelo Orange, Burnt Umber, Warm White, 
Avocado, Bright Yellow
Other: Practice paper, tracing paper, transfer paper

Before painting your project, practice all the elements on the practice paper. (You can find the patterns on our Folk It patterns Pinterest board.)  It's always a good idea to try painting the larger Pumpkin from the practice sheet first before moving onto the smaller ones.


1. Add a touch of Burnt Umber to Tangelo Orange and paint around the stem

2. Add a touch of Burnt Umber to Warm White and paint the stem

3. Add water to Burnt Umber and with this watery mix & your liner brush apply uneven diagonal lines to the stem

4. Add a touch of Tangelo Orange to Warm White and starting at the back paint each section of the Pumpkin using a 'C' stoke. 

5. Apply a second coat of this mix if necessary.  Tangelo Orange is a transparent colour, therefore we are creating a base so that the colour stays vibrant.  If you are painting onto a light coloured surface you can omit this step.

6. Next apply a coat of Tangelo Orange to the front sections.

7. Float Burnt Umber. (This is a technique we teach in our Flat Brush Cupcakes and Babushka kit) Before beginning this step, study the pumpkin below for a moment, bearing the following in mind... The Burnt Umber is going to create a shade, so we are floating the darker colour to any section that is behind another.  

8. Float Warm White on the edges of the Pumpkin that sit in front of another.  By using this technique, we help flat objects take shape. To the eye, dark colours recede so look further away and light colours advance and so appear closer. 


9. Make a wash with your flat brush using plenty of water and Bright Yellow and apply over the whole Pumpkin, see how this has reduced the whiteness of the floated highlights, this is a great way to dull your floated colours if you have just started learning...it also gives the Pumpkin a lovely warm glow.


10. The leaves are created using the wiggle stroke as taught in the Butterflies lesson, a comma stroke using the flat brush and combining the 2 together.  If you have not yet progressed to this level, then use your favourite leaf. 


11. The blossoms are as taught in the Oriental Blossom Lesson.  Use Warm White to paint each of the Petals and apply dots using Burnt Umber & Tangelo Orange.  


Once you are happy with your skills, you can create your final design.  If you wanted to create your own wreath design, you can learn more about how to do that here. To create your wreath, begin by painting the pumpkins.  When painting the stalks, try to paint them in different directions to add variety. 

Next, add your leaves.  Using single leaves and clusters, aim to fill the majority of your circle.  If you do not feel comfortable using the ruffled technique, use whichever technique you do feel comfortable with.  We painted leaves in a few sizes, again to add interest to the design.  

Next, add single blossom flowers around the wreath - don't worry if they overlap areas you have already painted.  Finally, identify any areas that look empty and add dots (using the small end of your dotting tool) and small comma strokes using your liner brush.  

To seal your work, you could use DecoArt wax however, if you have painted a tray as we have done, it is better to opt for a couple of coats of varnish to protect your project.  
SHARE:

Friday 12 October 2018

How to paint your very own Folky Fox


October is all about Autumn for our #funwithfolkit challenge, from leaves to pumpkins, this theme seems to have inspired so much creativity.  When we shared our cute folky fox recently, the response was amazing and so we put together a tutorial for you.  This quick and fun little tutorial is perfect practice for your comma strokes, plus you can create a cute furry friend at the same time! 

You will need: 

Black practice paper*
Tracing paper*
Transfer paper*
No 3 Round Brush* 
Dotting tool*
Rubber
Pencil 
DecoArt Americana Acrylic in Lamp Black* and Warm White*
DecoArt Dazzling metallics in Bright Copper

*included in our Round Brush Starter Kit 


To begin, print off our Folky Fox pattern to the desired size and trace the pattern.  


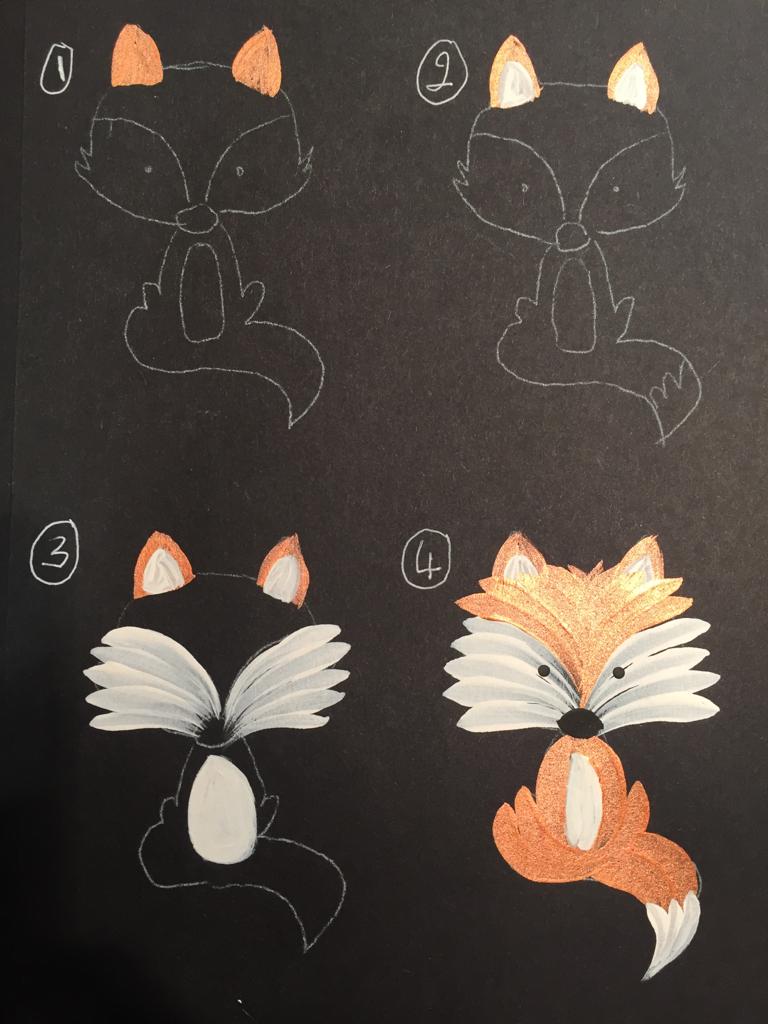
Next, using your transfer paper, transfer the design onto your black paper. Do this four times (as above) on to your practice paper as this will allow you to practice painting each part of the fox individually.  

First, begin practicing the face. 


Load your Round Brush with Warm White.  Begin the comma stroke at the top of the line and follow the line, aiming your comma stroke down to his nose.  Repeat this comma stroke until you have filled his cheeks, each time beginning from his cheek and ending at his nose.  Try to make each comma stroke overlap slightly so that you cover his cheeks.  This is great practice for painting those comma strokes in both directions! 


Next, practice the top part of his head.  Using the Round Brush again, load it with Bright Copper.  Place your brush one the line (the same one you began with for this cheeks) and again, paint your comma stroke, following the line down to his nose. 

Move to the other side of his head and following the line, repeat the comma stroke on the other side. Continue to alternate your comma strokes on one side then the other until you reach the middle.  By alternating this way you will build up his layers - again making sure your comma strokes overlap so no black is showing through. 

As you work your way towards the centre, you will notice that you will need to paint smaller comma strokes to cover the area, this is ok. 


The body: 

Using your round brush loaded with Bright Copper, paint a long comma stroke down one side of the body so that the tail of the comma stroke wraps around the tummy area a little.  Add two more comma strokes to fill the line that again, tuck under the foxes tummy. Repeat this on the opposite side  (you will only need two comma strokes on this side to fill the lines) making sure that the comma stroke finishes under the tummy.  

For the tail: 
With your Round Brush loaded with Bright Copper, paint four comma strokes ending in a point (left). Next, when these comma strokes are dry, load your round brush with warm white and paint three smaller comma strokes on the end of the tail, again ending in a point.  Now you are ready to join the tail on the body. 

When you have practiced this and feel confident in your comma strokes, it's time to create your first folky fox. 


Starting with the ears, use your round brush to fill in the triangles, first with Bright Copper then (once dry) add two smaller triangles with the Warm white. 


Add his cheeks as you practiced, then fill his tummy with Warm White.  


Next, using the Copper, paint the other half of his head before adding his body and then his tail as you practiced.  

When your Folky Fox is dry, add his nose using your round brush and a little Lamp Black before adding his eyes with the larger end of your dotting tool.  

And that's it...your Folky Fox is complete! 

UPDATE: With winter fast approaching, we changed our Copper paint for Zinc and painted our very own Arctic Fox plaque - what do you think? 


If you have a go at painting your own, please do tag us in your posts to let us know you have had #funwithfolkit 

UPDATE: we are just LOVING the way you have made this little guy your own.  

A cute Folky Fox helps decorate this plain notebook

Nazlie has brightened up a plain notebook with our Folky Fox to add a little interest.  


Vanessa gave Mr Fox a friend - adding a little blush to her coat to make her different. 


Helen gave our Fox a winter makeover with this gorgeous blue background and twinkly snowflakes.  


Karen had been asked to create a plaque for the Fox family and was going to use a stamp....until our tutorial popped into her news feed! 


SHARE:

Thursday 27 September 2018

Falling in love with Mandalas

When we chose September as Mandala month, we wondered whether it was a little ambitious.  We admire mandalas across social media on a daily basis but the great thing about them is that there is so much variety. From dotty mandalas to more intricate designs, they can truly be as unique and beautiful as each individual snowflake that falls. 

This gave us the idea that for September, instead of getting overwhelmed by all the different mandalas we could create, we would use one mandala template and have fun finding different ways to decorate it.   

A great mandala to practice your painting skills

Each project we have created we have started by transferring our design onto our journal using transfer paper before choosing our colours and designs.  Sometimes, we have had an idea in mind of the techniques we wanted to use like the one below... 

Mandala handpainted by Carol Sykes from You Can Folk It using folk art techniques


Here Carol used a simple floating technique to float DecoArt Americana in Snow (Titanium) white
 (this is a technique Carol teaches you in our Cupcakes and Babushka Flat Brush kits). This created such a delicate, ethereal look we couldn't help but love it.  


Carol Sykes from You Can Folk It created this mandala using Folk Art brushstrokes

Keeping things simple, using DecoArt Silver Sage Green, Carol painted each line using comma strokes with her liner brush before adding a few dots and filling any gaps with tiny hearts and a little French Mauve and warm white.  


A beautiful handpainted mandala created using delicate lace folk art techniques and comma strokes, all taught in the painting kits from www.folkit.co

Here, Rose chose to round off the mandala to simplify her pattern and filled it using our Delicate lace pattern and a few comma strokes.  

Bright mandala with a touch of metallic paint from You Can Folk It

Adding a touch of DecoArt Shimmering Silver along with Razzleberry and Teal Green, we used a mixture of dotting, delicate lace and comma strokes to decorate this one.  Delicate lace and comma stokes are a great way to fill a large area without painting solid blocks of colour and creating a more delicate mandala.

Handpainted mandala created using colours inspired by Jamaica

Our customers also decided to use our design and paint their own mandala.  Here, Vanessa from The Arc Shed has been inspired by the colours of Jamaica and we were amazed at how well our rosebuds work as the centre of this mandala. We would never have thought of it but it looks fantastic! 

A work in progress.... beautiful handpainted mandala using painting techniques from You Can Folk It

Still a work in progress, we are interested to see how this one turns out.  The painter behind At the Painting Table has combined a limited set of colours to create a mandala with quite a bit of unfilled space but instead of looking empty, it looks striking! 

Using one mandala template, you can decorate it in so many ways

Our painting challenge is open to everyone so if you fancy using our mandala or creating your own, we would love to share it.  Just tag us or use #funwithfolkit. You can find a copy of our mandala here. 

We are so glad we tried something new this month, we hope you will be too x 

SHARE:
© You Can Folk It!. All rights reserved.
designed by pipdig